


While Piper, the AI SDR agent, actively engages and qualifies visitors on your website, your sales reps spend most of their day working directly inside Salesforce. The Qualified Canvas App bridges this gap by embedding essential Qualified features right where your team already works — no tab-switching required.
Understanding the Qualified Canvas App
The Canvas App is a Salesforce managed package that embeds Qualified features inside your Salesforce environment using an iframe powered by Salesforce's Canvas framework. One installed package powers three distinct components, giving reps access to critical tools without leaving their active records.
Supported components and layouts
You can add any of these three components to Salesforce Lightning pages based on your team's needs:
| Component | Recommended Salesforce placement | What it shows | Additional requirement |
| Live Booker | Any page (record, app, or home pages) | The Qualified meeting booker interface | Per-user Salesforce connection required (see Step 5) |
| Signals | Account record pages | Account-level account Signals | - |
| Agent Notes | Lead or Contact record pages | AI SDR agent notes from the Spotlight tab in the home view. | - |
All three tools are centrally managed and configured by navigating to Settings → Salesforce → Canvas App within the Qualified platform.
Moving away from legacy Visualforce layouts
If your team previously used Visualforce (VF) snippets to embed Qualified, here's what you need to know before migrating:
- The legacy VF setup (found under Settings → Signals → Salesforce) has been deprecated in favor of Canvas App Lightning components.
- The underlying
/embeds/company/:tokenendpoint remains active, so any existing Visualforce embeds will continue to work — nothing will break immediately. - No new Visualforce setups are available. All new installations must use the Canvas App.
- The legacy Visualforce layout and the new Canvas App components can run side by side because they read from the same data source. Once you've verified the new setup, you can safely remove the old Visualforce page from your layouts.
Before you begin
Make sure you have:
-
Admin access to both your Qualified account and your Salesforce org
-
Access to Salesforce Setup, including the Developer Console and App Builder
8 steps to install and configure the Canvas App
Follow these configuration steps to deploy the Canvas App components across your Salesforce instance.
Step 1: Copy your installation key
- In Qualified, go to Settings → Salesforce → Canvas App.
- Copy the installation key shown on the page. You'll need these in the next step.
💡 Tip: Keep this browser tab open — you'll return to this page in Steps 2 and 7.
Step 2: Install the managed package in Salesforce
- From the same Canvas App settings page in Qualified, click Open Salesforce.
- When prompted to log in, click Use Custom Domain and enter your org's Salesforce domain before signing in.
- Follow the standard managed package installation flow in Salesforce, using the Installation key you copied in Step 1 as the “password” to install.
Step 3: Configure Connected App permissions
This step controls which Salesforce users can access the Canvas App components.
Set the permitted users policy:
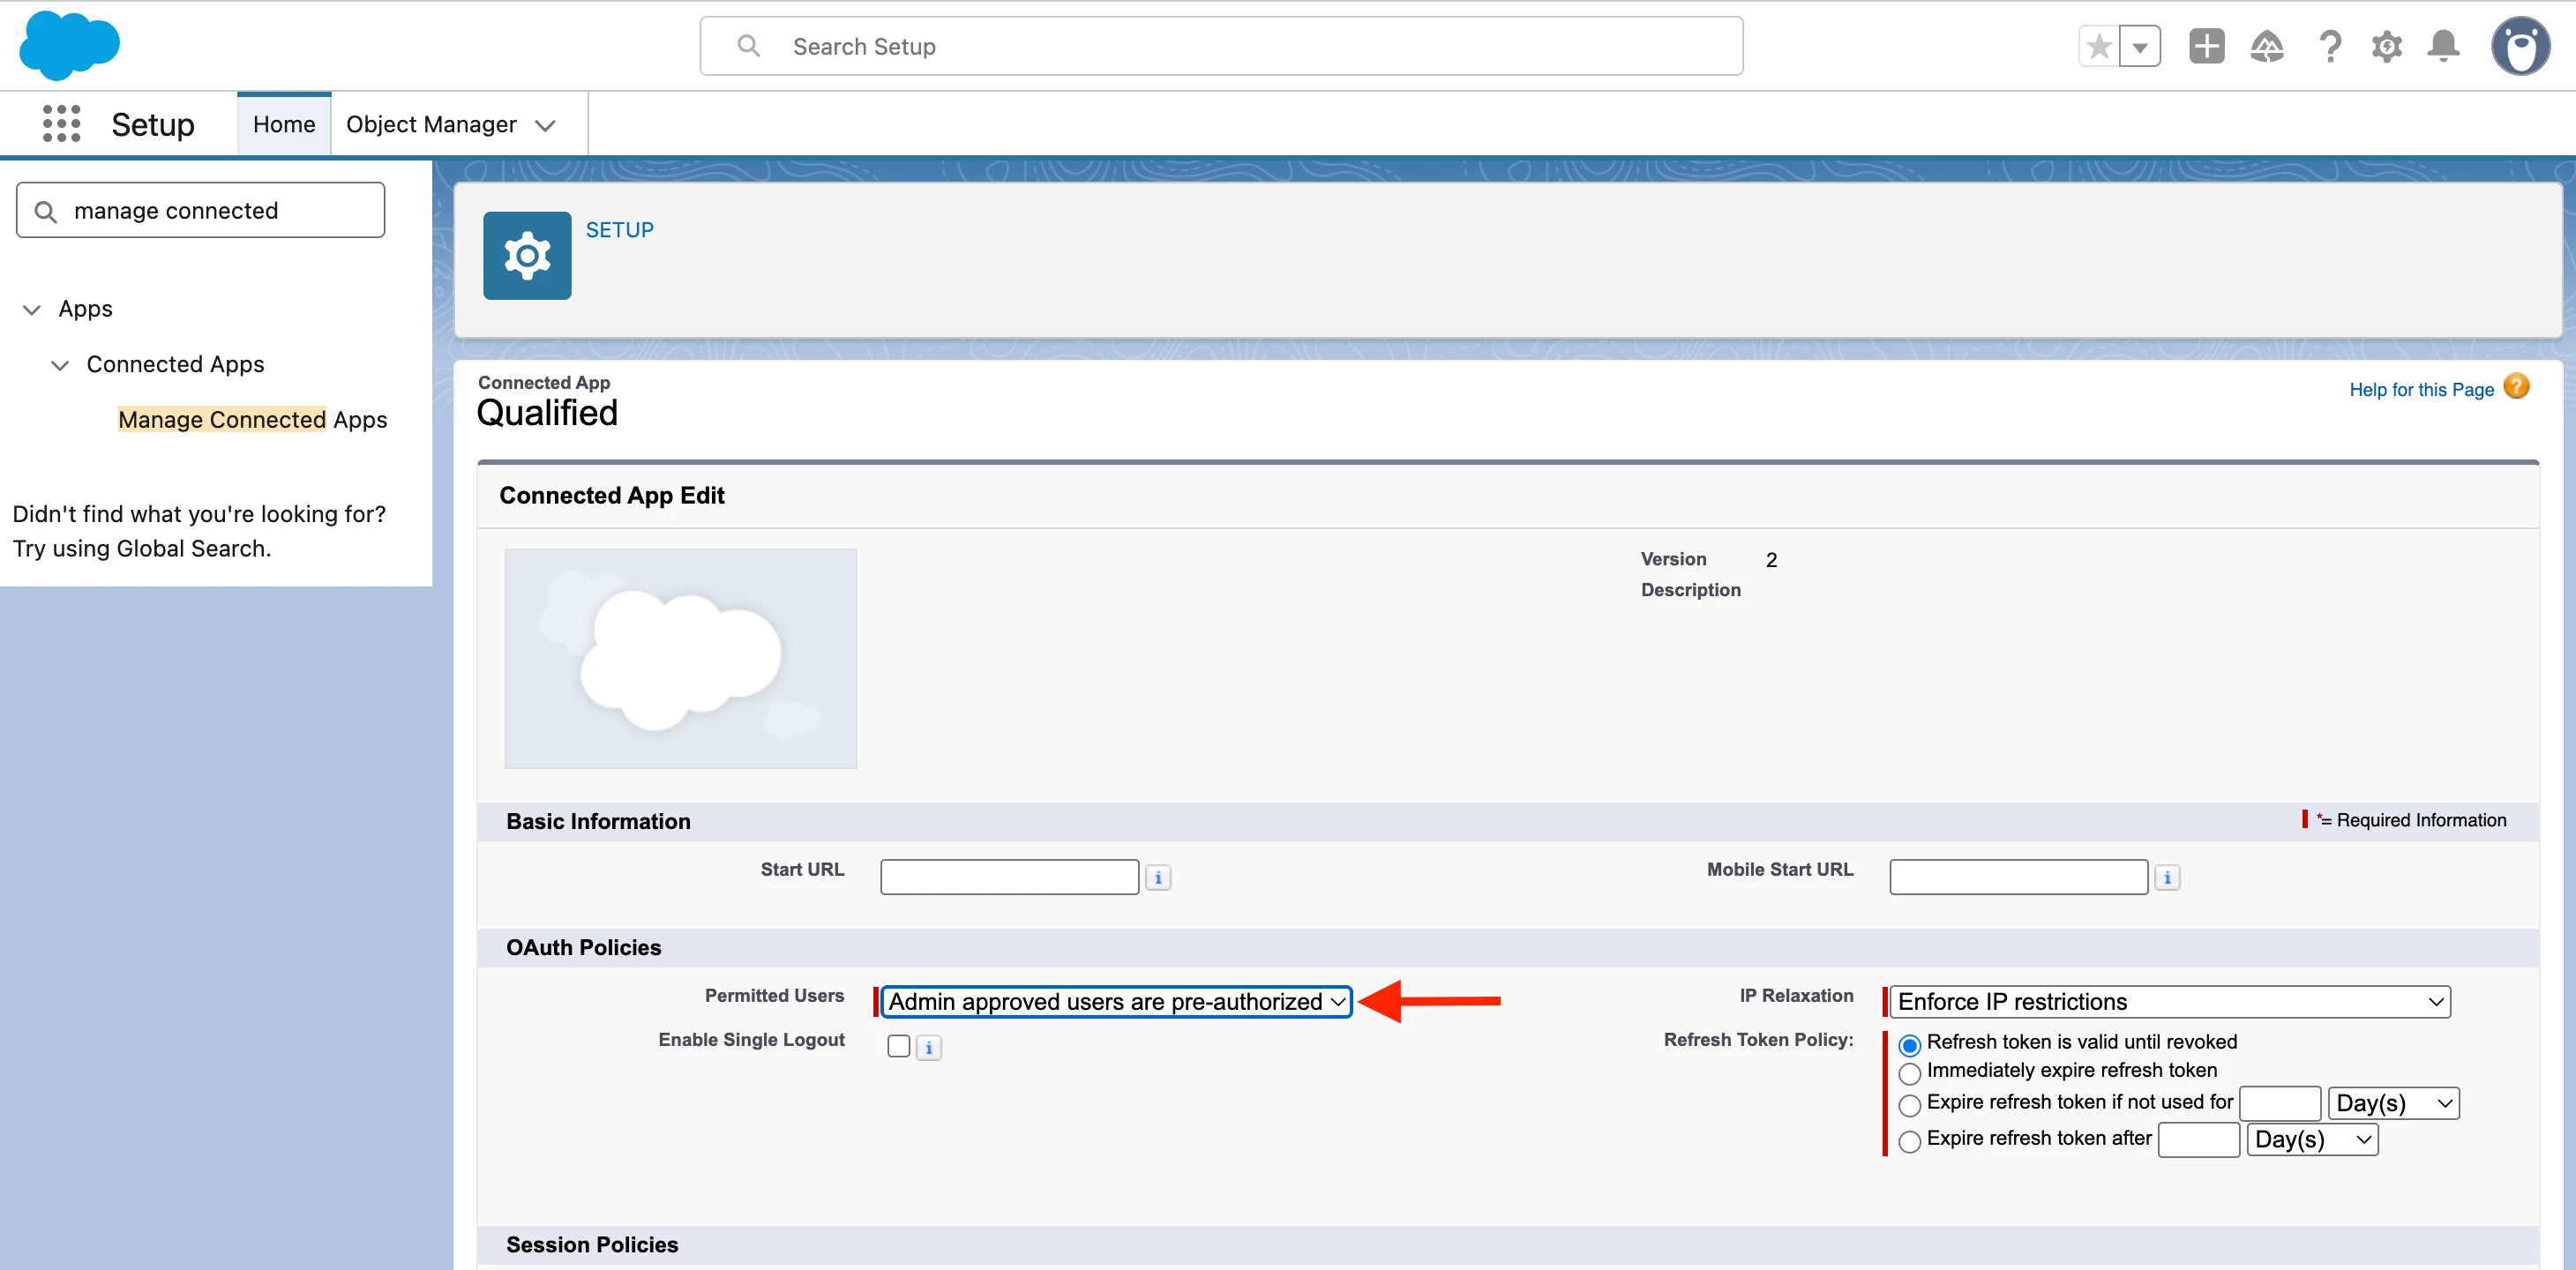
- In Salesforce, enter
Connected Appsin the Quick Find box and select Manage Connected Apps. - Click Edit next to Qualified.
- Under OAuth Policies, set Permitted Users to
Admin approved users are pre-authorized. - Click Save.
Assign access to the right profiles:
- Return to the Connected Apps list and click Manage Profiles for the Qualified app.
- Select the Salesforce user profiles that need access to the Canvas App components.
- Click Save.
📝 Note: For more on managing Connected App access policies, see Salesforce Help: Manage OAuth Access Policies for Connected Apps.
Step 4: Add the Trusted URL for security
Salesforce requires you to explicitly allowlist Qualified's domain to satisfy Content Security Policy (CSP) requirements.
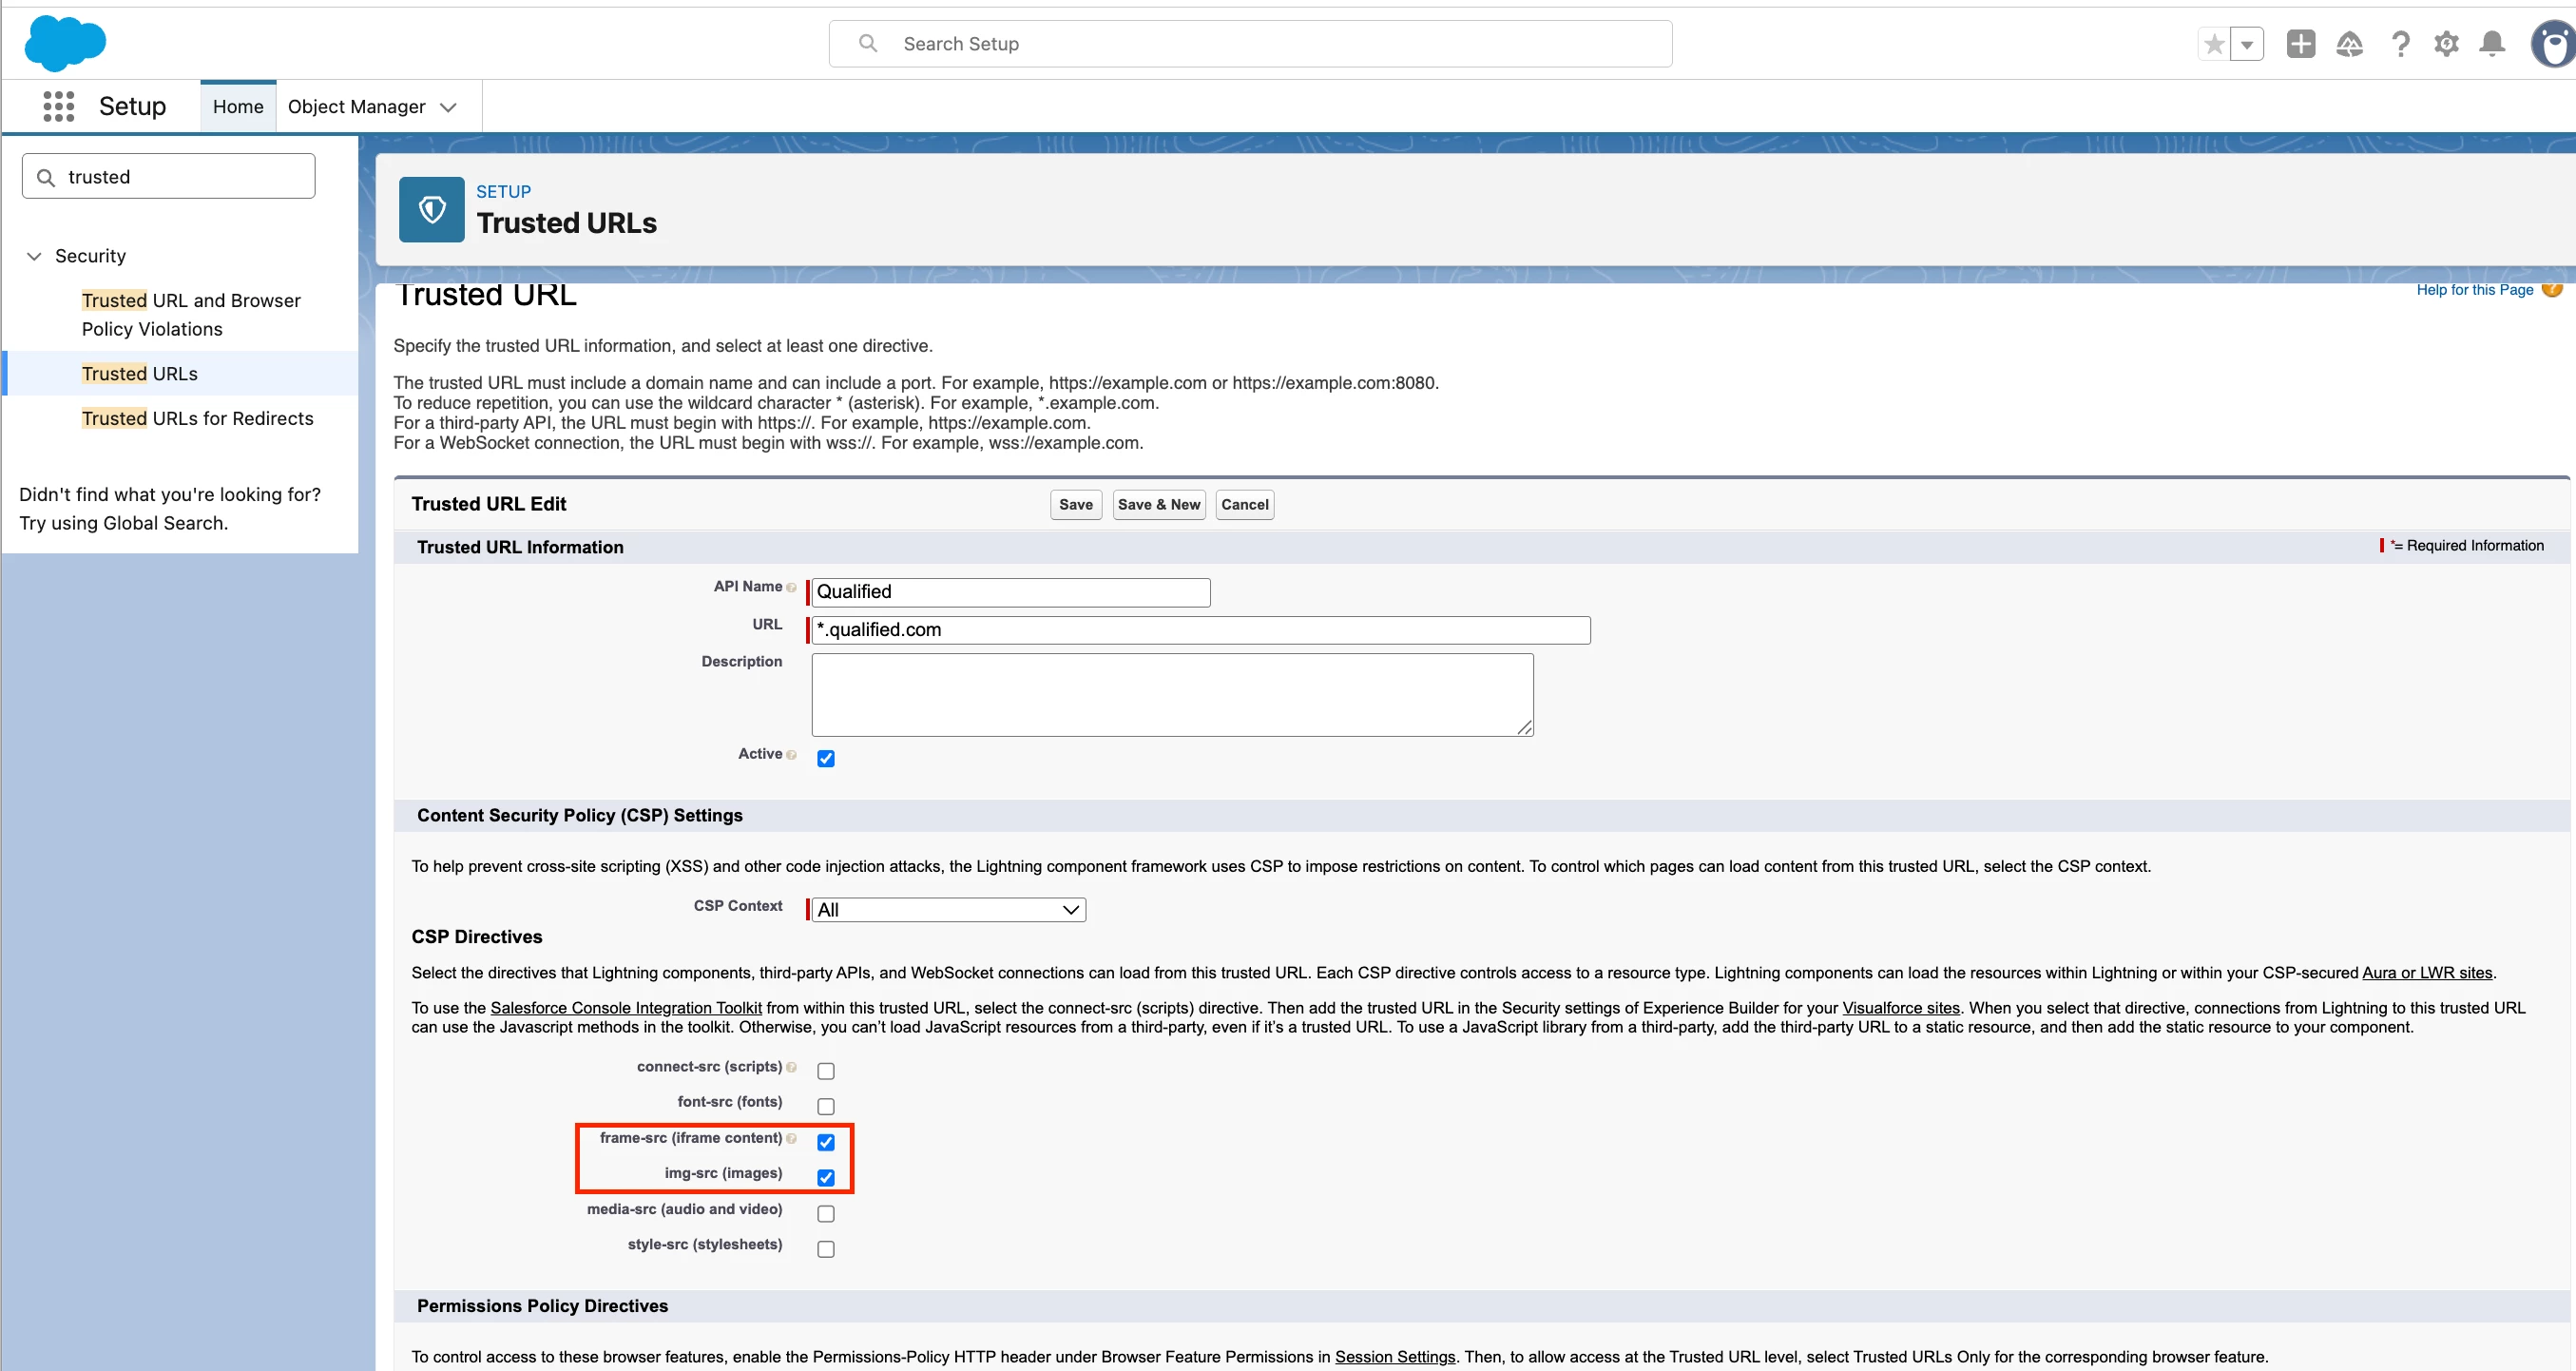
- In Salesforce Setup, go to Security → Trusted URLs.
- Click New Trusted URL.
- Enter
*.qualified.comas the URL. - Make sure the frame-src (iframe content) and img-src (images) directives are enabled.
- Save your changes.
📝 Note: For more on Trusted URLs, see Salesforce Help: Manage Trusted URLs.
Step 5: Set up user authentication
📝 Note: This step only applies if you're deploying the Live Booker component. If you're only setting up Signals or Lead Spotlight, skip to Step 6.
For the Live Booker to work inside Salesforce, each sales rep who will use it needs to connect their own Salesforce account from within Qualified. This is separate from the organization-wide Salesforce integration your admin set up.
- Who needs to do this: Any rep who will be booking meetings using the Live Booker component in Salesforce. They must be an active Qualified user — either a Meetings or Chat user — to make this connection.
- How it works: When the Live Booker loads in Salesforce, Salesforce sends a signed request to Qualified with that user's Salesforce Org ID and User ID. Qualified looks for a matching personal credential. If it can't find one, the component shows an authentication error instead of the booker.
To connect a personal Salesforce account:
- The rep logs into Qualified with their own account.
- Navigate to their personal profile settings in Qualified.
- Locate the Salesforce connection and follow the prompts to connect their individual Salesforce account.

Step 6: Create the Lightning components
You'll build one Lightning component wrapper for each Qualified feature you want to deploy. Repeat this step for each component (Live Booker, Signals, Lead Spotlight).
- In Salesforce, click the gear icon (⚙️) in the upper right to open Setup.
- Click Developer Console to launch it in a new window.
- In the Developer Console, go to File → New → Lightning Component.
- Name the component based on its function — for example:
QualifiedLiveBookerQualifiedSignalsQualifiedLeadSpotlight
- Click Submit.
📝 Note: For more on working in the Developer Console, see Salesforce Help: Using the Developer Console.
Step 7: Paste the component and controller snippets
- Back in Qualified, go to Settings → Salesforce → Canvas App.
- Copy the Lightning Component code snippet for the tool you're building.
- Switch back to the Salesforce Developer Console and paste the snippet into the component file.
- Copy the Controller code snippet from Qualified and paste it into the corresponding controller file in the Developer Console.
- Save your changes.
Repeat Steps 6 and 7 for each component you want to deploy.
Step 8: Update your Salesforce record pages
Now place your new components on the appropriate Lightning record pages.
- In Salesforce, open the Lightning App Builder for the record page you want to update.
- Find your new Qualified component in the component panel on the left.
- Drag it onto the page layout in the position you want.
- Click Save, then Activate if prompted.
For best results, place each component on the following pages:
- Live Booker → Lead or Contact record pages
- Signals → Account record pages
- Agent Notes → Lead or Contact record pages
📝 Note: For more on editing record pages, see Salesforce Help: Lightning App Builder.
Once your components are placed and saved, they'll display the same real-time data and interfaces you see inside the main Qualified application.



.svg)


