

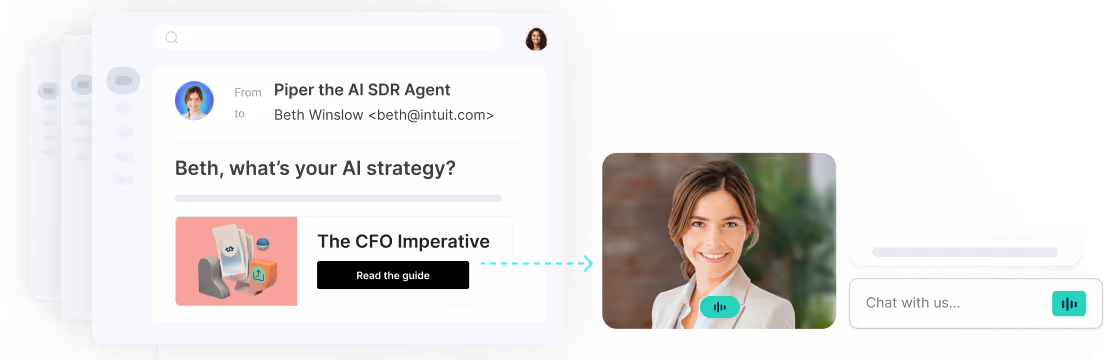
The Qualified live chat messenger is where reps chat with visitors live, take voice/video calls, and offer the meeting booker. You're also able to view previous interactions with the chatbot or reps.
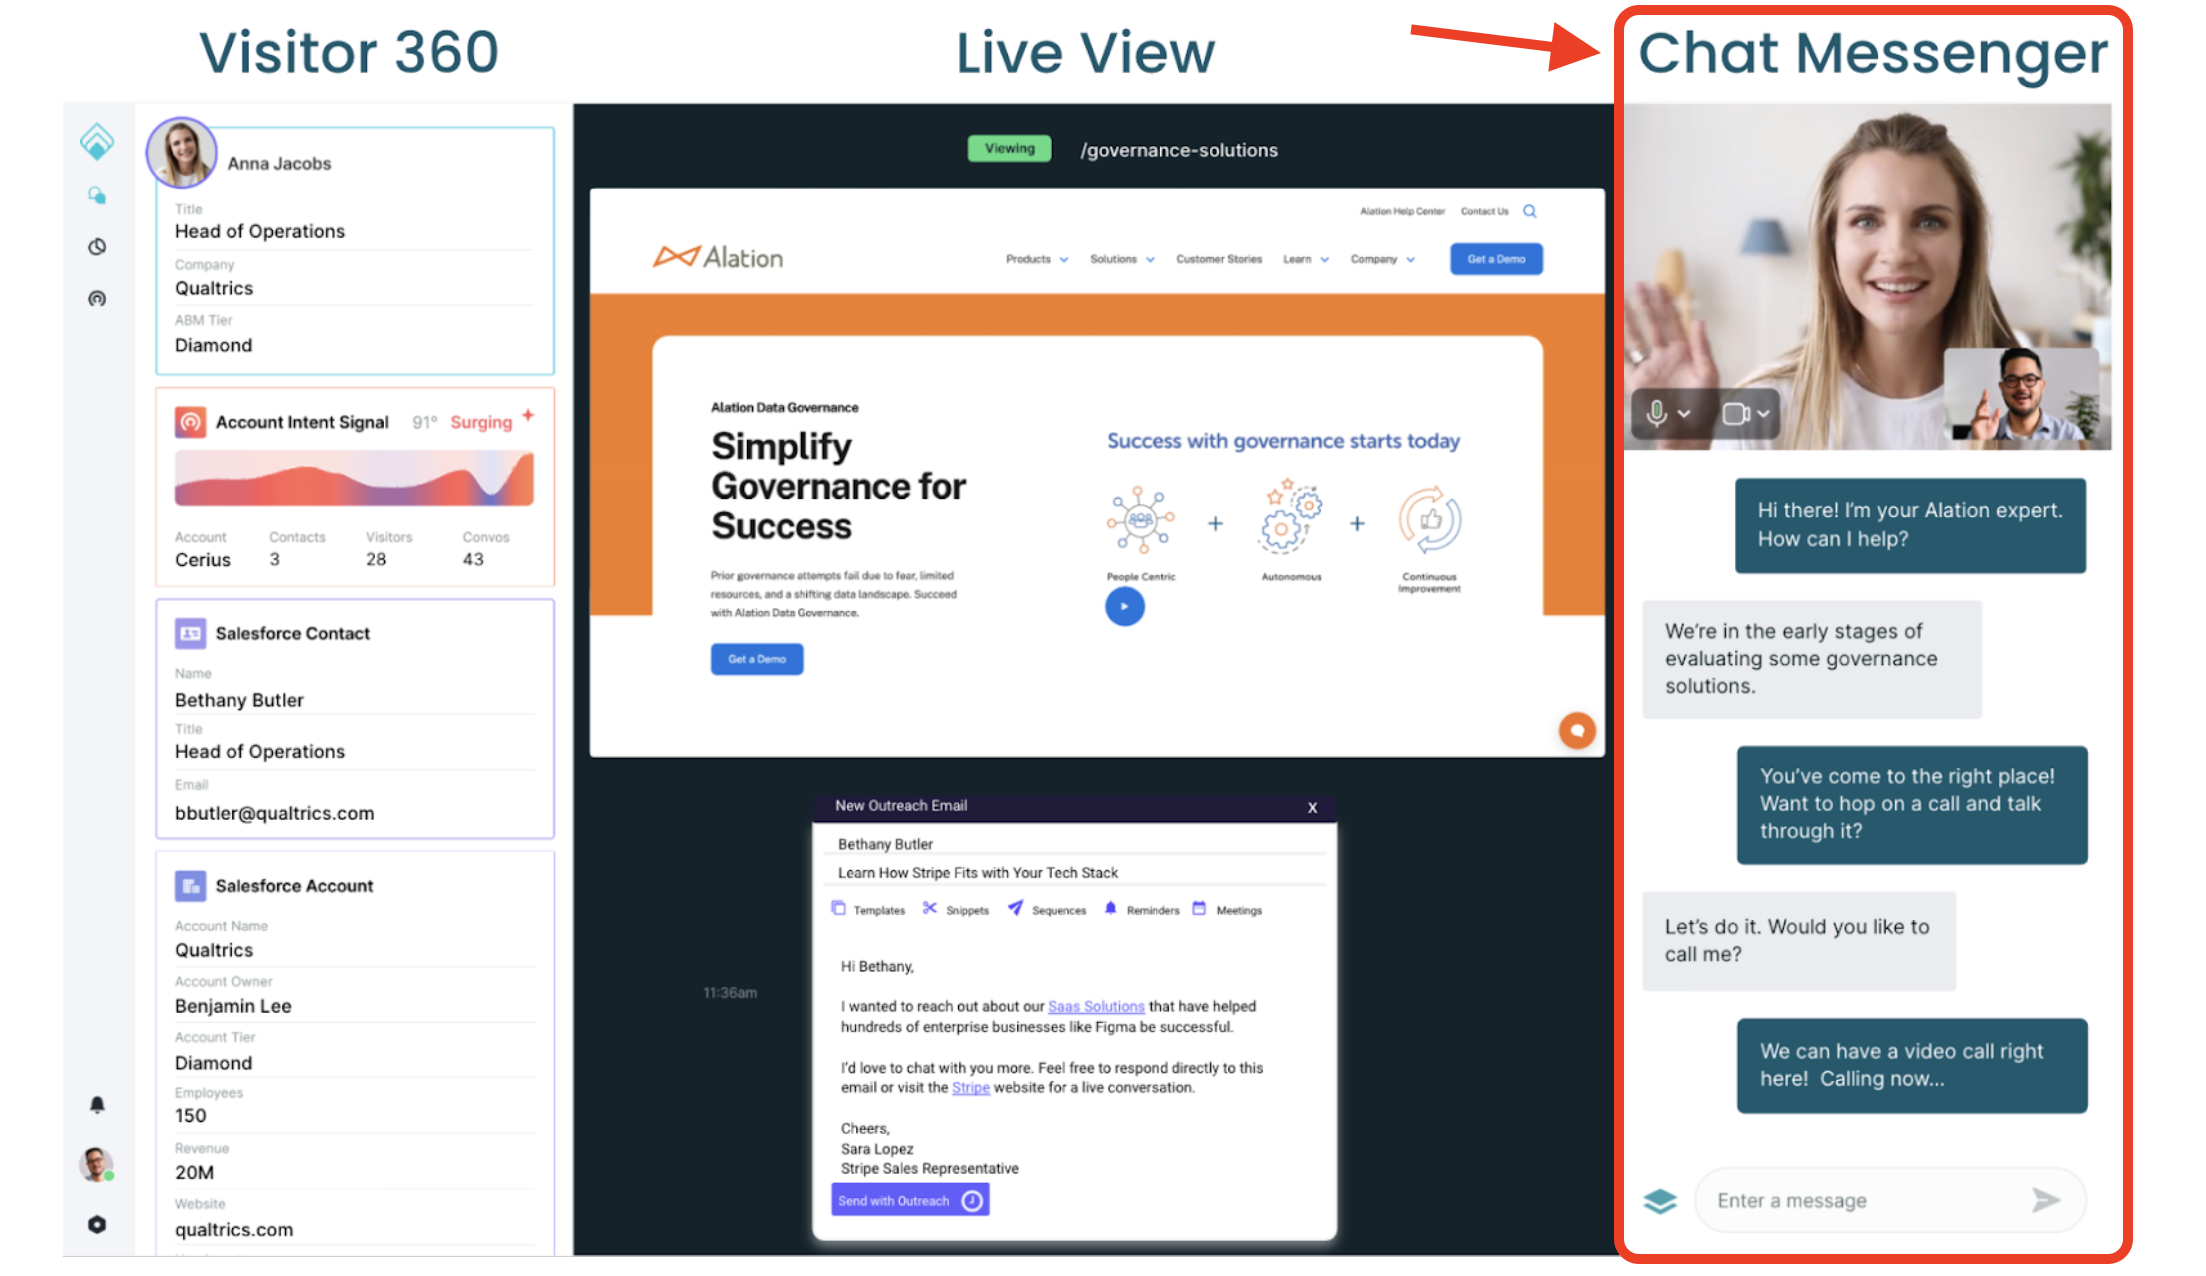
Below are details on different feature reps can utilize while live chatting with visitors:
If you want to learn more about the Visitor 360 and Live View, check out Navigating Qualified.
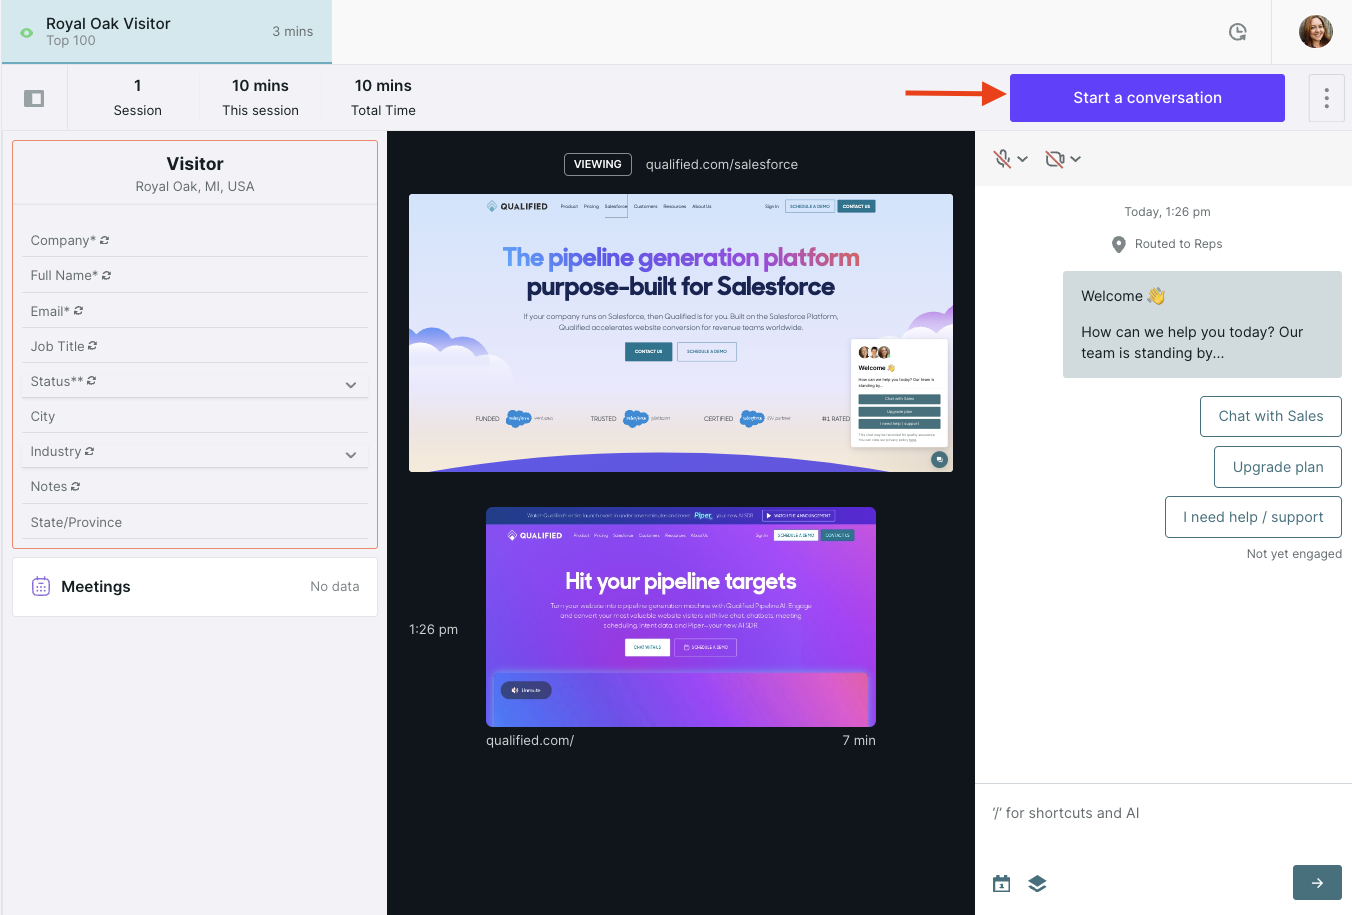
Start a conversation
When a visitor has been routed for an inbound chat or pounce, the reps that the visitor was routed to will have the ability to Start a conversation with the visitor.
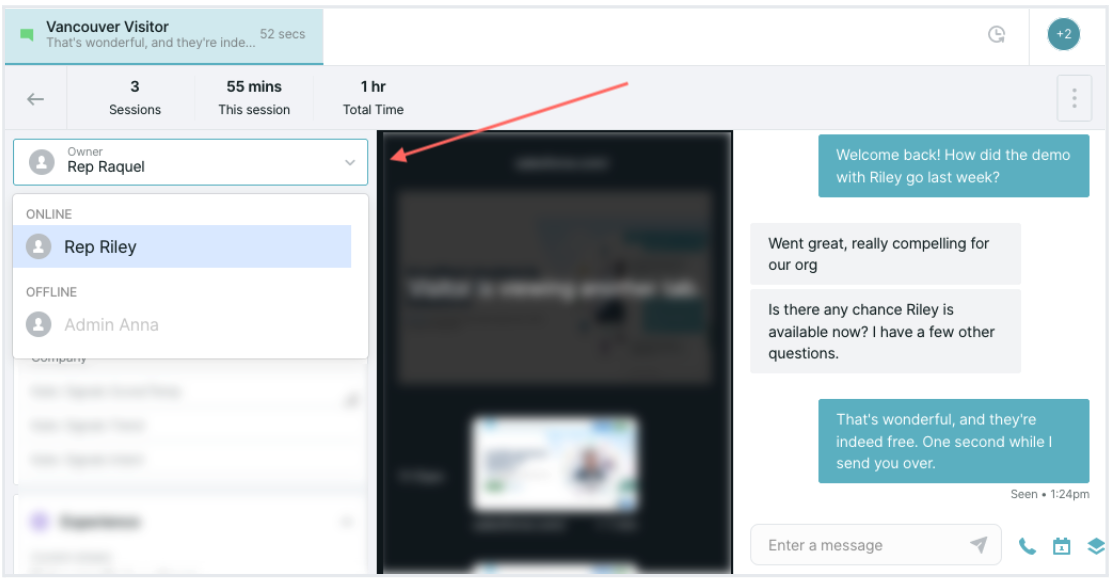
1. Click on the visitor card, or the alert notification, to open up the conversation console with that visitor.
2. Click the Start a conversation button at the top of the chat messenger.
3. Then, begin typing your message below.
4. To send your message, hit enter on your keyboard or click the arrow button on the bottom right.
Answering auto pounce replies
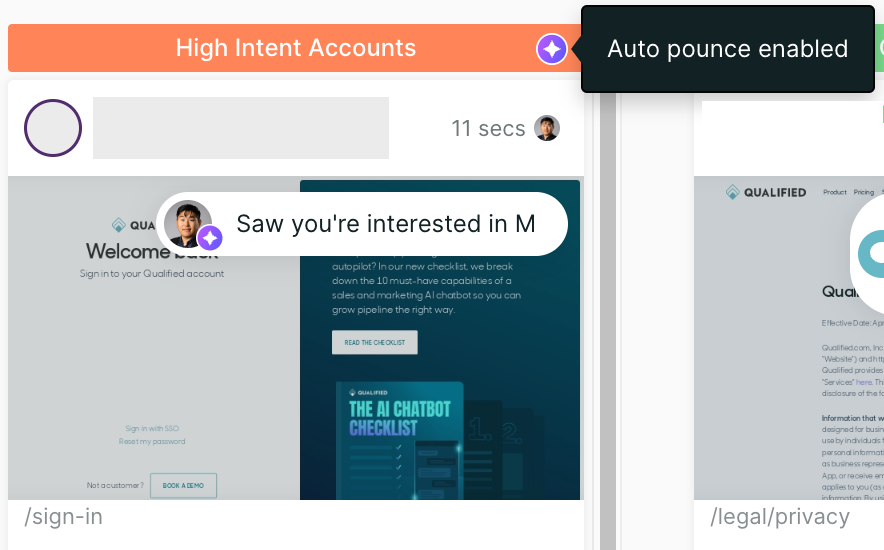
Qualified auto pounce uses Qualified AI to craft eye-catching greetings to automatically proactively engage with visitors while you tend to other VIP visitors or doing other work. It will greet the visitor with an initial pounce message, and secondary nudge message if they don't reply. Once a visitor responds, you will be alerted to continue the conversation where Qualified AI left off. See it in action below:
Auto pounce abides by your existing Conversations routing rules and will rotate which rep auto pounce mimics on availability.
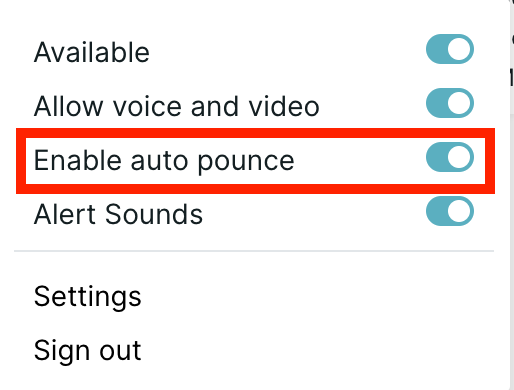
How it works
If your company has auto pounce enable, then you'll see the Enable auto pounce toggle in your chat settings. It will be enabled by default when you set yourself available for chat. If you do not want Qualified AI to automatically pounce on visitors on your behalf, click your profile image and toggle off Enable auto pounce.
You'll also see whether auto pounce is turned on for a stream, you will see this icon on the top right hand corner.
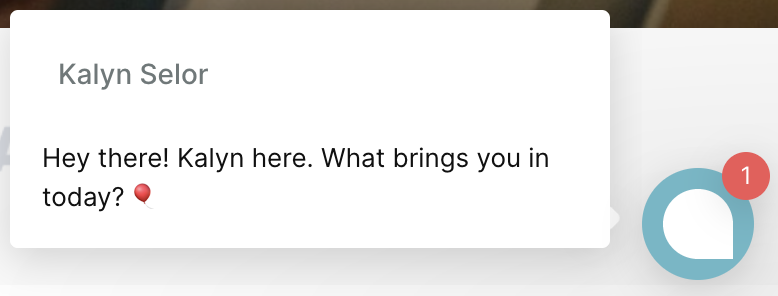
Once a visitor responds to an auto pounce, you will get alerted in the app through your normal notification settings, and see this timer on your home screen prompting you to start a chat.
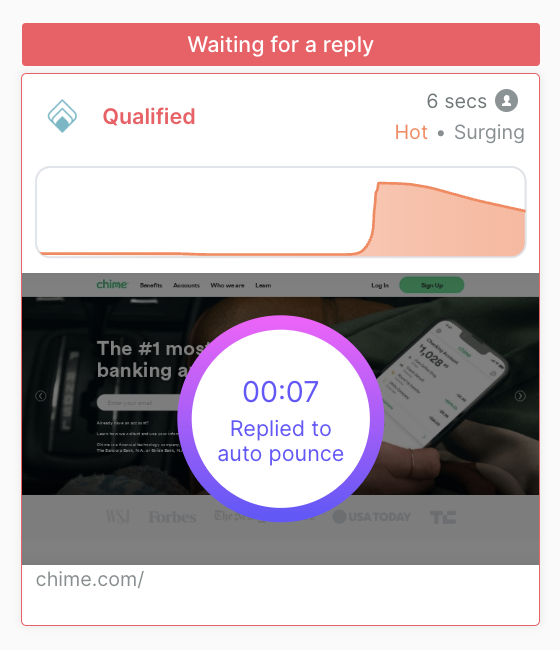
Unlike an inbound chat, Qualified will not surface a meeting booker as a fallback. Make sure to toggle OFF "Enable auto pounce" if you walk away from your computer! If a response is missed, you will be marked as disabled for auto pounce.
When you get notified to enter the conversation, pick up where Qualified AI left off! To the visitor, it looks like it's been you, the rep, the whole time.
Auto pounce messages are indicated with a purple background and only visible in the chat messenger.
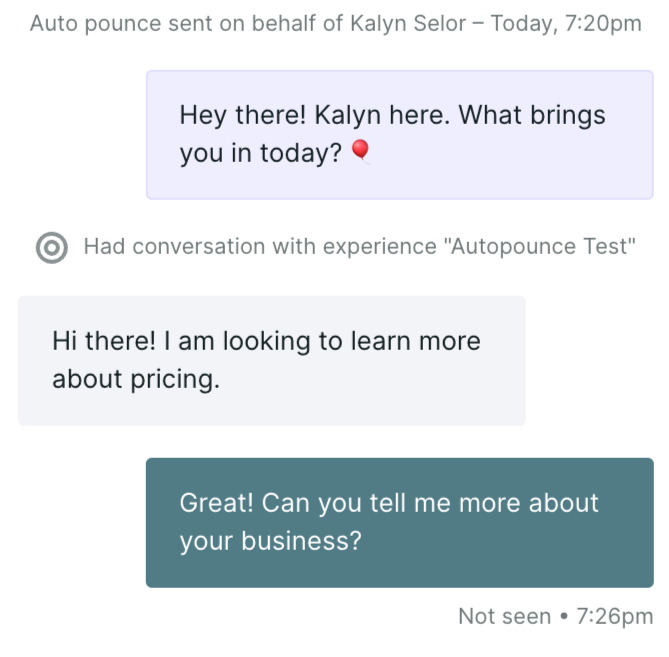
Auto pounce is pouncing on behalf of you, so the visitor experience will be no different as if you were to pounce on them yourself. You do not have to greet them a second time when you join the conversation.
Minimizing missed responses
For any visitor response to an auto pounce, an action is required from you as the rep. In most cases, you will respond by sending a message to the visitor and continue the conversation.
However, some conversations may not warrant a response. In this case, you can mark the conversation as Spam or No response needed.
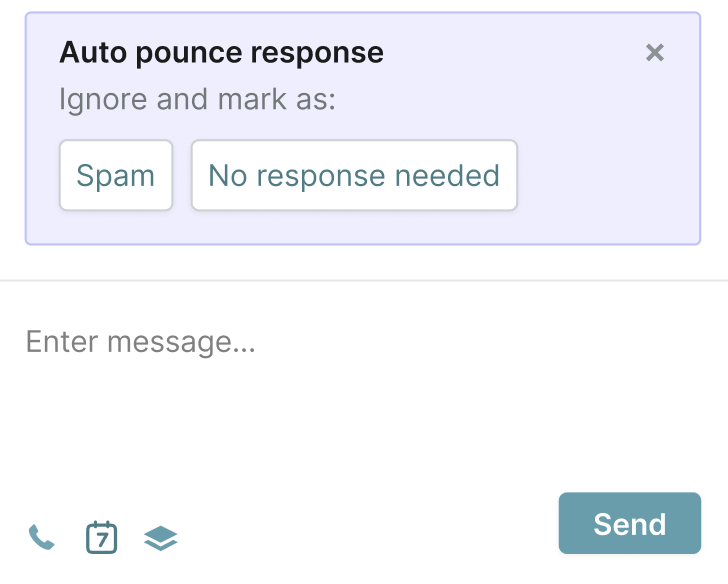
If no action is taken within the rep timeout limit set by your admin (normally 60 seconds), you will be marked as no longer enabled for auto pounce, and the lack of response will be categorized in reporting as a missed response.

Formatting and hyperlinks in live chat
Formatting in live chat
Whether you're chatting with your visitors in live chat or styling your experiences, Qualified offers a few styles to format your text and add personality to your conversations.
For full instructions on using Qualified’s markdown language, see here.
Using shortcuts
Shortcuts allow reps to deliver fast, accurate responses in live chat. You can easily boost your team's productivity and gain the website visitor's trust by adding shortcuts to frequently asked questions and pounce opening messages.
To learn more about using shortcuts, click here.
Using AI copilot: suggest, expand, translate, and tune
AI copilot allows reps to have faster and more efficient conversations for more pipeline. Similar to using shortcuts, you can utilize these features by typing “/” within the messenger.
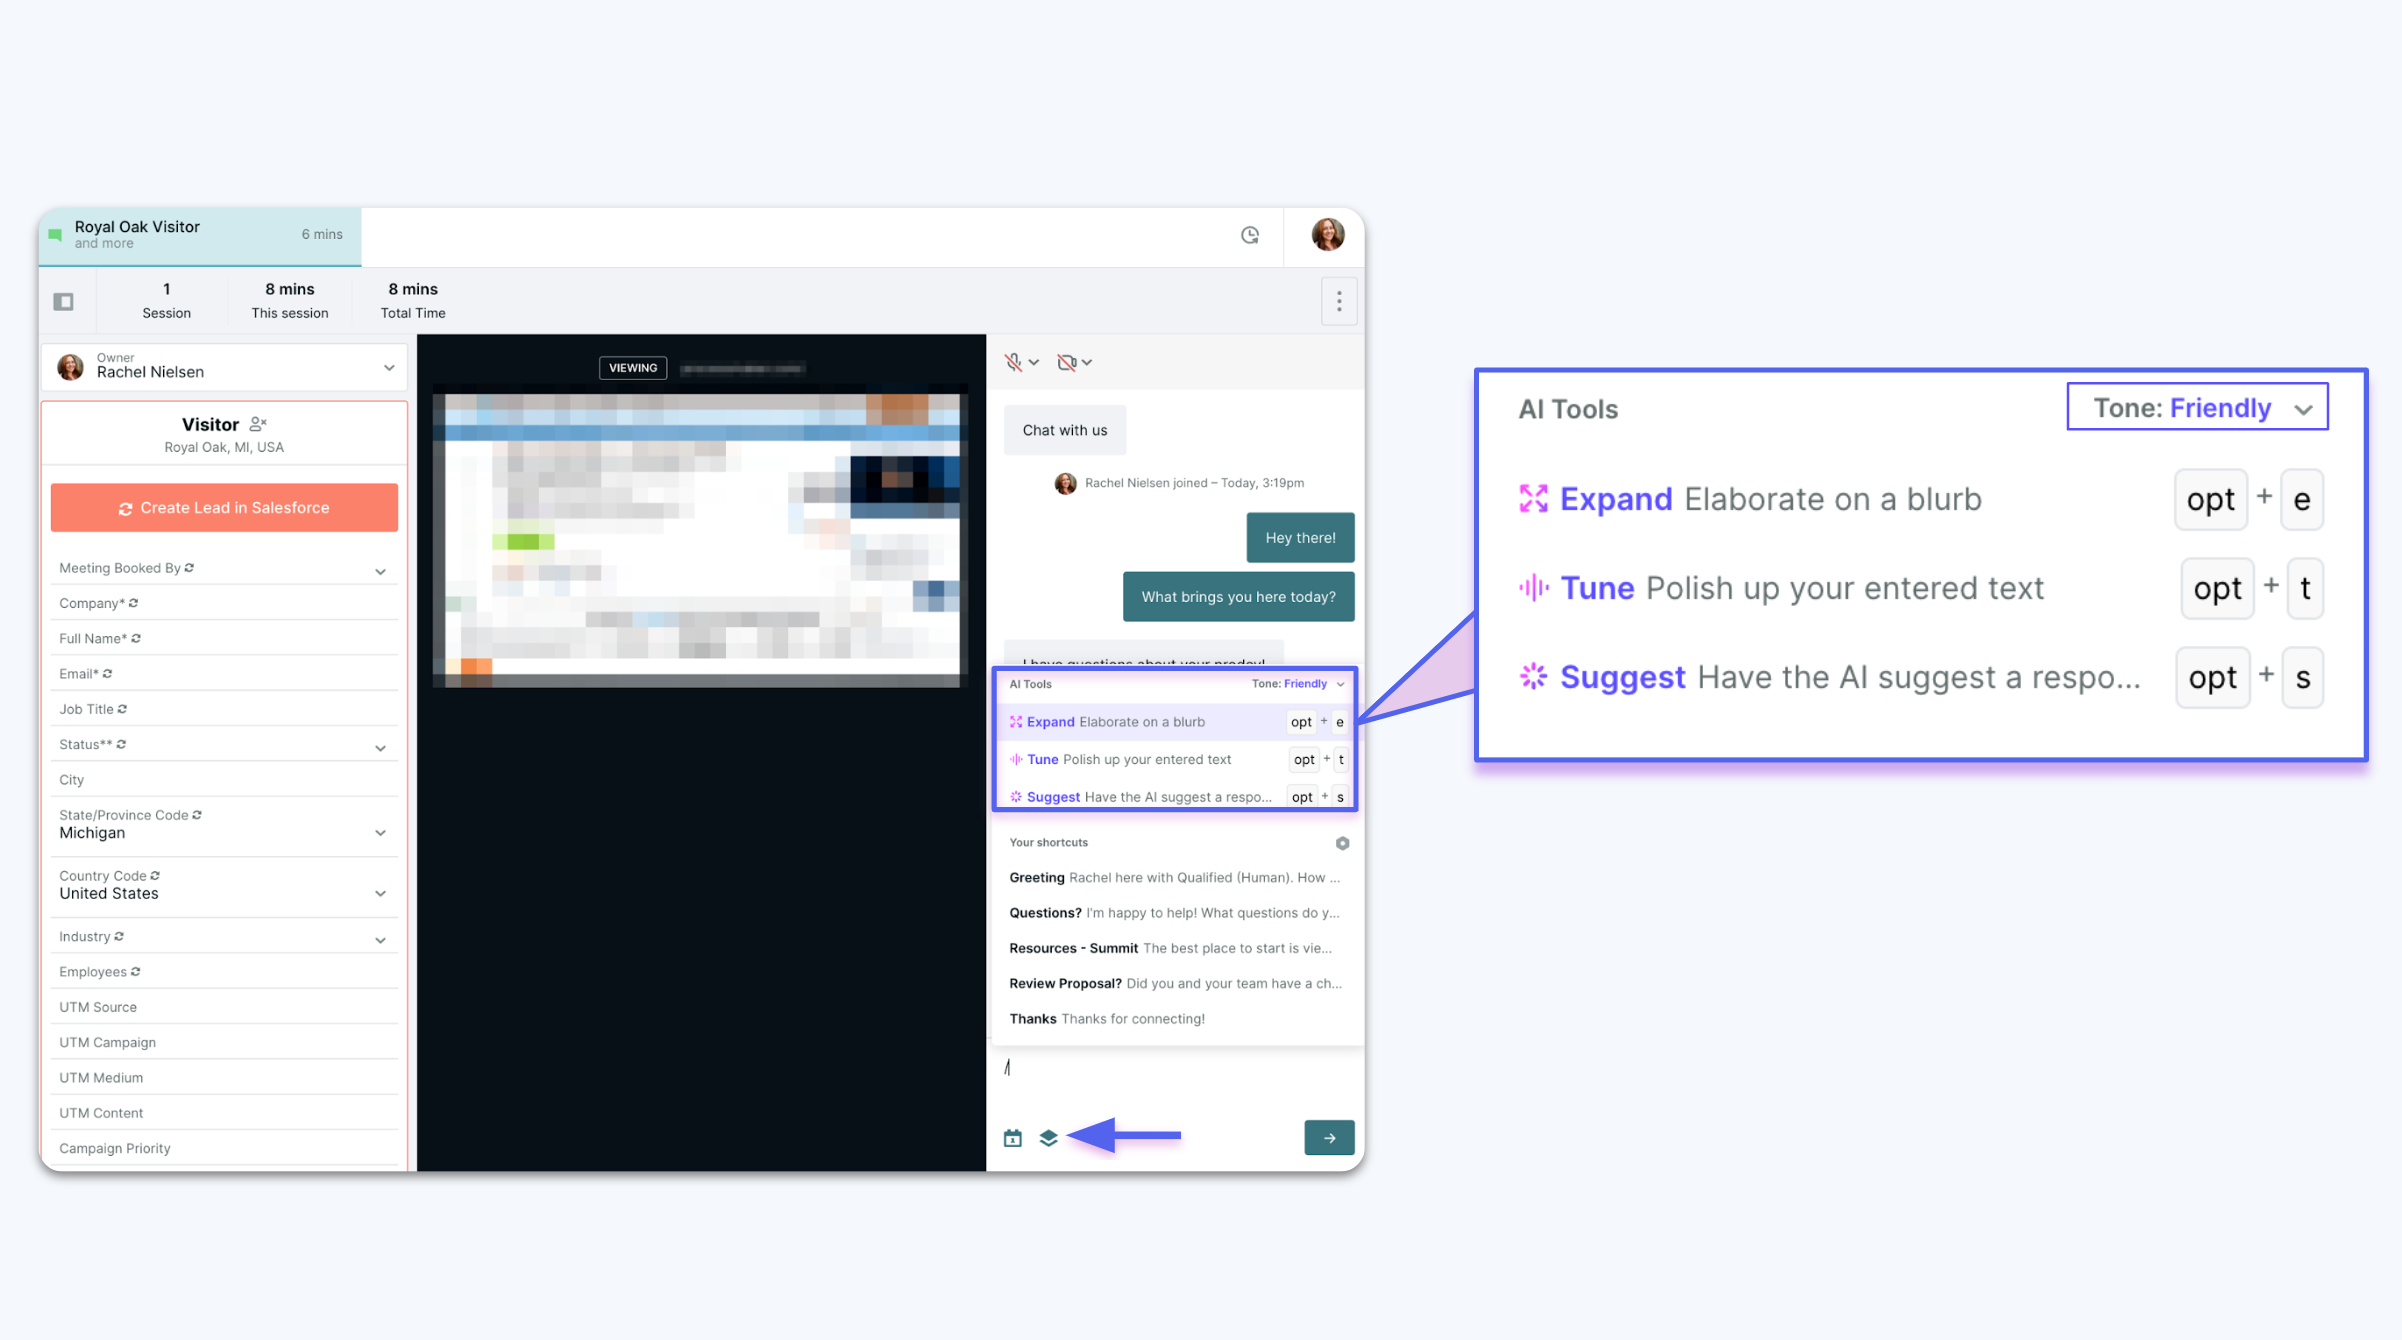
AI Suggest
Use generative suggestions to answer a question you may not know the answer to or want an alternative explanation to send to your visitor.
AI Expand
Type in a couple bullets or key word and watch AI Expand turn your short-hand notes into a fully baked response ready to send.
AI Translate
No matter what language you and your visitors speak, AI Translate can make sure you both understand each other perfectly.
AI Tune
Fix grammar errors and apply the appropriate tone to messages to fit the flow of the conversation. We currently offer 3 tones: Casual, Friendly, & Professional. Tone can be applied per individual conversation and you can adjust it by clicking the drop down on the top right hand side of the shortcut menu.
- Casual - Chat as if you're speaking with a returning customer (most informal).
- Friendly - Chat as if you're speaking with a prospect (semi-formal).
- Professional - Chat as if you're speaking with a C-suite (most formal).
See AI copilot in action
Watch these features in action in this short video:
Calling with voice and video
Qualified enables buyers and sellers to meet live via voice and video while still on your website. Using the Qualified messenger, sales reps and visitors can call each other immediately to drive pipeline faster.
If you’re interested in Qualified voice and video, reach out to your Qualified Success Architect.
Prepare for calls
You can call visitors with voice and video when logged in to Qualified via your browser or our desktop app. If you use the desktop app, make sure it's version 1.3 or newer.
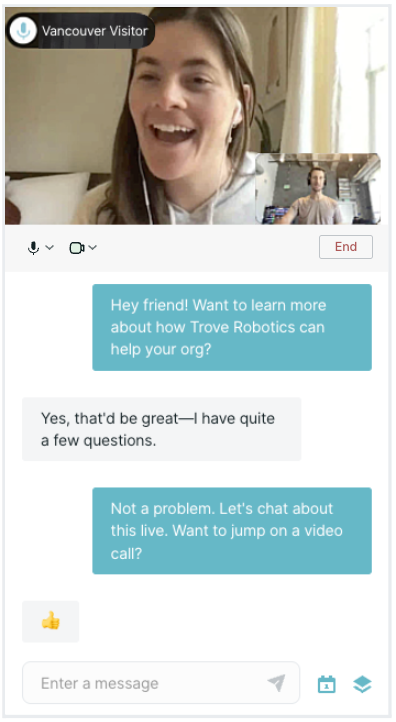
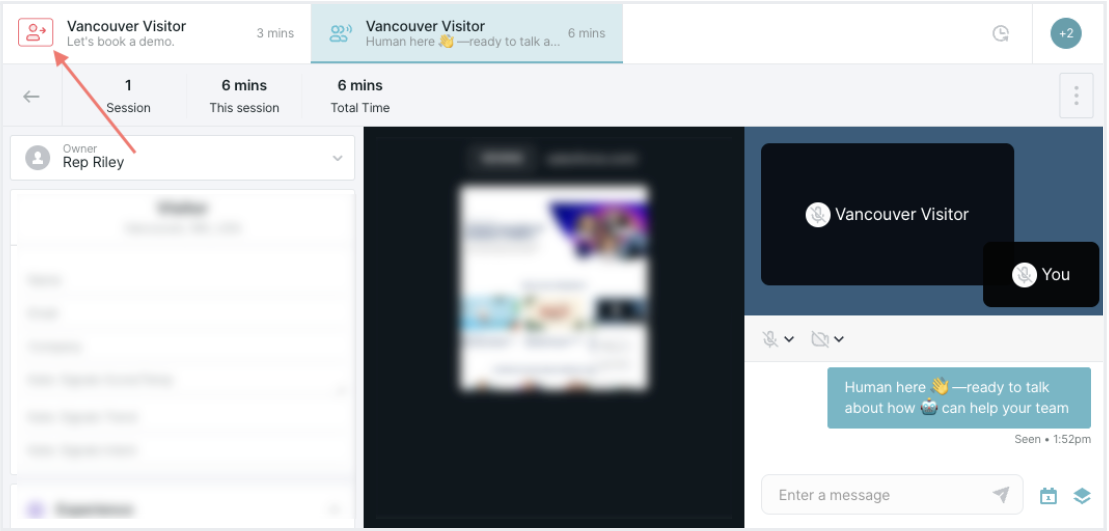
When you log in to Qualified, toggle yourself available. By default, this will also enable the voice and video option. Click your profile photo in the top-right or bottom-left corner to verify that you Allow voice and video:
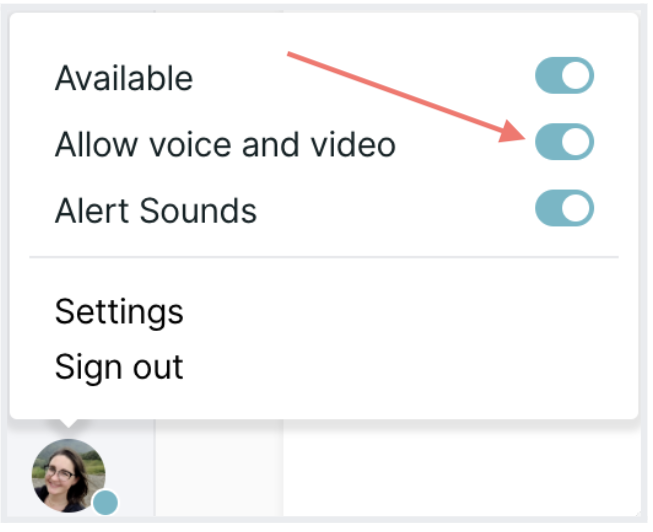
A box with video previews will then appear at the top of the Qualified messenger during your chats. (No live audio or video will play until a microphone or camera is proactively turned on.)
You may want to test your microphone and camera before starting live calls with visitors. We also recommend being ready to take notes, because calls are not recorded.
When to start or accept a call
There are a few scenarios where calls are advantageous and you may want to suggest one for expediency.
- You can answer the visitor’s detailed questions quicker on a call rather than text chat.
- The visitor explicitly states that they have limited time.
- Your text chat is taking an extended amount of time and potentially distracting you from other high-value prospects.
To decide when to begin or accept a call request:
- Build rapport and ask qualification questions: Calls can take more time, so verify that the visitor is in your ICP first. You can also decipher if they're a legitimate prospect or irrelevant by assessing what the visitor types before sending a message.
- Look at the Visitor 360 to identify the visitor: You can be confident about details mapped from Salesforce fields. When information is pulled from an integration, like 6sense or Clearbit, check the Confidence. If the confidence level is Very High, then most likely you’re conversing with that person. If there’s little or no information in the Visitor 360, ask the visitor for their email and organization.
You do not have to accept an incoming call. If you opt not to, continue chatting with the visitor via text. You can always upgrade to voice and video later in the conversation.
Create a shortcut for when you decline a visitor’s call, such as “Sorry—I’m not currently available for video calls. Can we continue via chat? Or would you like to book a meeting so we can sync live at a better time?”
Start a call
A rep or visitor can begin an audio or video call.
Rep calls a visitor
We recommend letting customers know that you want to start a call and waiting for them to agree. When you’re ready, click the Microphone icon and Video icon below the video box. The icons will change color, indicating that the visitor can hear and see you:
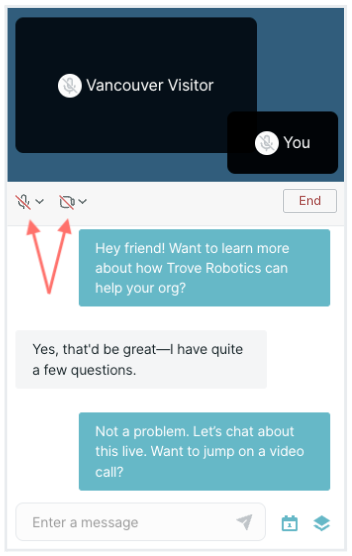
The visitor should then click the Microphone icon and Video icon in their messenger window to turn on their own. You may need to tell them to do so. Once they enable them, click the Allow visitor and video button and the call will begin.
The first time you or the visitor join a call, Qualified will ask for permission to access the microphone and camera. Once granted, the call begins.
After Qualified has your permission to access your microphone and camera, clicking the icons will immediately turn them on. Because visitors can see and hear you without their explicit permission, exercise these controls carefully. It’s important to be tactful and strategic when initiating a call to not startle or overwhelm visitors.
If you turned off your voice and video availability but later want it during a live chat, toggle Allow voice and video back on. Your video box will then appear in your open chats, ready for calls.
Visitor requests a call
Alternatively, your Qualified admin may allow visitors to initiate video calls. If so, visitors can turn on their camera and audio before a rep initiates a call. The visitor’s tab in Qualified will pulse green, alerting you that a visitor is waiting.
The first time a visitor shares their camera and audio, you’ll see Allow visitor audio and video in the messenger’s video box. If you’re comfortable accepting their call, click that button or Allow audio only below for limited transmission:
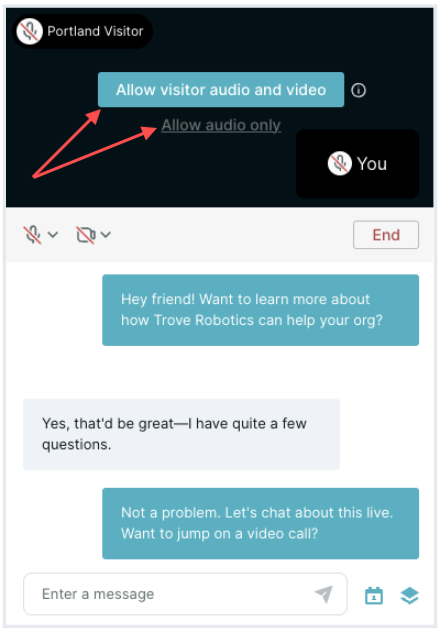
While the visitor waits for you to accept their call, they see your profile picture and a message stating that a rep is connecting soon in the video box.
Call and chat handling
After you join a call, we highly recommend transferring your other live chats to different available reps.
Once a call is active, all participants can:
- See if the other person’s microphone or camera is turned on and, if so, their live respective video.
- Select which microphone, speaker, and camera are used and Blur Background by clicking the adjacent Arrow icons.
- Continue to send text chats in the Qualified messenger.
- Click End to turn off all microphones and cameras.
If a visitor is acting unacceptably, block and report them. This will immediately end the call and prevent them from seeing all of your experiences moving forward.
Rep view
As a rep, you remain in the Qualified app, just like with live text chat:
You can navigate around Qualified while on a call and the video box will remain visible. With this flexibility, you can review the visitor’s company Account 360 to learn more about them, like which advertisements were clicked through, to guide your conversation.
You can still offer the meeting booker while on a call to schedule a follow-up meeting.
Visitor view
Visitors see the video along the top of the Qualified messenger, which still floats on your website:

When they navigate around your website, the call remains connected. They can also click the Expand arrows icon on the right to enter full screen mode.
Ending a call
Sales reps and visitors can click the End button on the right to immediately turn off both cameras and microphones. If you want to continue chatting with the visitor via text, the Qualified messenger will remain open for your continued conversation.
To finish a call, the End button must be clicked by a rep or visitor.
While Qualified creates a Salesforce event when a live chat conversation ends, voice and video calls are not recorded or timestamped in the Salesforce event’s playback URL. As such, we recommend logging call notes on the Salesforce event after the entire conversation finishes.
Calling with voice call
Live chat is often a great way to start a conversation, but the progress of your conversation may slow due to the delays when typing. As a result, many sales reps want to upgrade from a chat to a voice call instantly without the hassle of asking for someone's phone number, setting up a conference call, or going through the pain of starting an online meeting. Voice calls are an instrumental aspect of the selling process, and that's where Qualified's voice call features really shine.
When to initiate a voice call
As a sales rep using Qualified, the best time to initiate a voice call is when you're already engaged with a prospect via chat. While chat is a great way to start a conversation (initiated by you or the prospect), you can have a more productive conversation over voice by answering questions quickly and engaging your prospect to get what you want out of the conversation.
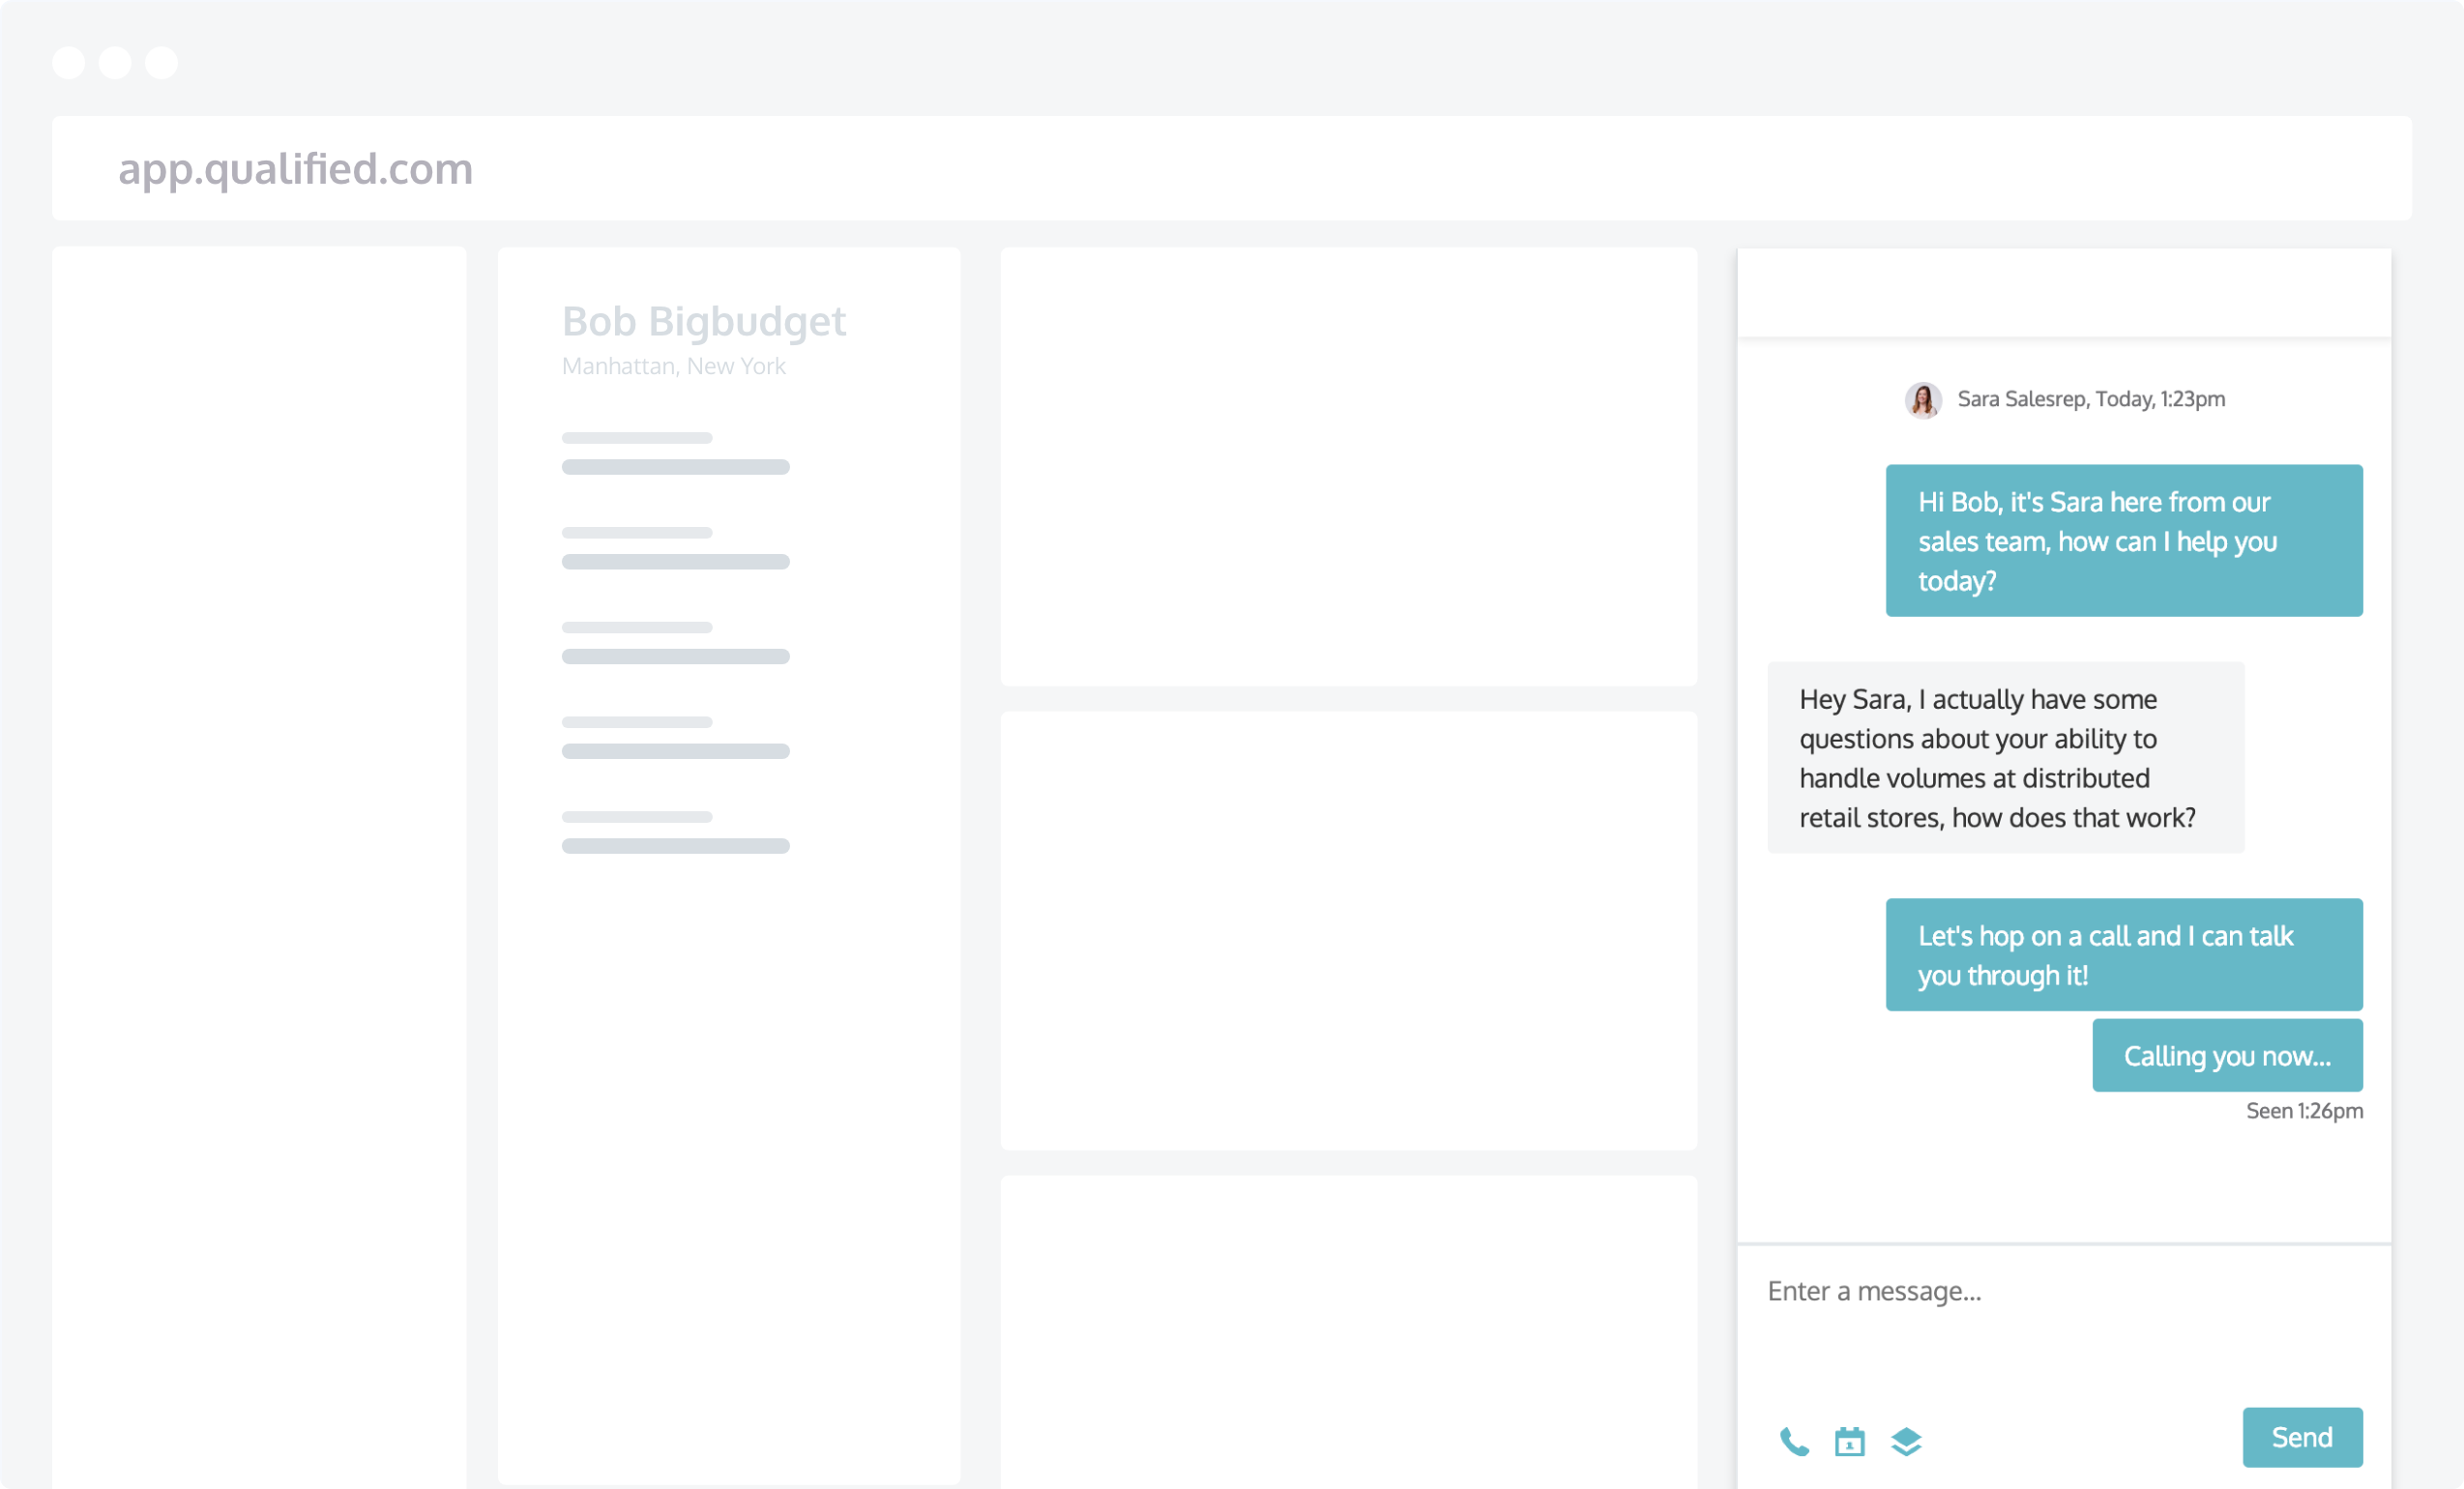
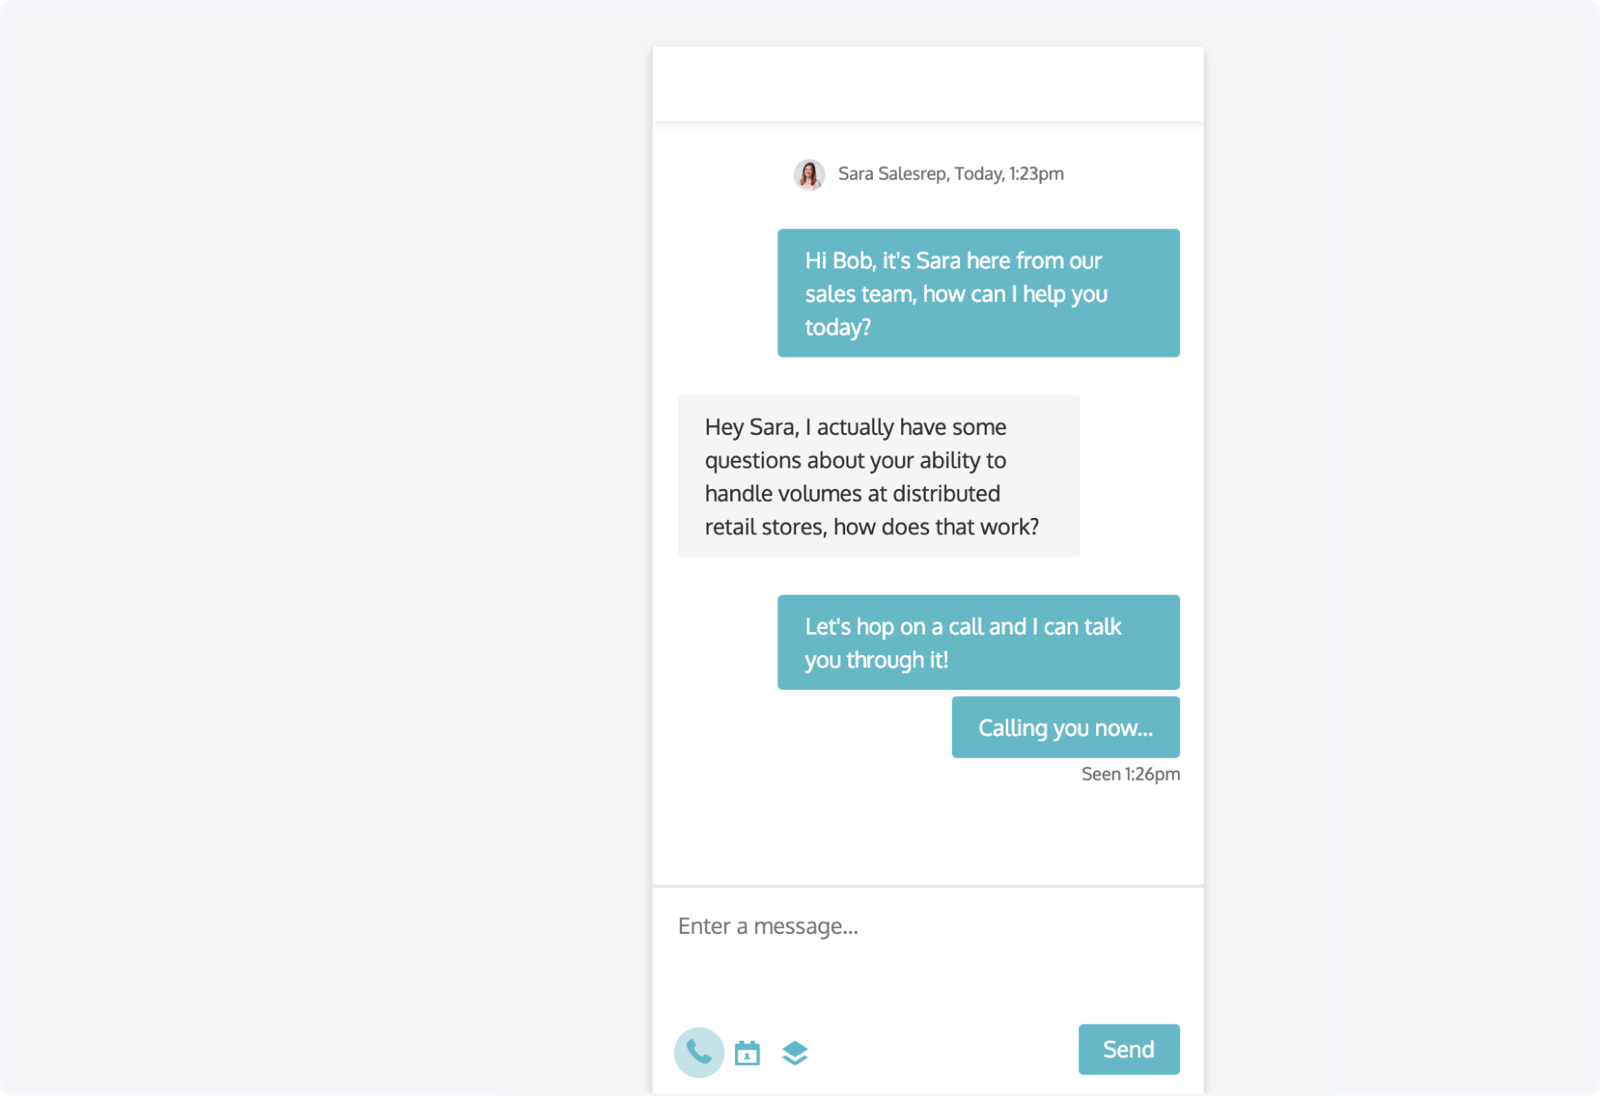
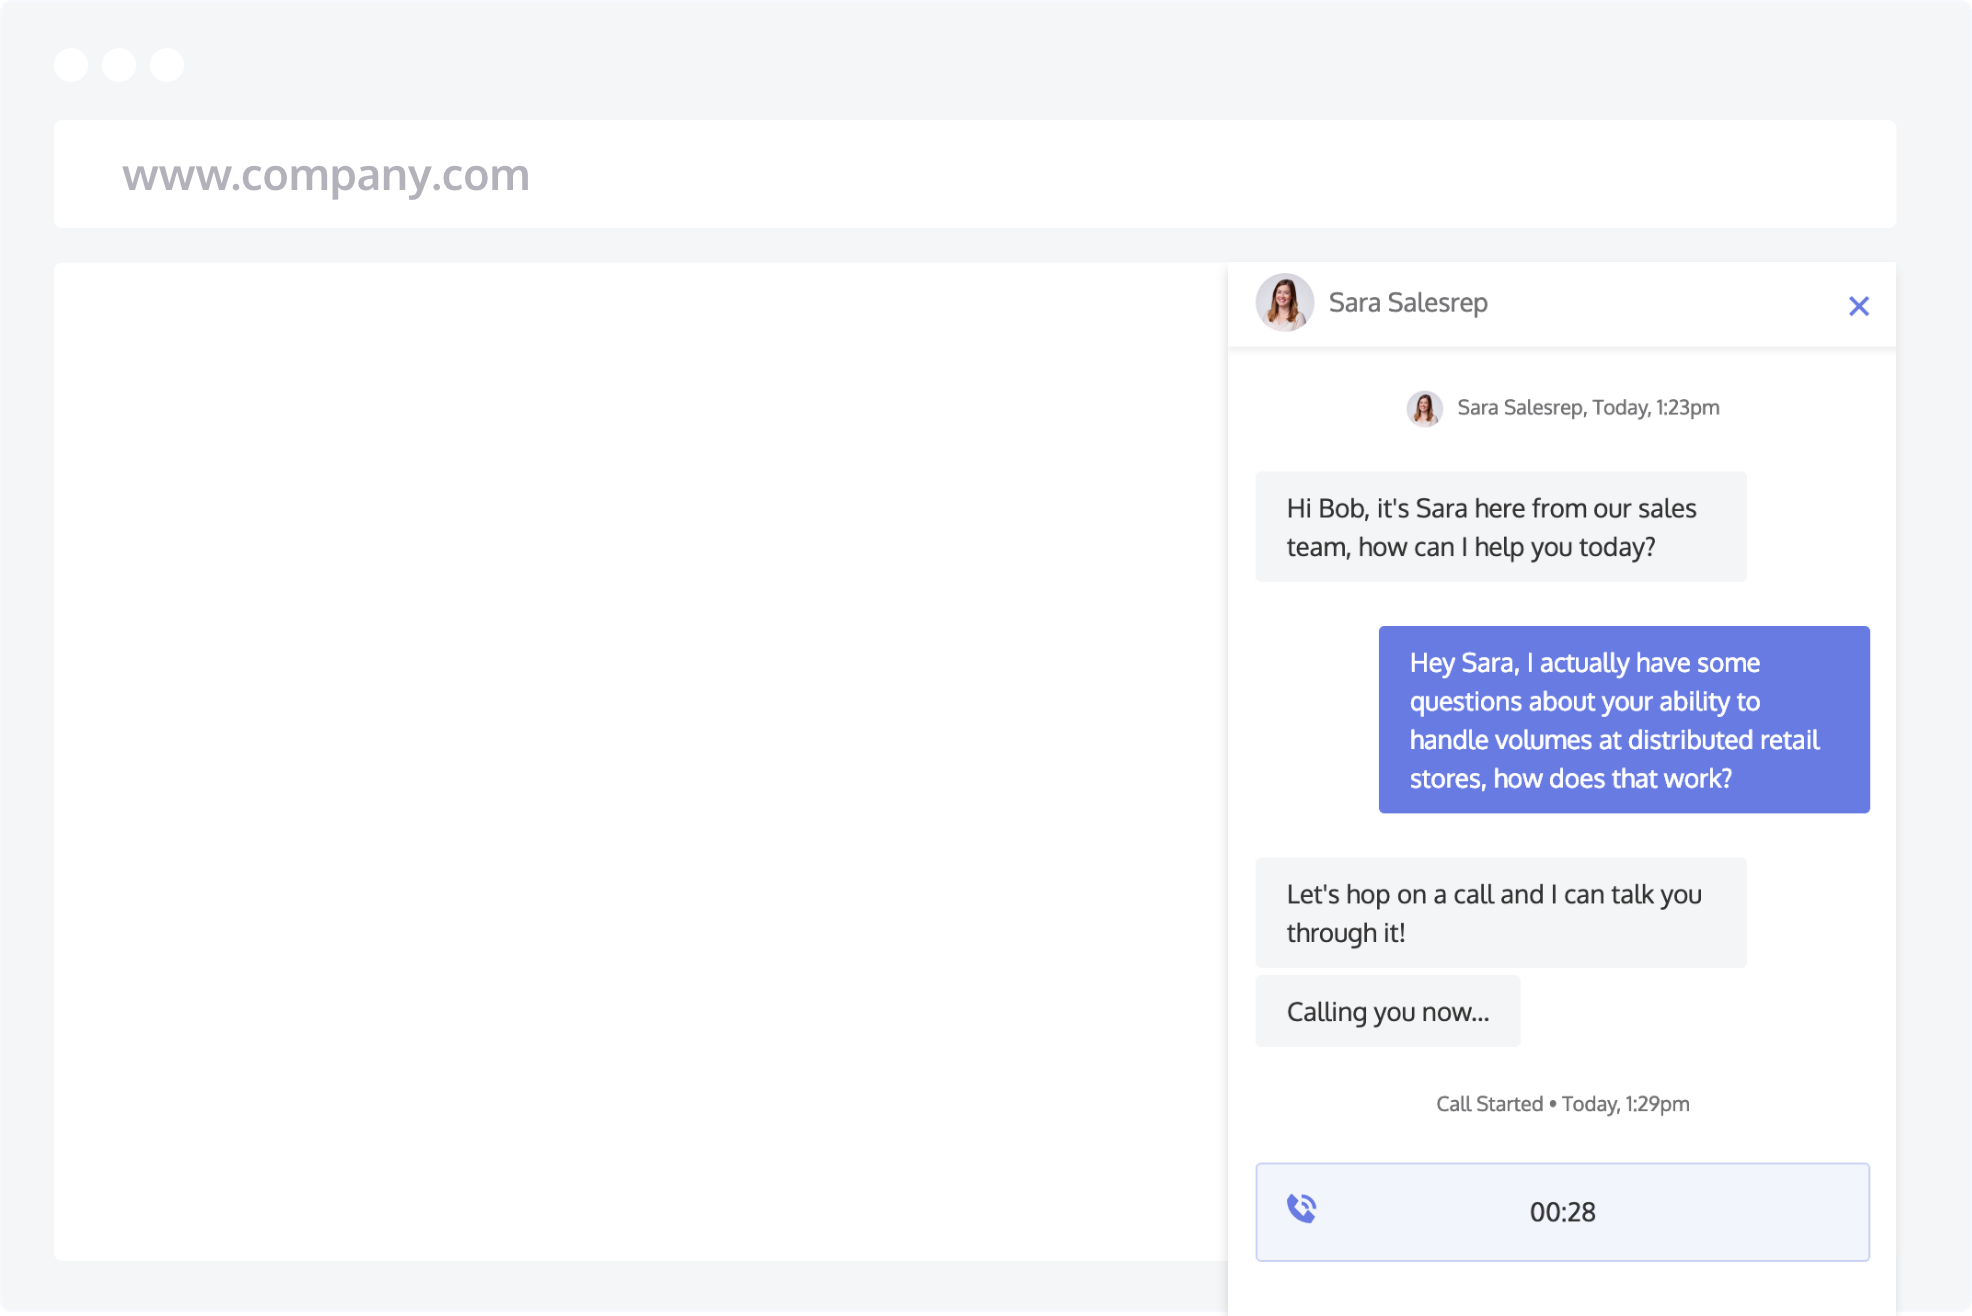
If you're looking to identify common things like budget, authority, need, and timeline, these are more easily learned via a voice call. Here is an example of a live chat session between a rep and a prospect that is seamlessly upgraded from chat to voice.
How to initiate a voice call
Initiate a voice call by clicking on the phone icon at the top of the chat session window. Prior to initiating the call, it's a good idea to send a chat message, such as "Calling you now..."
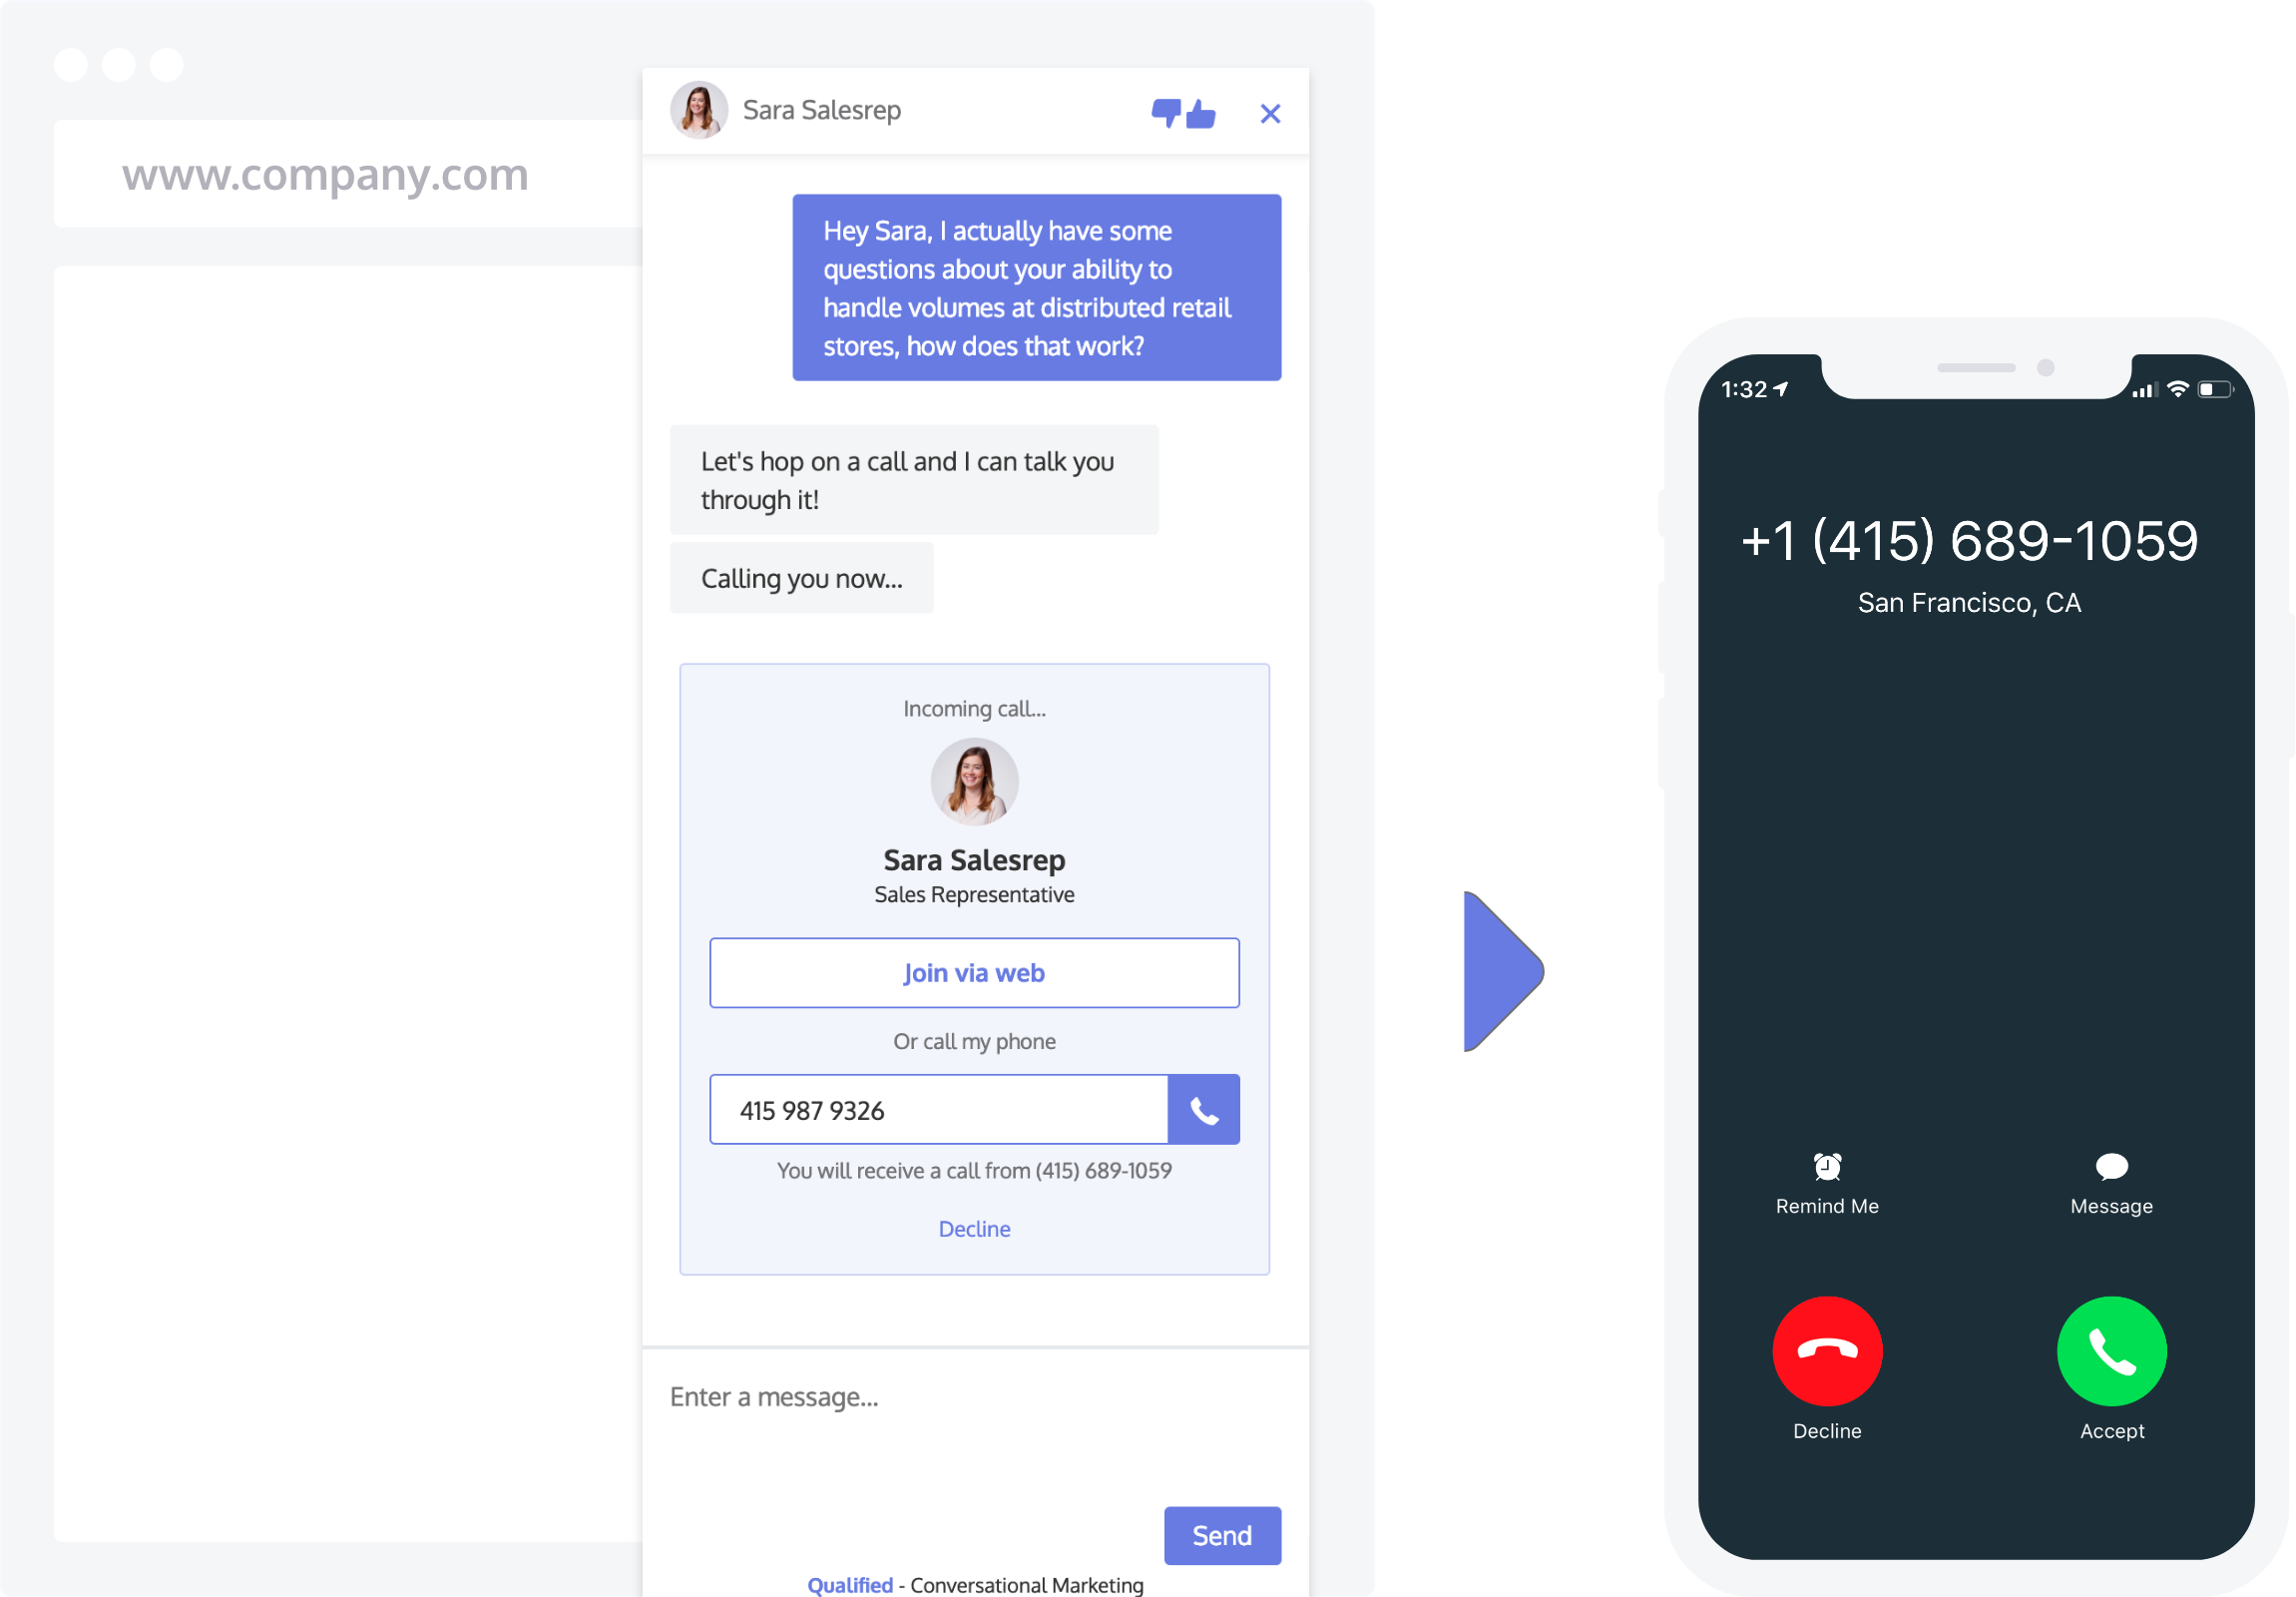
What the prospect sees on your site
After you initiate the call, the prospect sees a message for an inbound phone call. This might be a bit jarring because many prospects aren't used to having a voice call placed right through your website, but if you send a quick message like "calling you now..." they won't be alarmed when the following voice call prompt appears in the messenger.
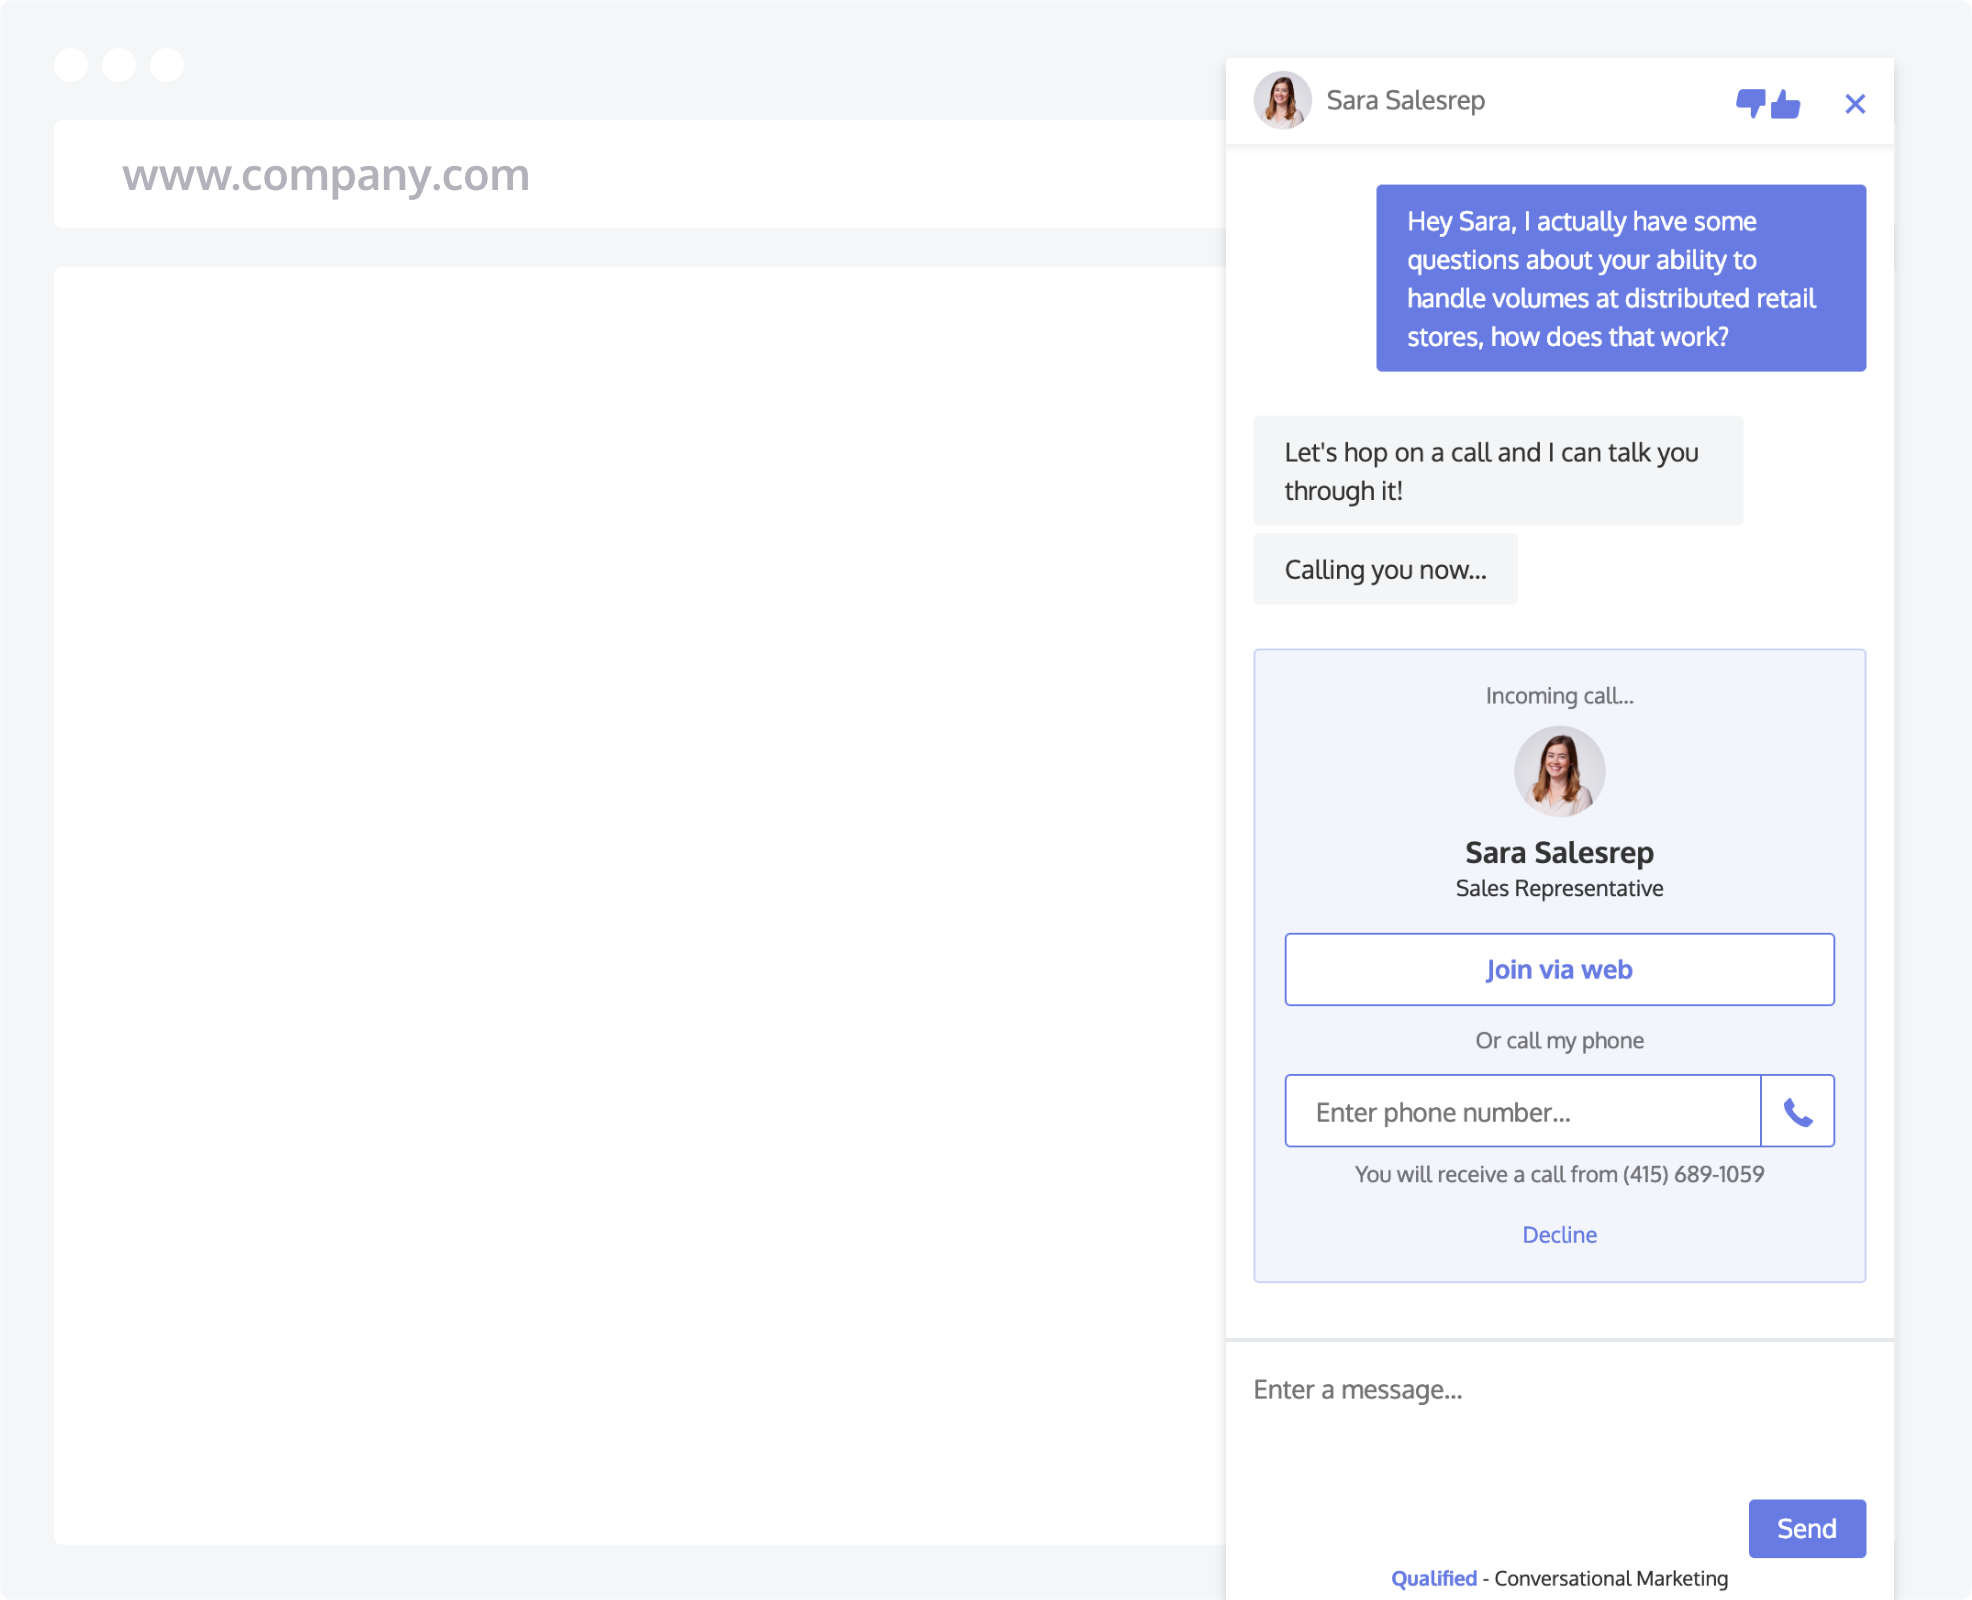
Options for the prospect to join a call
A prospect has two ways of joining the call that you initiated. They can join via web, which will connect the call right through the microphone and speakers on their computer, or they can join via phone which will place a call to the phone number they enter into the messenger. Let's look at each of these flows in a bit more detail.
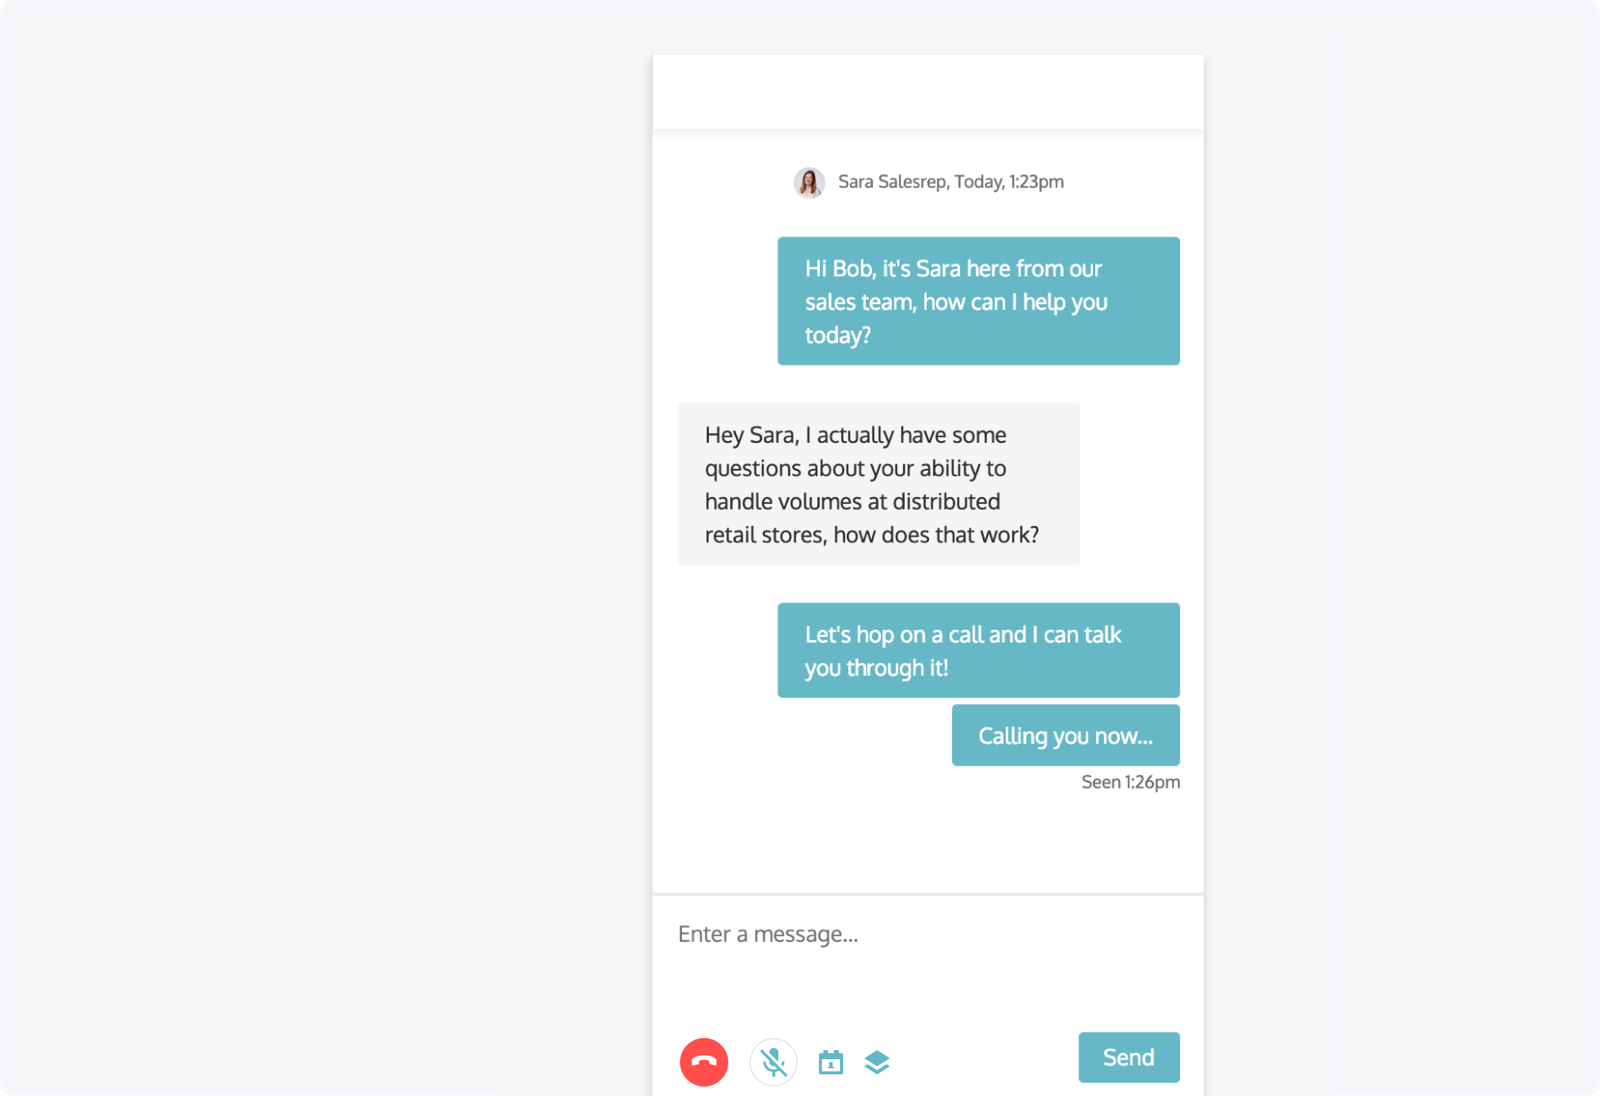
Joining a call via web
When a prospect chooses to join the call via their web browser, they are electing to use their computer microphone and speakers to communicate. In order to do this, the computer operating system will ask them to allow use of their microphone and speakers. After allowing use of the microphone, the prospect has now joined the call and both parties can talk. Let the selling begin!

Joining a call via phone
When a prospect chooses to join a call via phone, they simply type the phone number of their landline or mobile phone. Qualified will then ring their phone and, when the call is answered, both parties can talk.
Terminating a voice call
Either participant may terminate a voice call by clicking on the red "hang up" icon, either on the computer or simply hang up if speaking over the phone on a landline or mobile phone.
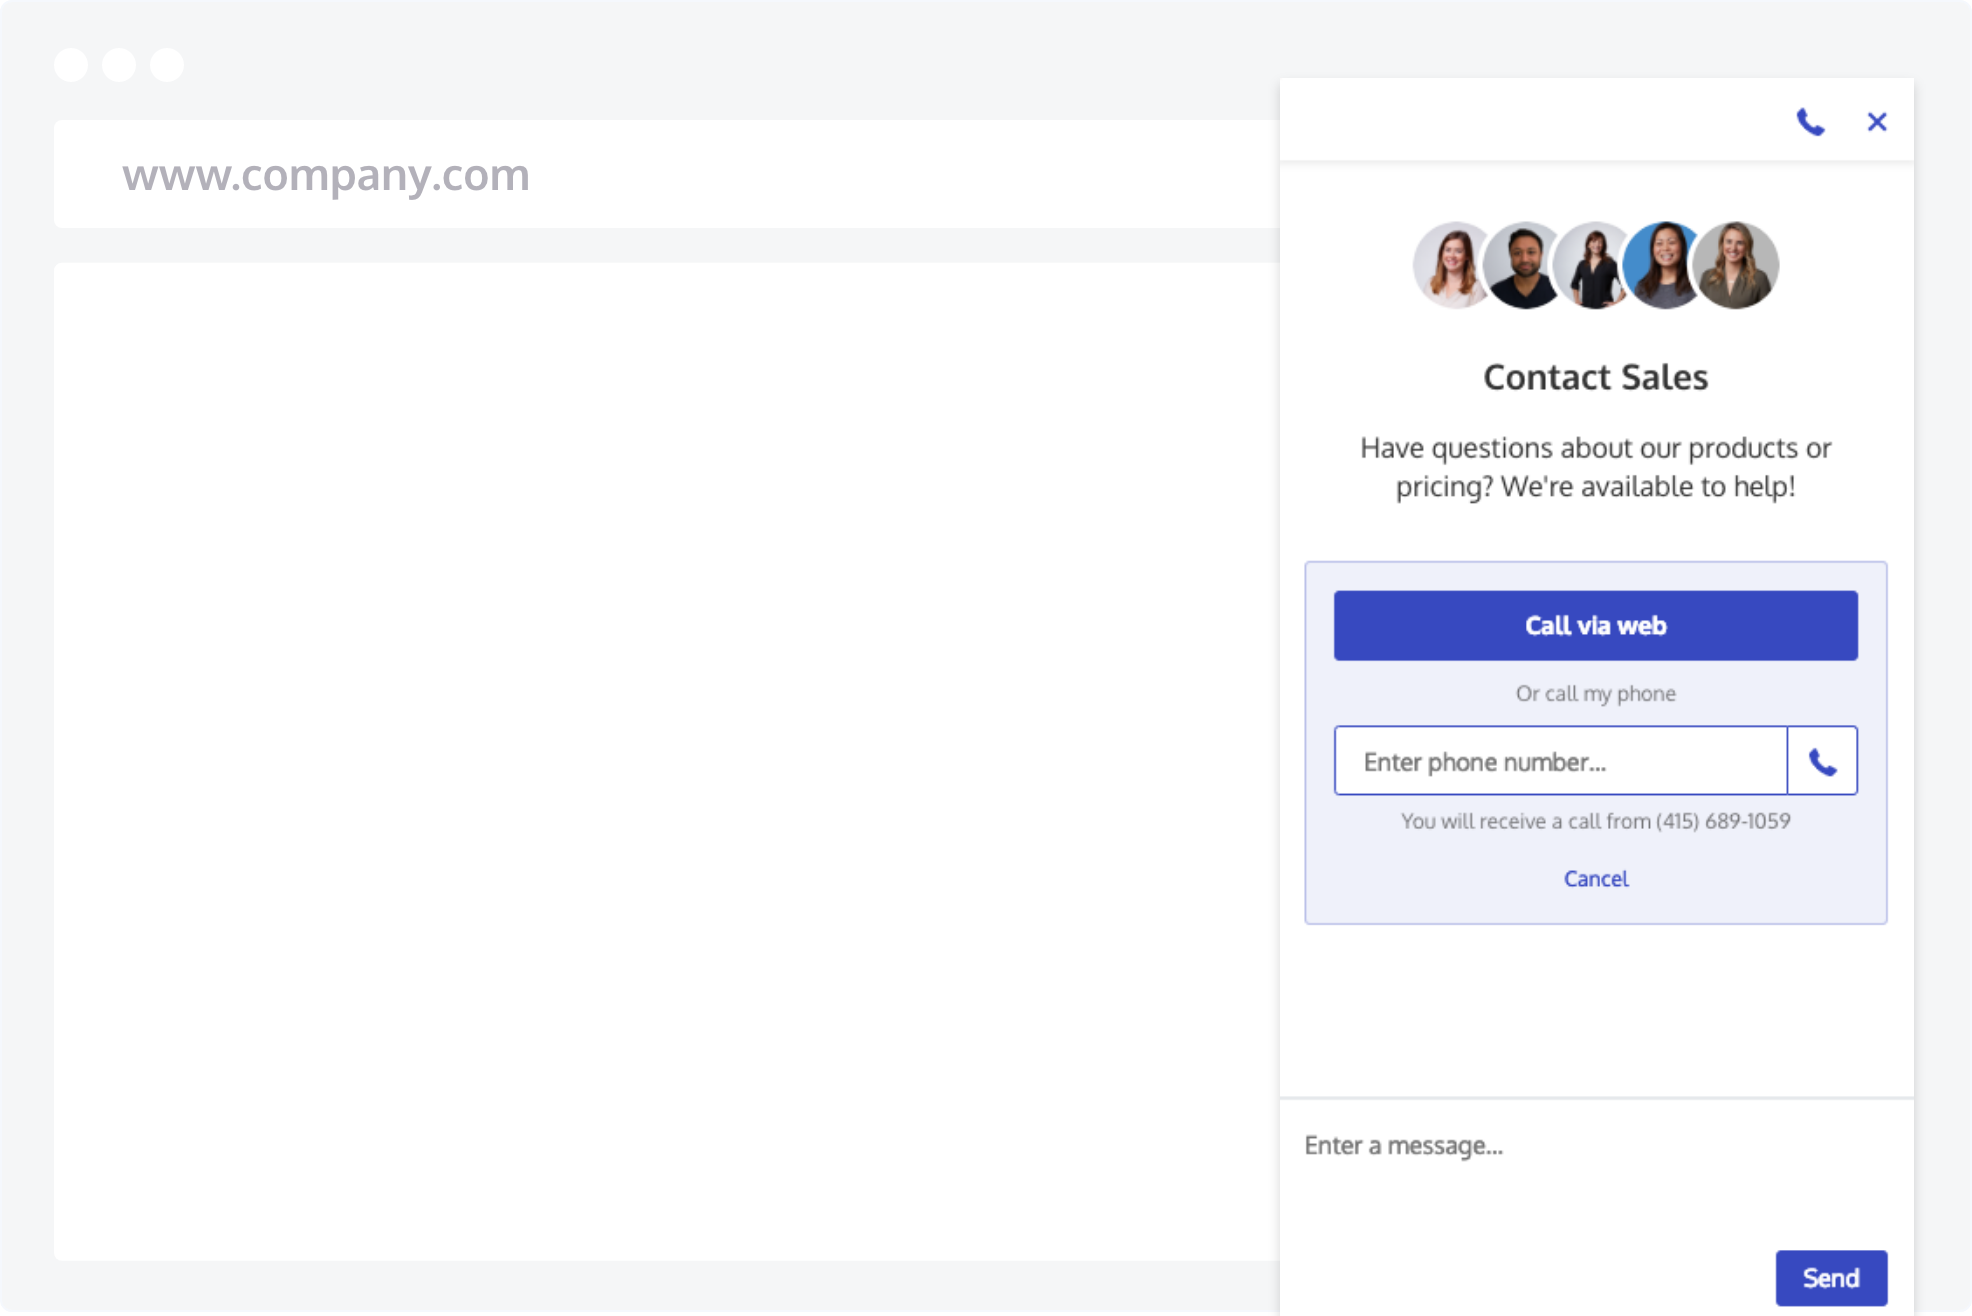
How and when visitors can call you
When qualified visitors are on your website, as defined by your qualification rules, the messenger gives them instant access to your sales team via chat and voice calls. The messenger allows visitors to initiate a voice call either directly over the web or ring a phone number they enter manually. This is what the experience will look like for a qualified lead on your site:
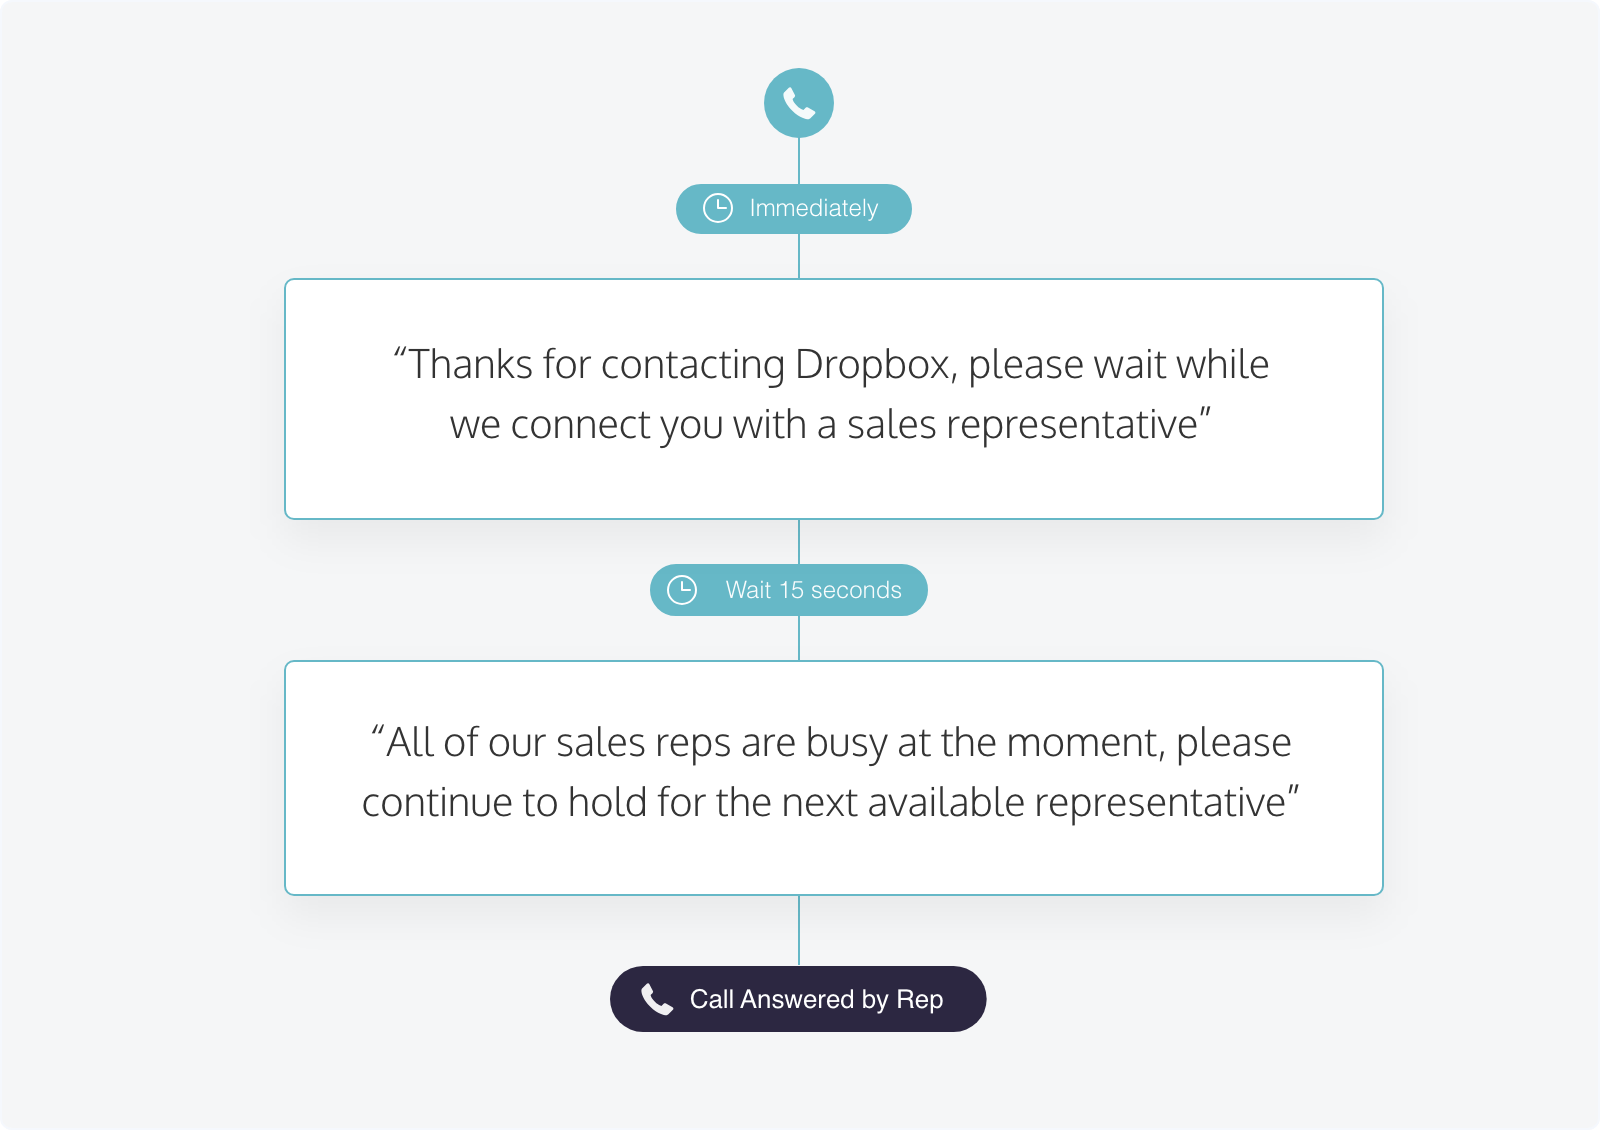
The "on hold" experience for your visitor
When a qualified visitor calls you, their inbound call is put into a queue for your reps to answer. Until a rep answers the call, the visitor will be placed on hold. Your admin can change the name of your company in the Admin settings area of the app. For example, if your company name is "Dropbox," the visitor would hear the following until the call is answered by one of your reps:
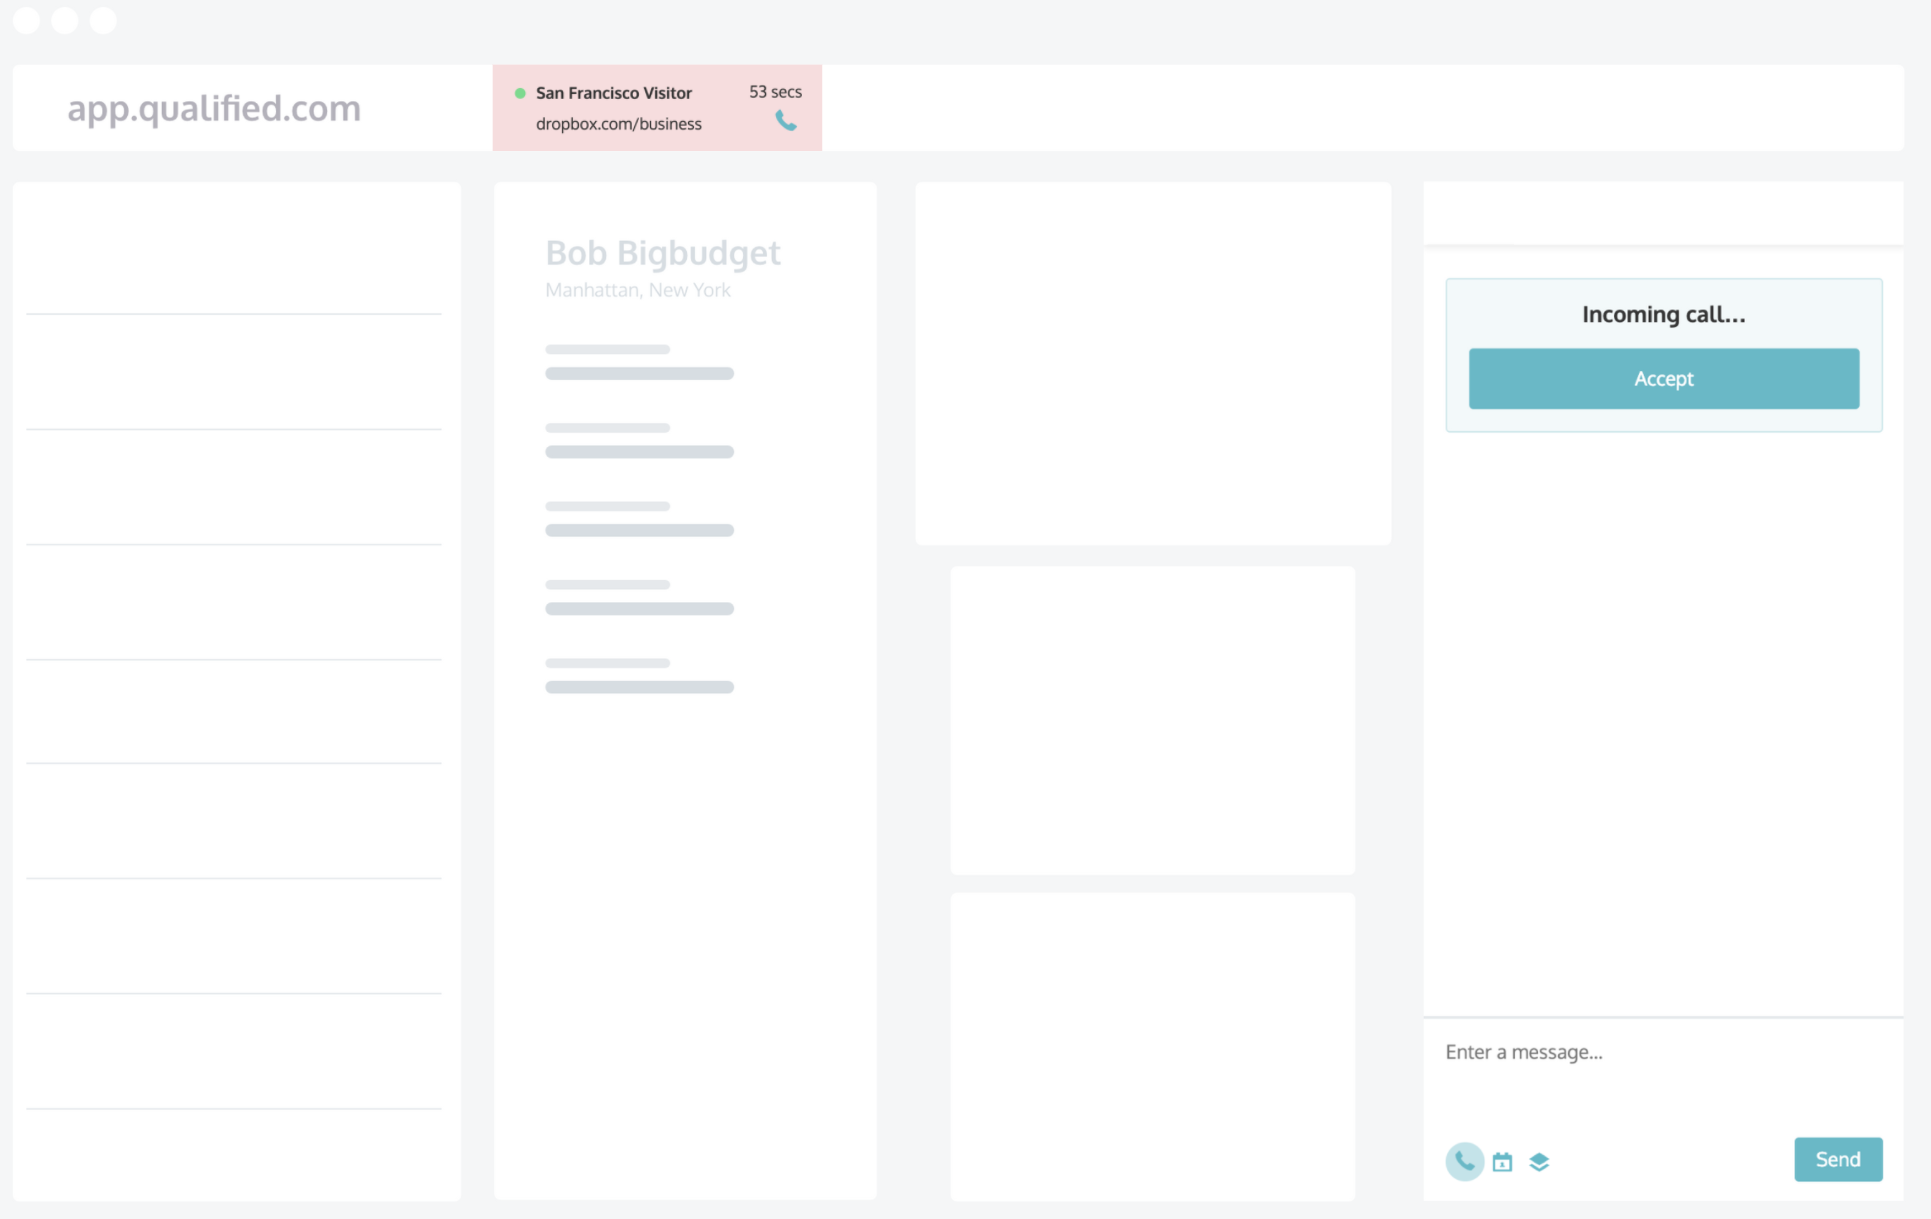
Receiving and answering a voice call
Incoming voice calls are placed in the sales rep queue. They flash on the left side of the Qualified app, a phone ring sound plays, and the browser posts an alert notification. The first sales rep to answer the call removes it from the call queue, and the call is now connected to that rep.
Terminating a voice call
Either party may terminate a voice call by clicking on the red "hang up" icon on the computer or simply hang up if speaking over the landline or mobile phone.
Offering the meeting booker in live chat
Reps can manually show a meeting booker any time during a conversation. To show the meeting booker:
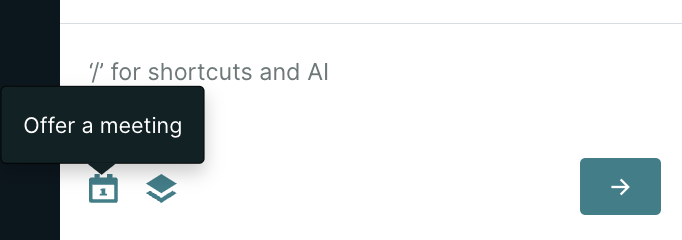
1. Click the Calendar icon in the lower left-hand corner of the messenger.
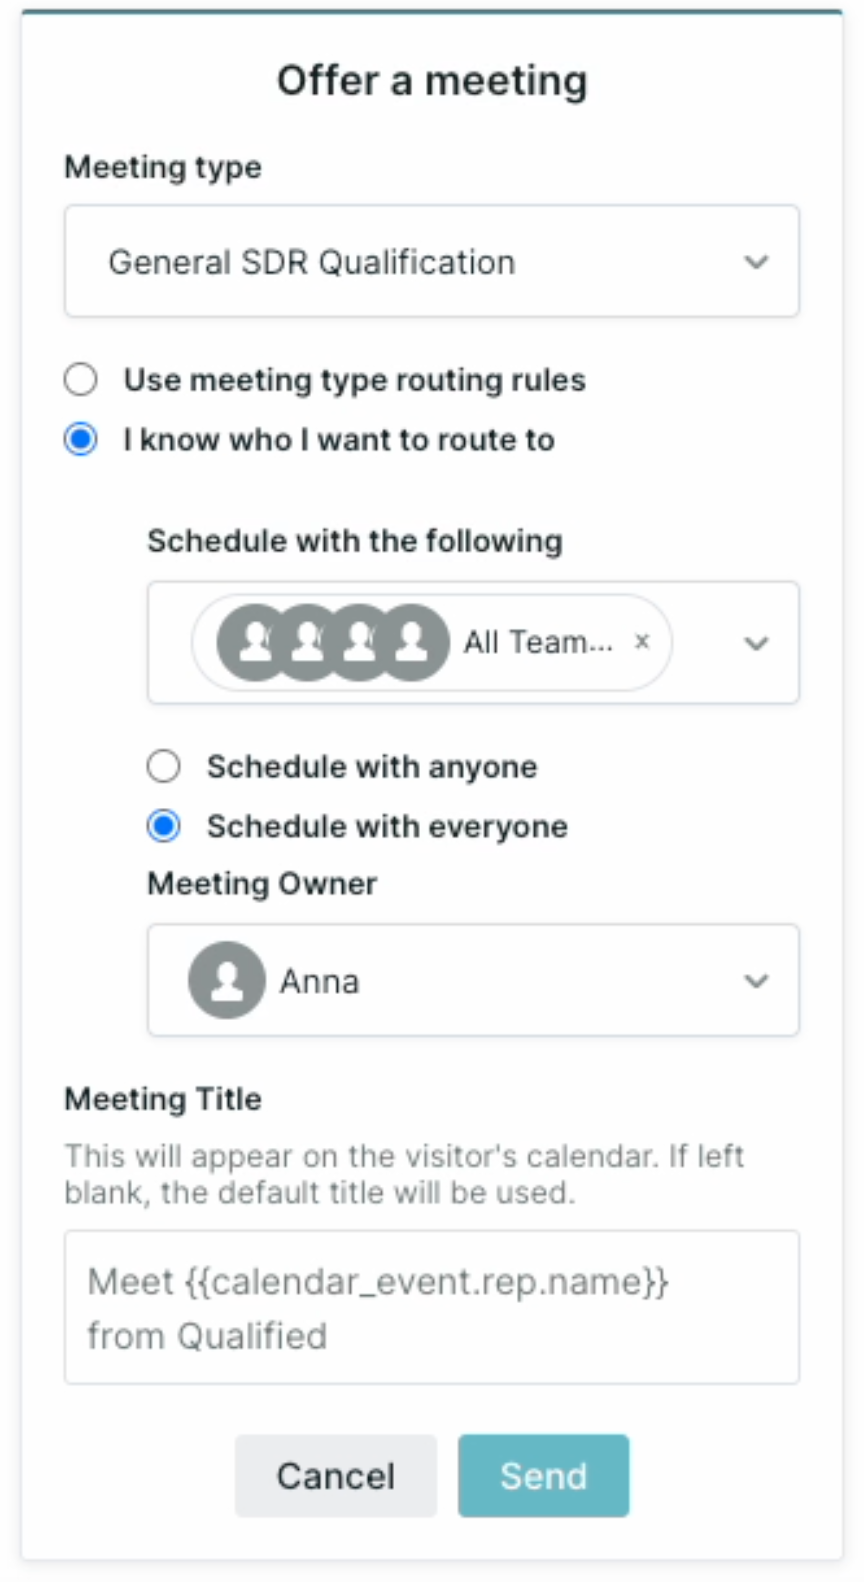
2. Select which meeting type fits your visitor’s needs.
3. Select use meeting type routing rules or I know who I want to route to. Using meeting type routing rules will respect the current queue for that meeting type and display the rep who's next in line.
4. (Optional) If you choose I know who I want to route to and Schedule with everyone to coordinate multiple people’s calendars, you’ll need to pick a Meeting Owner.
5. (Optional) If you want to change the Meeting Title, enter a new one.
6. Click Send.
When a meeting is booked, Qualified automatically adds an event to the reps’ calendar and sends the visitor a confirmation email that includes a calendar invite.
Transferring a chat
Should you want to reconnect a visitor with a rep they previously spoke with or focus on a video call, transfer the chat to someone else. This will reassign the conversation to a different available rep.
How to transfer a chat
We recommend telling your colleague in advance and sharing with the visitor why you’re transferring the conversation. For example, you may reassign the chat to a sales rep they previously met with.
When you’re ready, go to the Visitor 360 and select an available rep from the Owner drop-down menu:
If the ideal rep to continue the conversation isn’t available, inform the visitor and offer that rep's calendar in your next message.
How to transfer a chat during a Qualified call
If you’re engaged in multiple chats simultaneously and one of them transitions to a voice and video call, you may want to reassign the other chats. When you join a call and another rep is available, click the Transfer icon located in that conversation’s tab above the Visitor 360 or live view:
When reassigning chats during a call, it’s important to use the single-click Transfer icon. If you instead navigate away from the call to use the Owner drop-down menu, your call will end immediately.
What happens when a chat is transferred
The conversation window will close and return you to the Qualified home page. The transferred chat will immediately be sent to the other rep, and display a notification that a visitor is waiting. They can then view the full transcript in the messenger and chat with the visitor live.
At this time, it’s not possible to call a visitor if their chat was transferred by any rep.
Block visitors
You may encounter site visitors that send spam or abusive content through the Qualified messenger. Your reps can quickly block a visitor to stop their unsavory behavior:
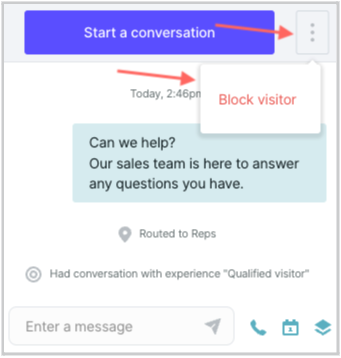
1. While you’re chatting with this person, click the Menu icon in the messenger’s upper-right corner.
2. Click Block visitor.
3. Click Block visitor on the confirmation window.
This will block the visitor from accessing the Qualified messenger on their current device due to a saved browser cookie.
It’s good to know, however, that blocked visitors can return from an incognito browser or a different device. If a visitor continues their abusive behavior, the rep can instead click Block and report visitor:
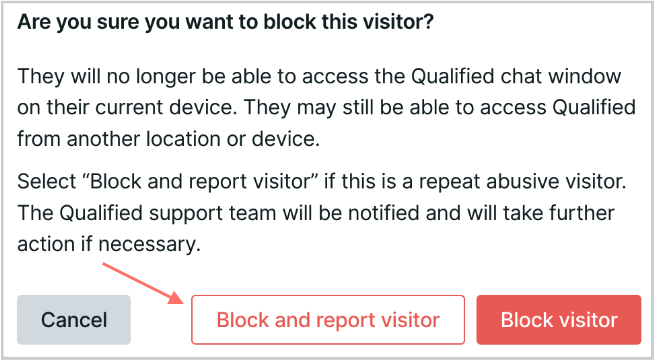
This will block the visitor with another browser cookie and notify our Qualified Technical Support team to investigate. They may decide to block the visitor’s IP address from your Qualified instance.


.svg)


