


Meeting Queues are a new, centralized way to manage how meetings are routed in Qualified. This feature simplifies the entire process by moving the routing logic away from individual Meeting Types and into a reusable object called a Meeting Queue.
This gives you a single place to manage, monitor, and have confidence in how meetings are distributed to your team.
A Note for Existing Customers
Meeting Queues will be the default functionality for all new Qualified customers as of September 25, 2025. We are currently developing an automated migration path for existing customers.
In the meantime, if you're interested in migrating to Meeting Queues, please contact your Qualified Success Architect (QSA) for assistance. For information on our current routing functionality, please see our article on Existing Meeting Routing Functionality.
What are Meeting Queues?
At its core, a Meeting Queue is a Group of users in Qualified with a routing algorithm applied to it.
The routing logic lives in the group’s “Meetings queue” settings, which you can then apply to any Meeting Routing Rule. This approach has several key benefits:
- Centralized management: All your routing logic lives in one reusable place, making it easier to manage at scale.
- Clear visibility: A dedicated dashboard lets you see who is next in line, monitor rep performance, and understand distribution at a glance.
- Simplified setup: The configuration process is more streamlined. Once a queue is set up, you can apply it to any Meeting Type without extra configuration.
- Increased confidence: Know exactly how your meetings are being distributed, ensuring fairness across the team.
How to configure a Meeting Queue
Follow the steps below to enable a group as a queue, define its routing logic, and apply it to a Meeting Type
1. Enable a Group as a Meeting Queue
- Go to Settings → Organization → Groups & Queues.
- Click +Create new group or select an existing group from the list.
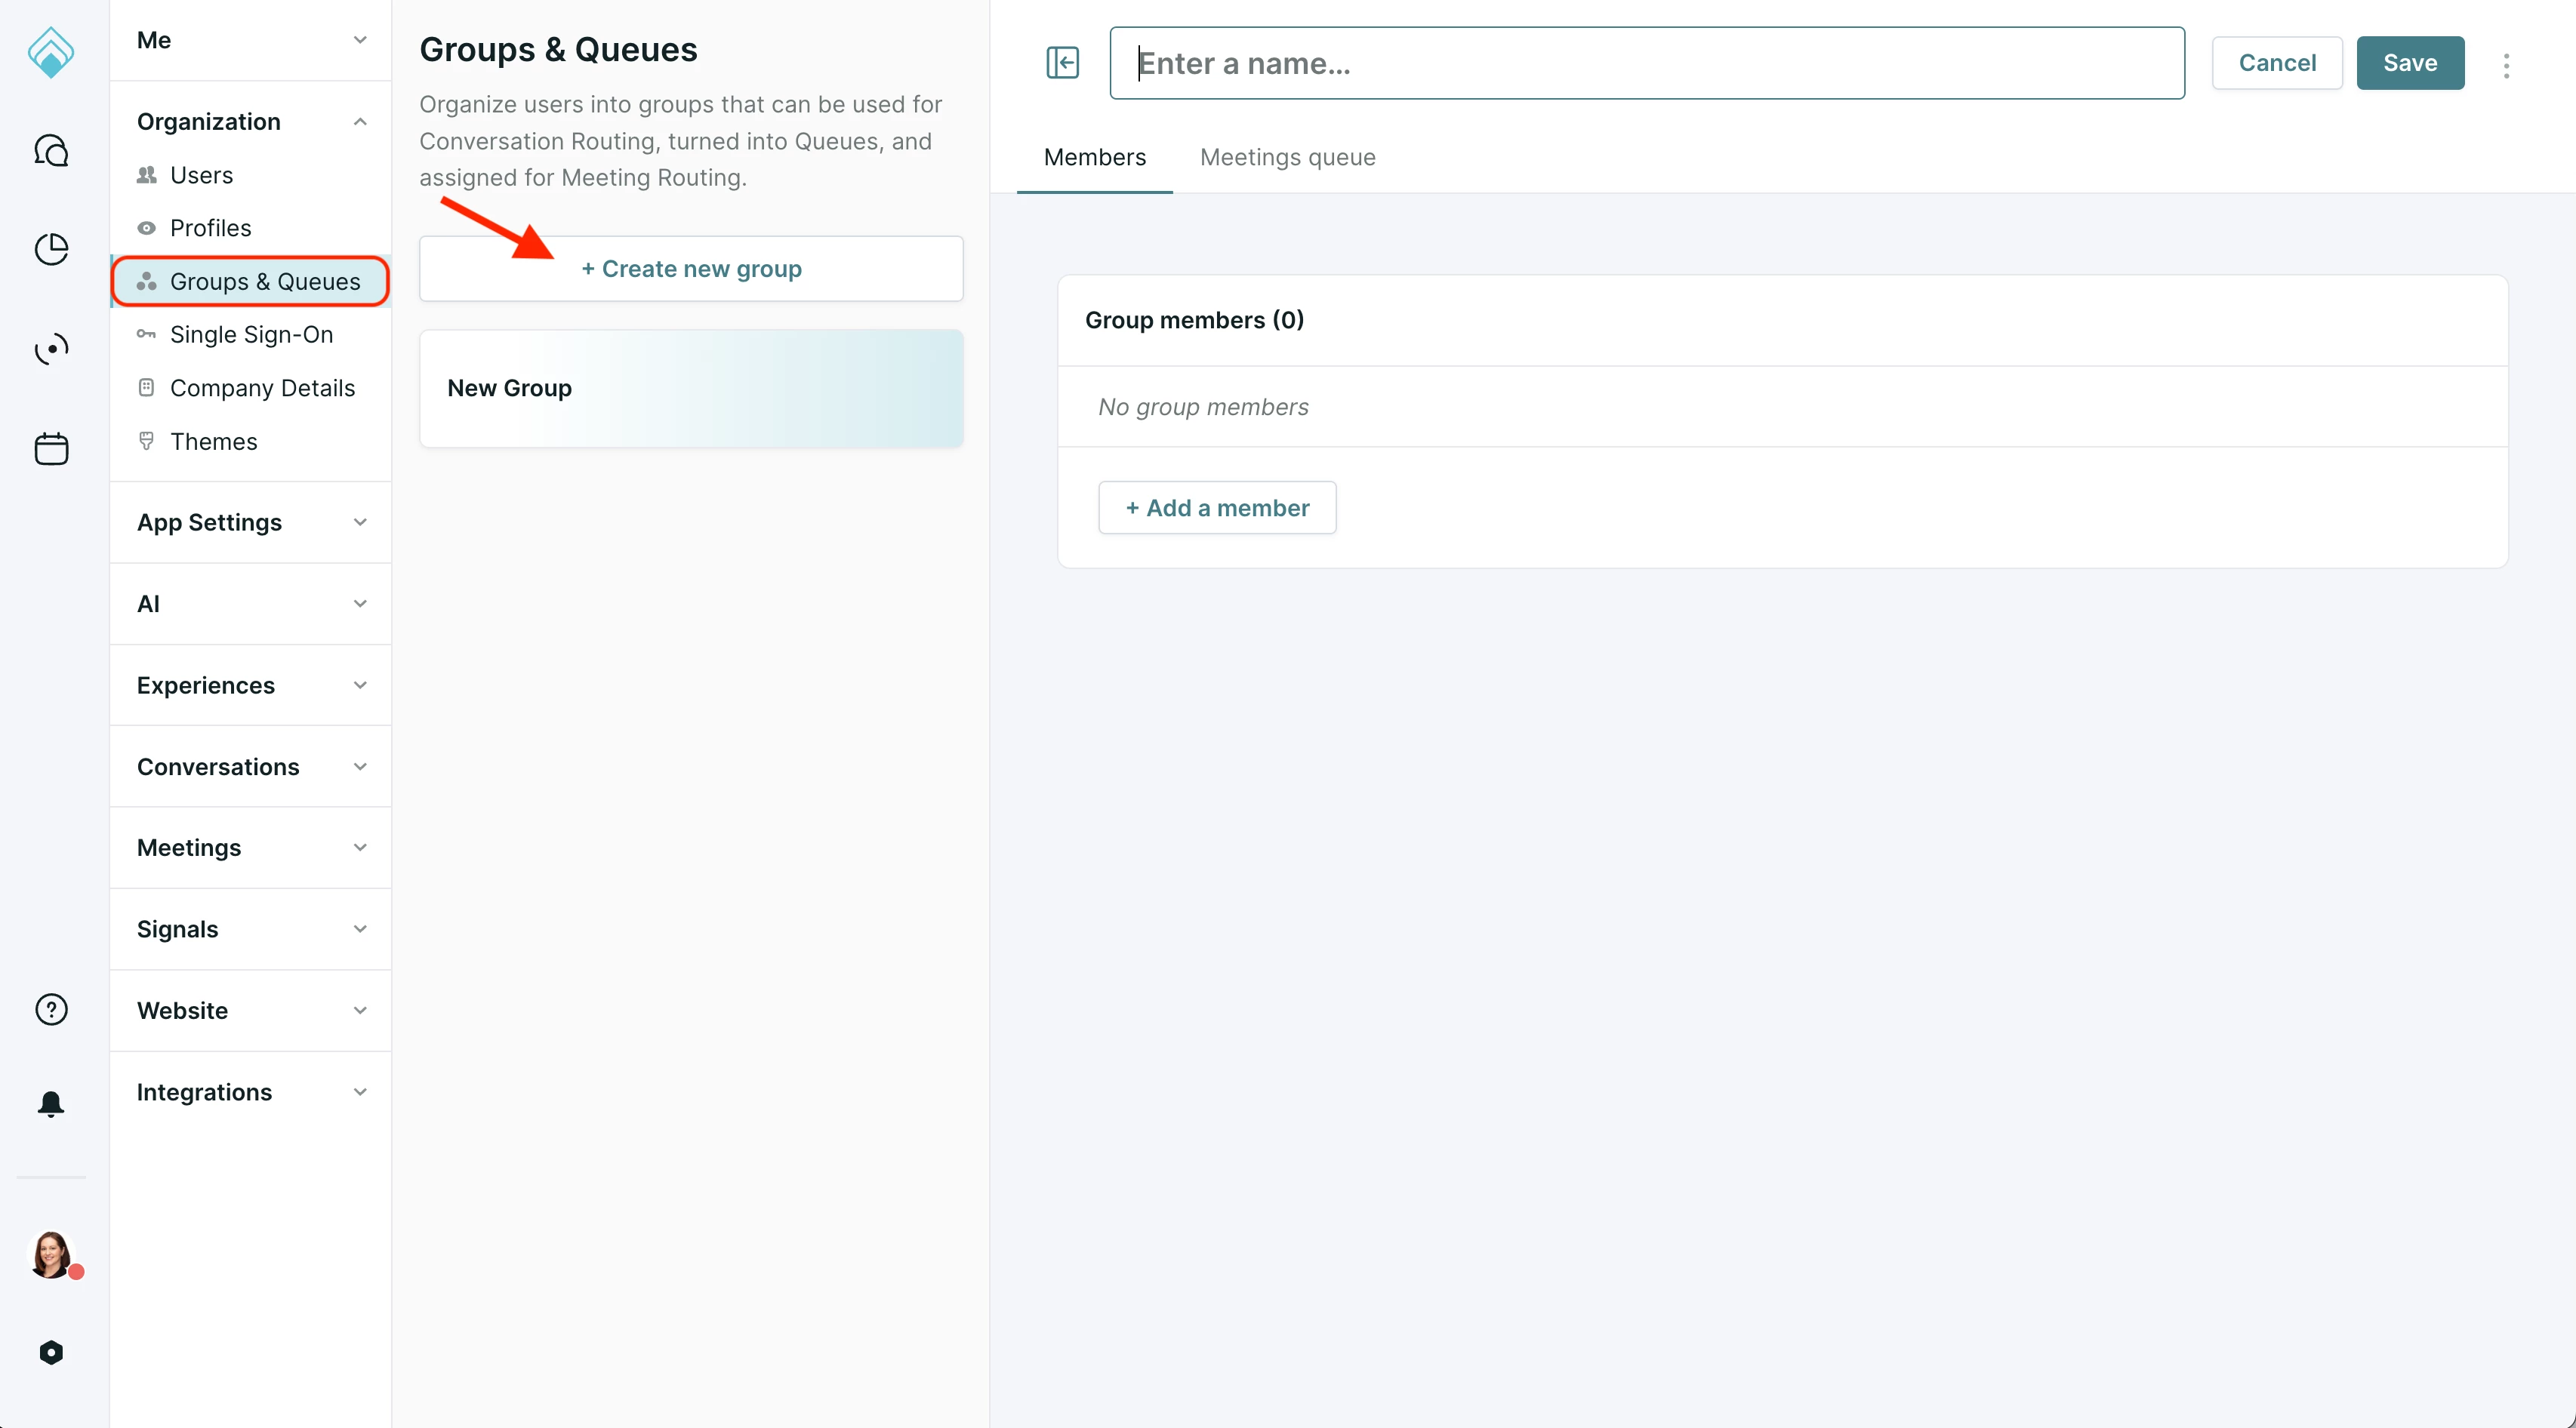
- If you are creating a new group, you must add a name for the group and at least one group member.
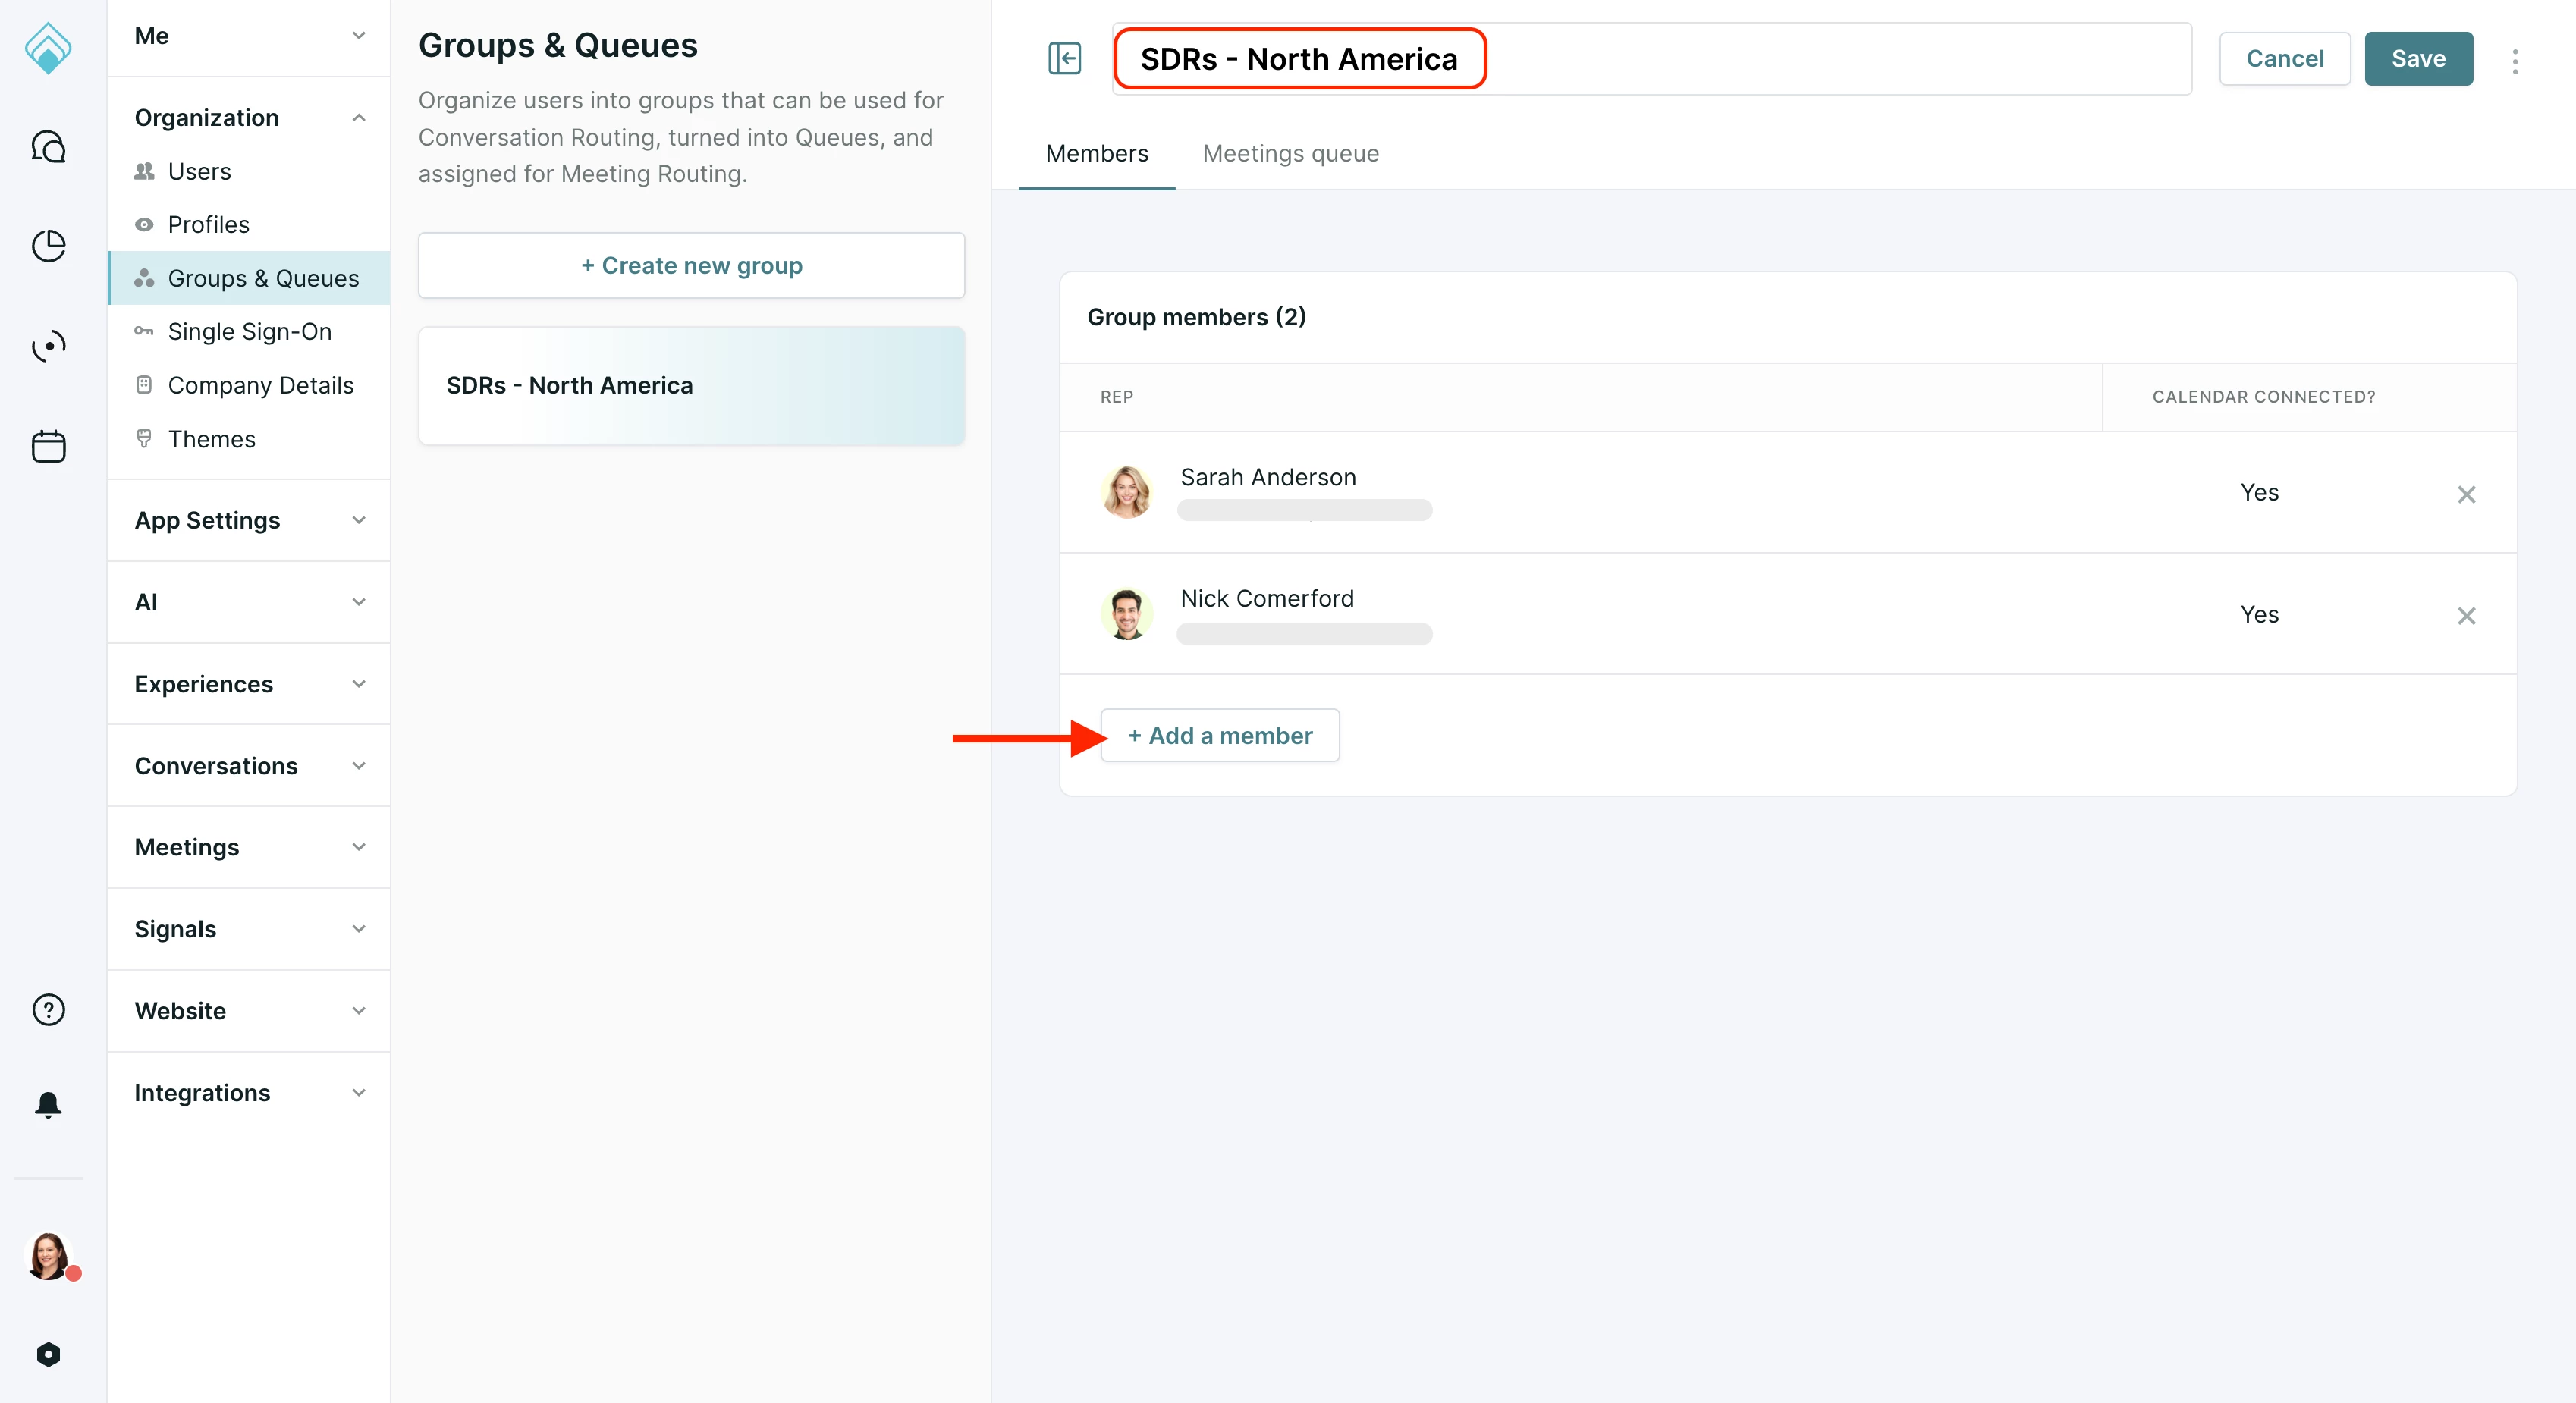
- Then, select the Meetings Queue tab and toggle on "Use this group as meetings queue".
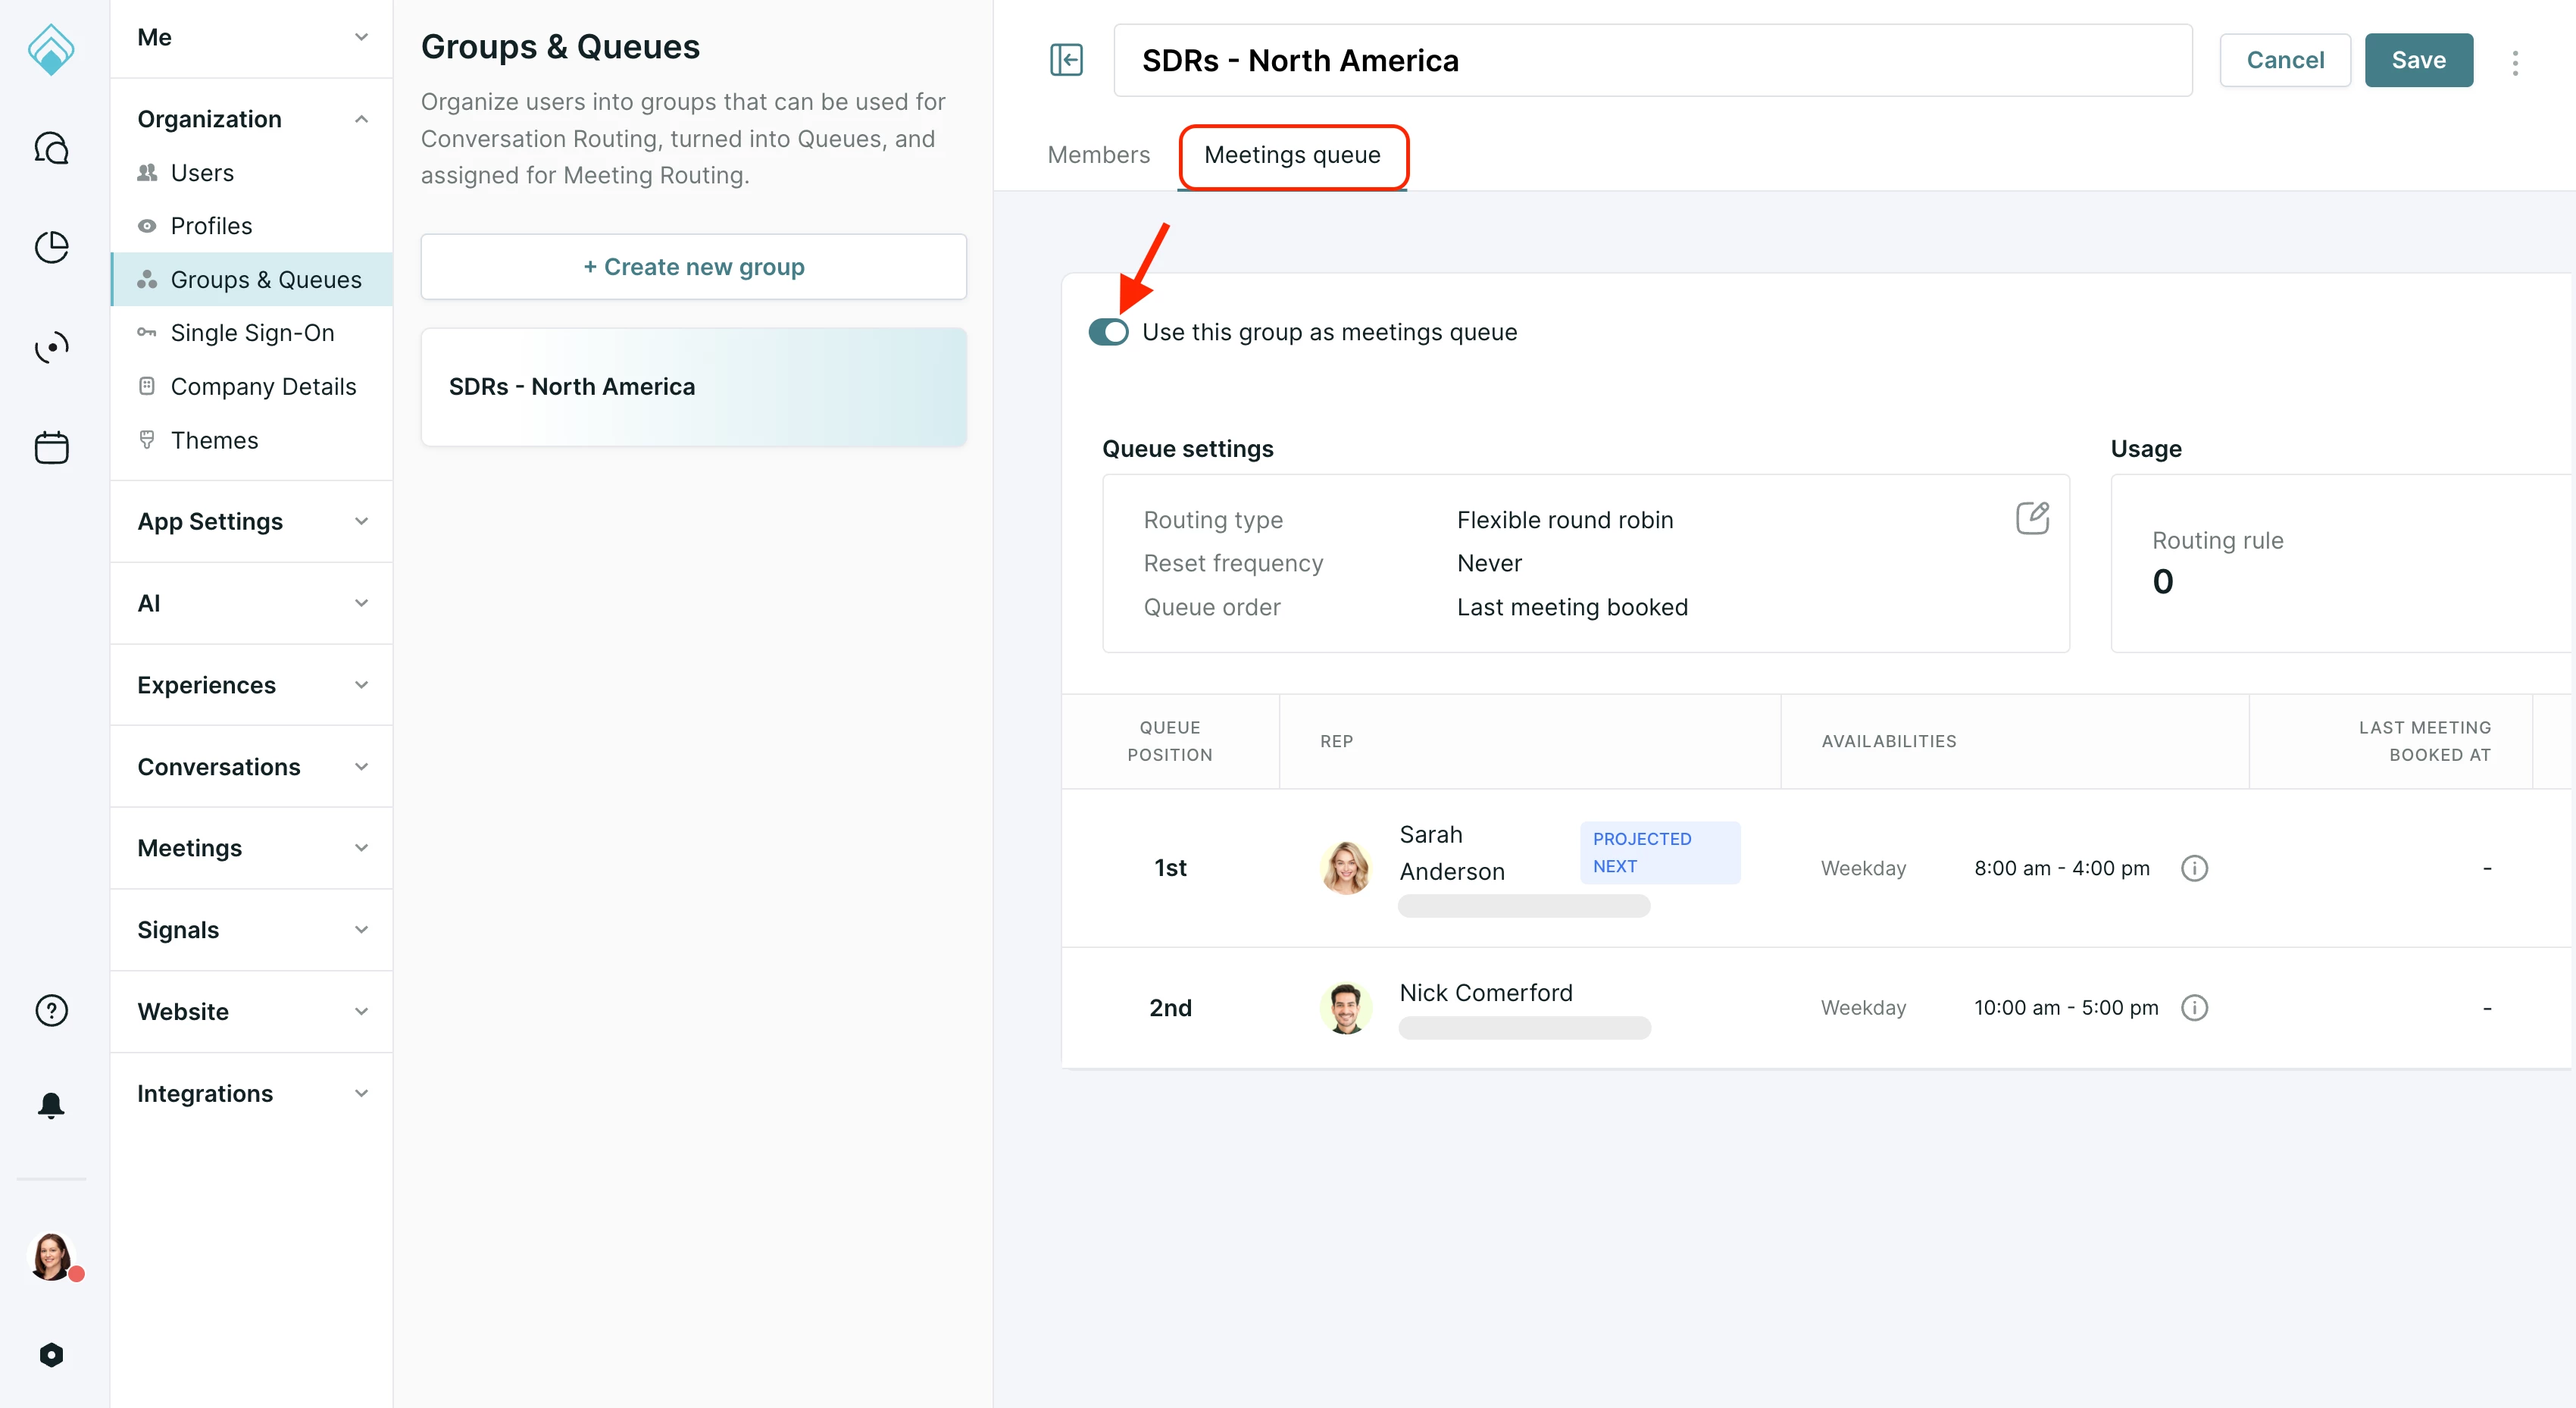
2. Define the queue settings
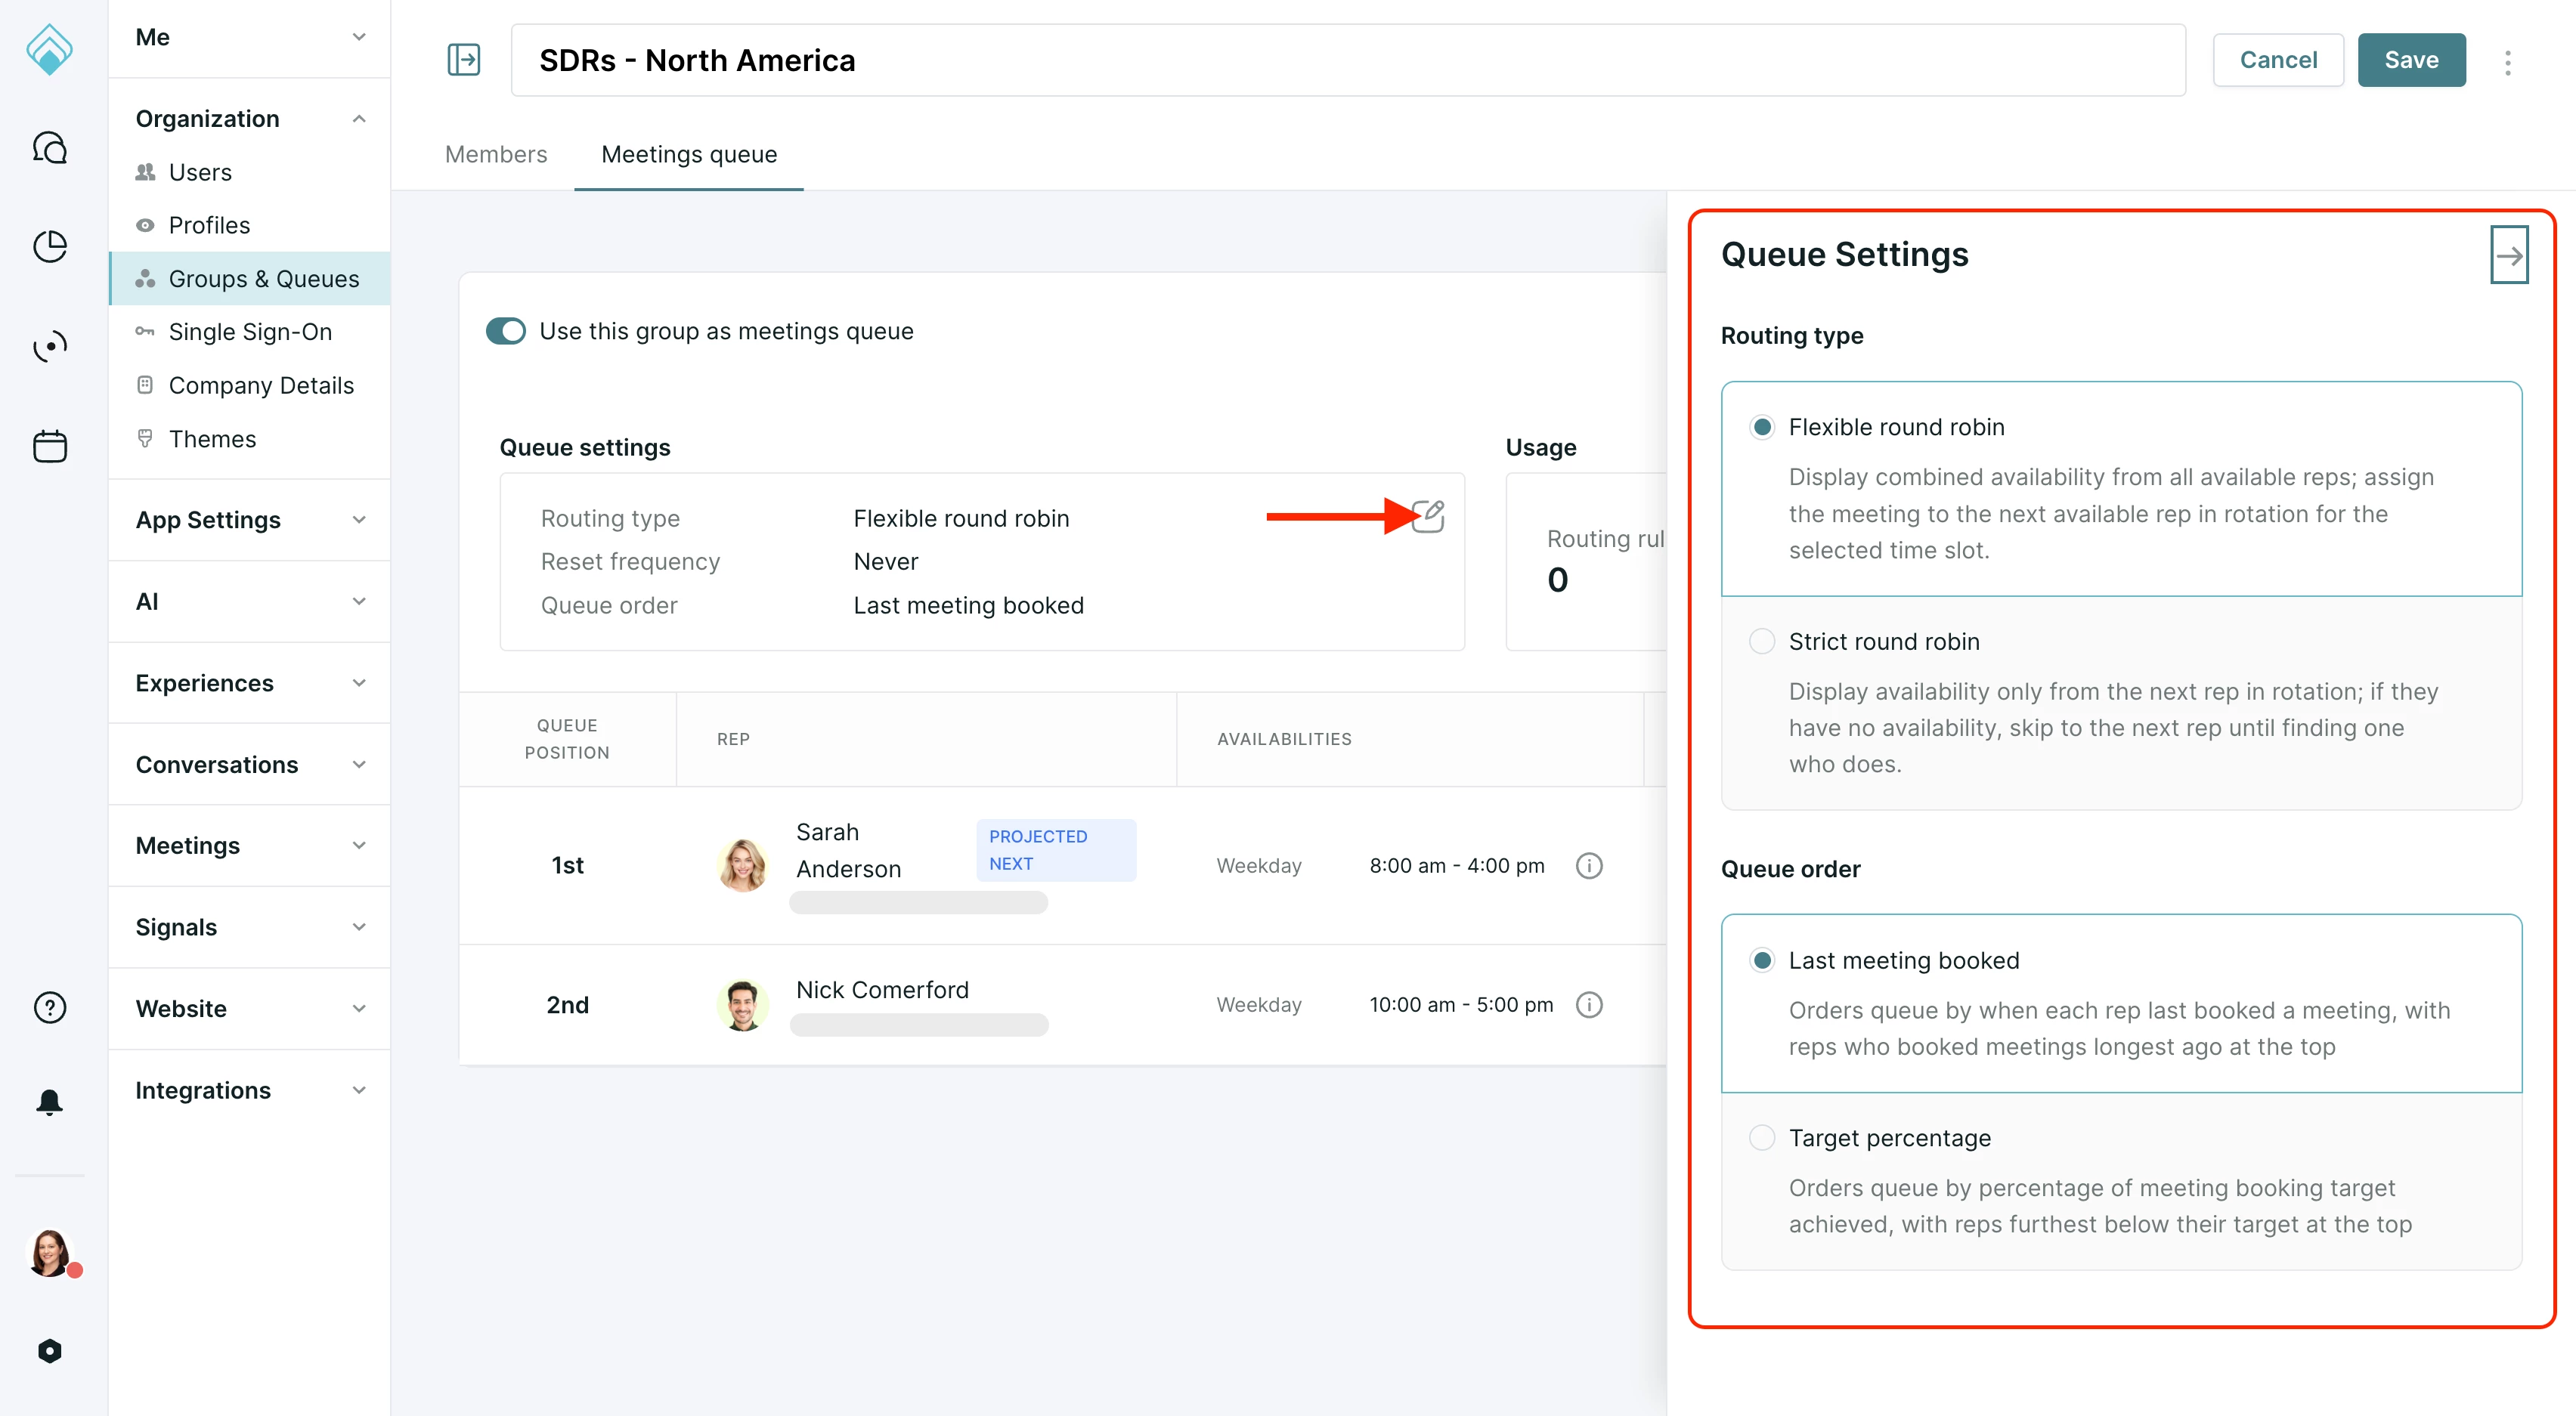
- Click the edit icon to define the queue settings.
-
Under Routing type, select an option:
-
Flexible round robin: Display combined availability from all available reps; assign the meeting to the next available rep in rotation for the selected time slot.
-
Strict round robin: Display availability only from the next rep in rotation; if they have no availability, skip to the next rep until finding one who does.
-
-
Under Queue order, select an option:
-
Last meeting booked: Orders the queue by when each rep last booked a meeting, with reps who booked meetings longest ago at the top.
-
Target percentage: Orders the queue by percentage of meeting booking target achieved, with reps furthest below their target at the top. If you select this option, you must also choose a Reset Frequency:
-
Monthly: Reset occurs automatically at midnight on the 1st of each month.
-
Quarterly: Reset happens automatically at midnight on the first day of the quarter.
-
Never: Stats will accumulate without resetting.
-
-
- Click Save.
3. Add the queue to a Routing Rule Set
- Go to Settings → Meetings → Routing.
- Click Create new routing rule set or select a rule in an existing routing rule set.
- In the "Book with the following" section of the rule, select your Meeting Queue from the dropdown menu.
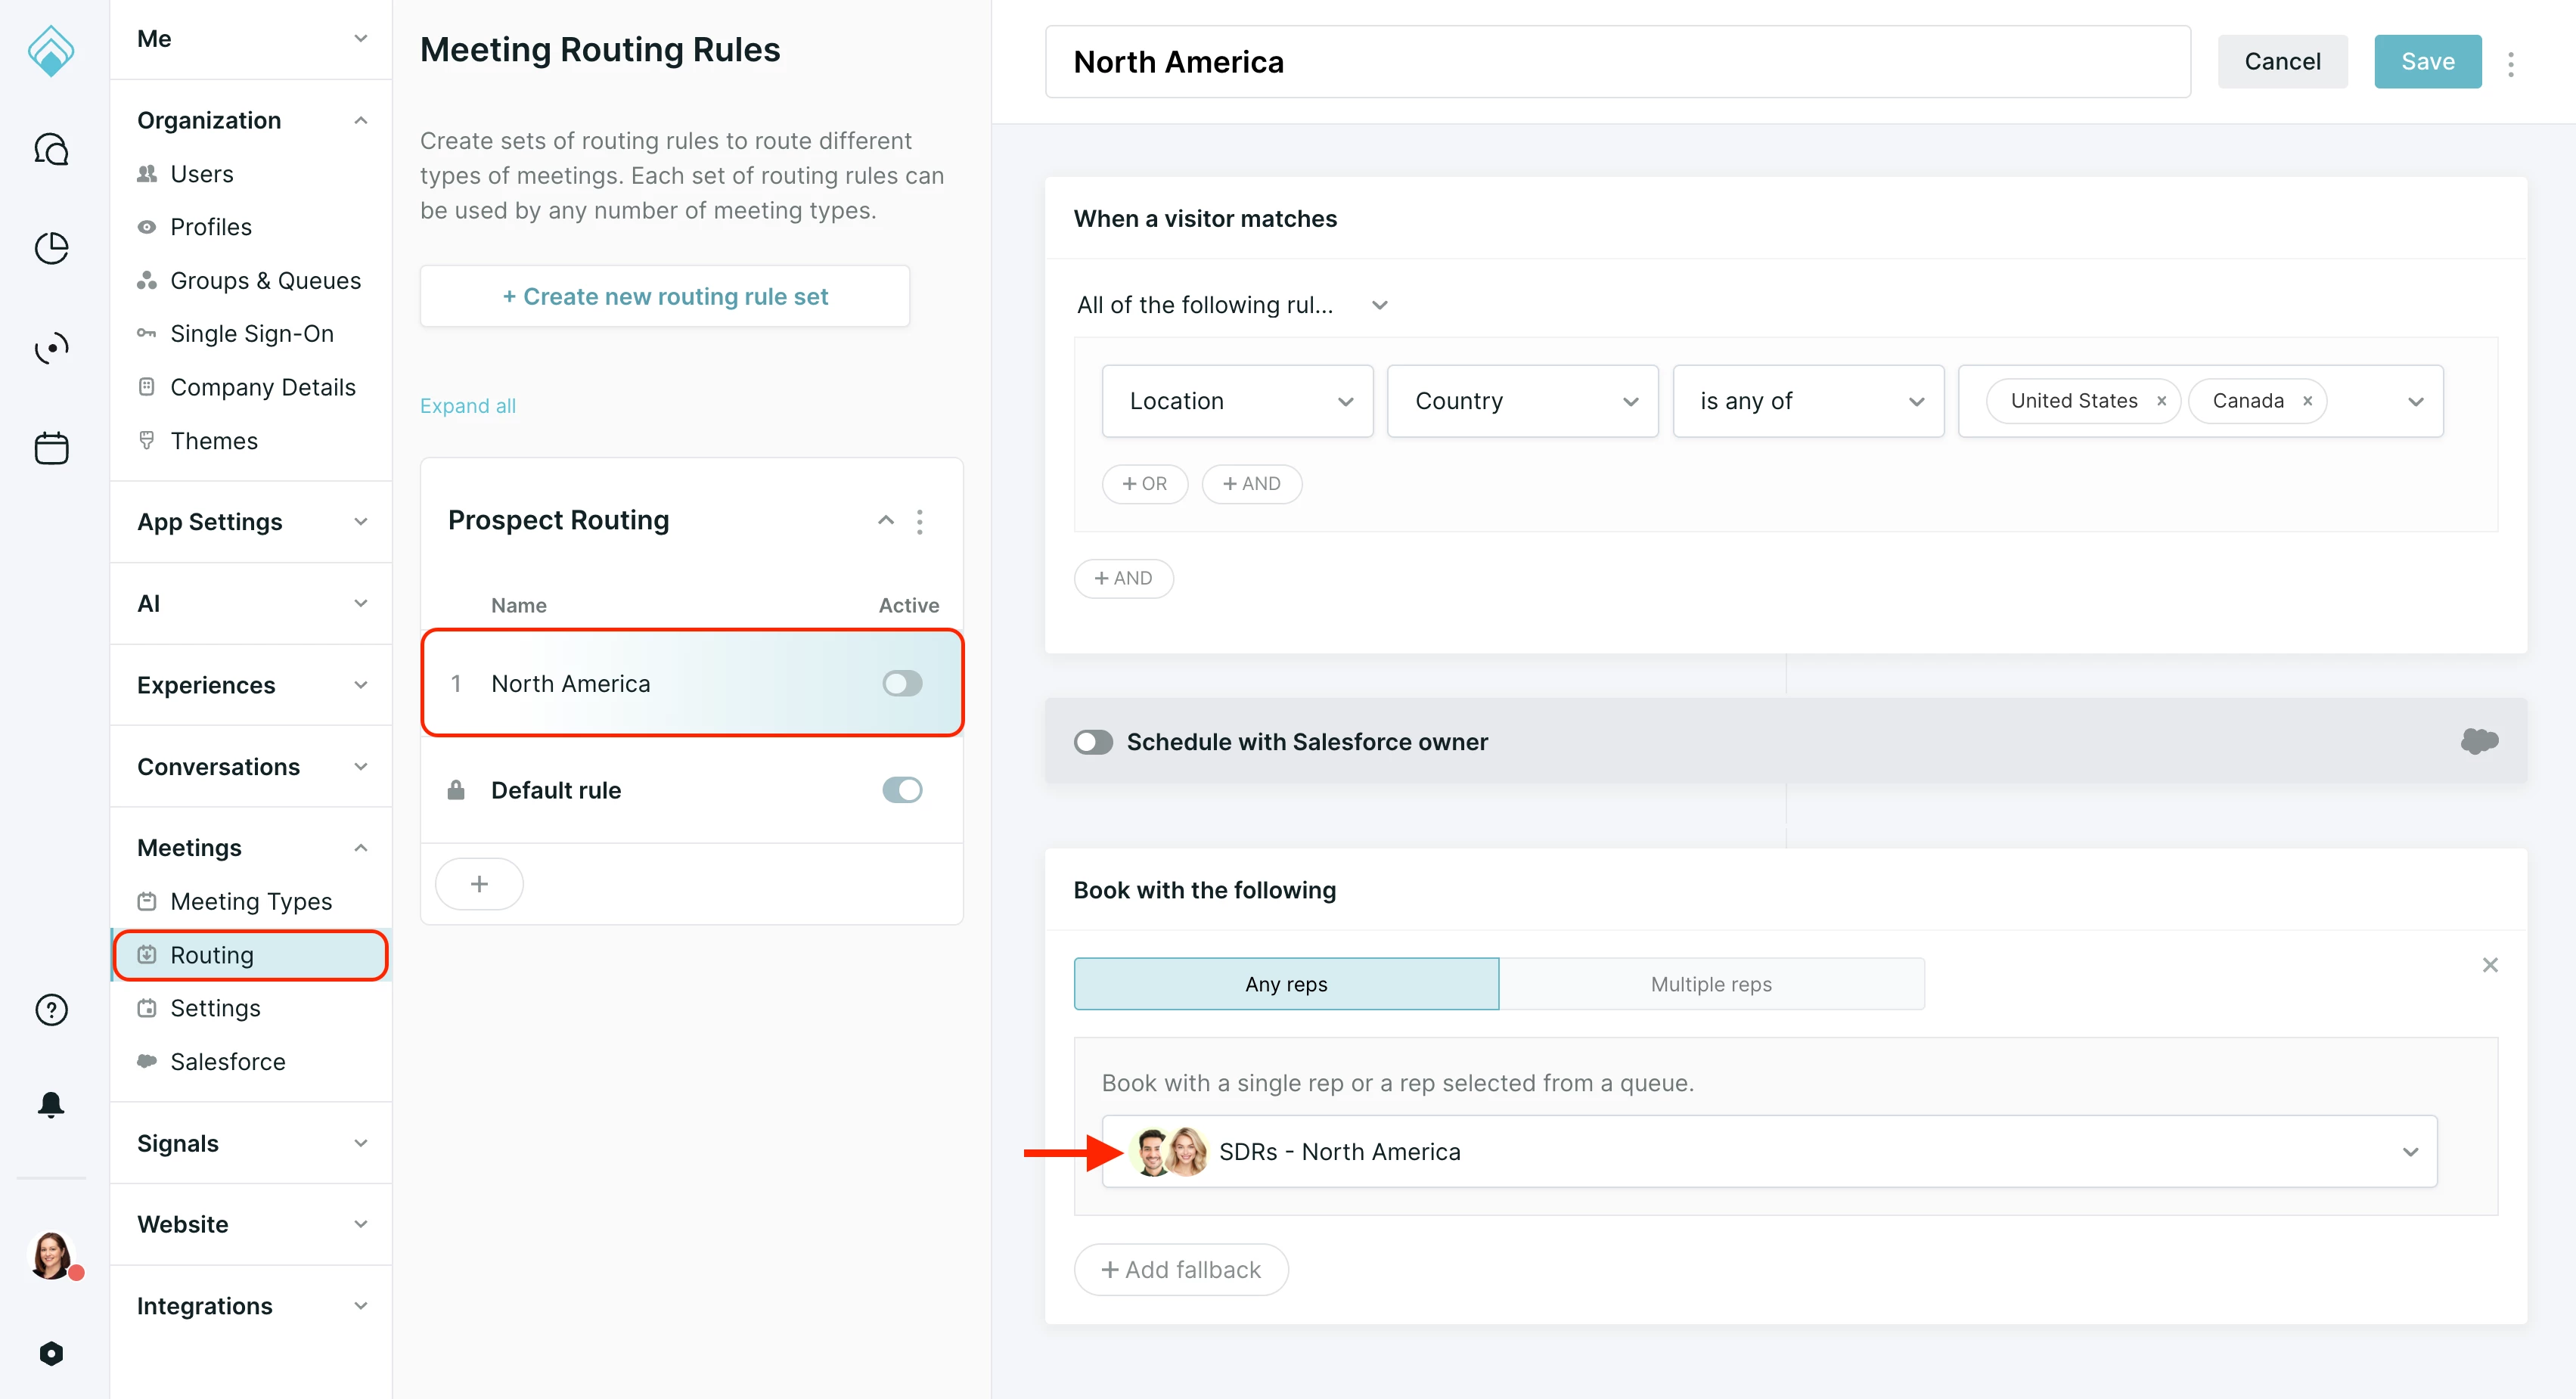
-
Click Save.
4. Assign the Rule Set to a Meeting Type
-
Go to Settings → Meetings → Meeting Types.
-
Click Create new meeting type or select an existing meeting type.
-
On the Meeting Settings tab, select your routing rule set from the dropdown menu.
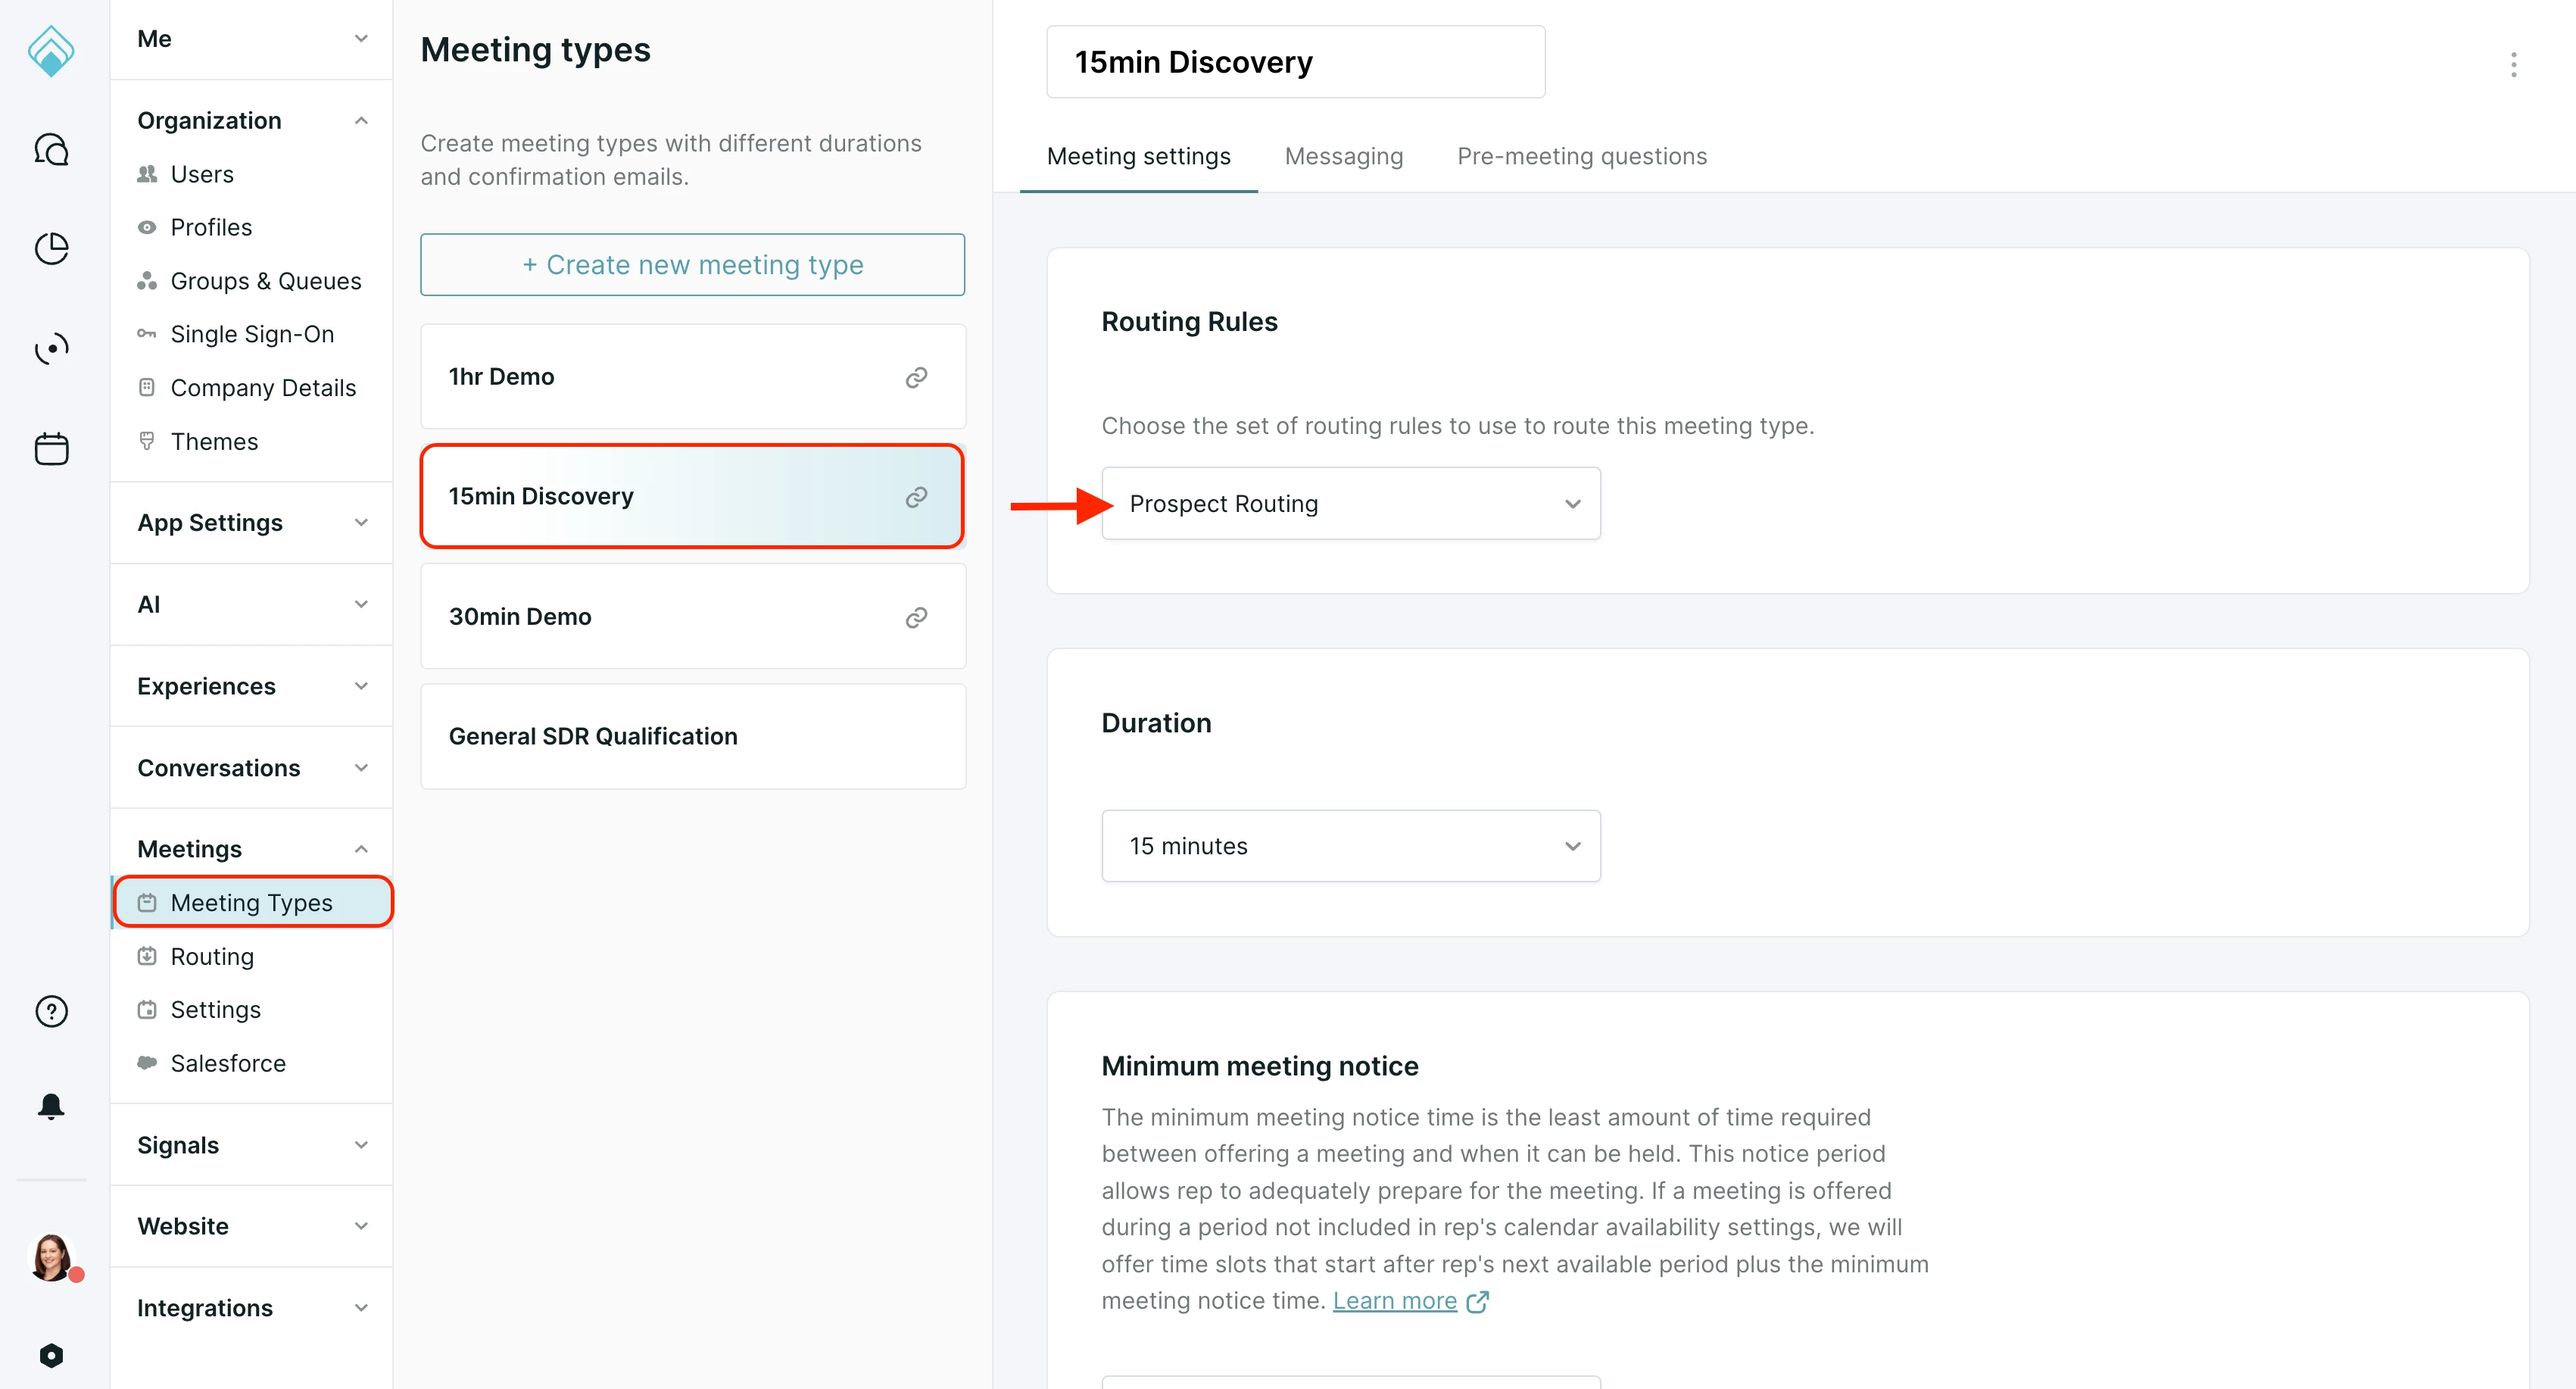
-
Click Save.
How to monitor a Meeting Queue
Once your queue is active, you can easily track its performance and see the live routing order from the Groups & Queues dashboard.
-
Go to Settings → Organization → Groups & Queues.
-
Select the group that has been enabled as a queue.
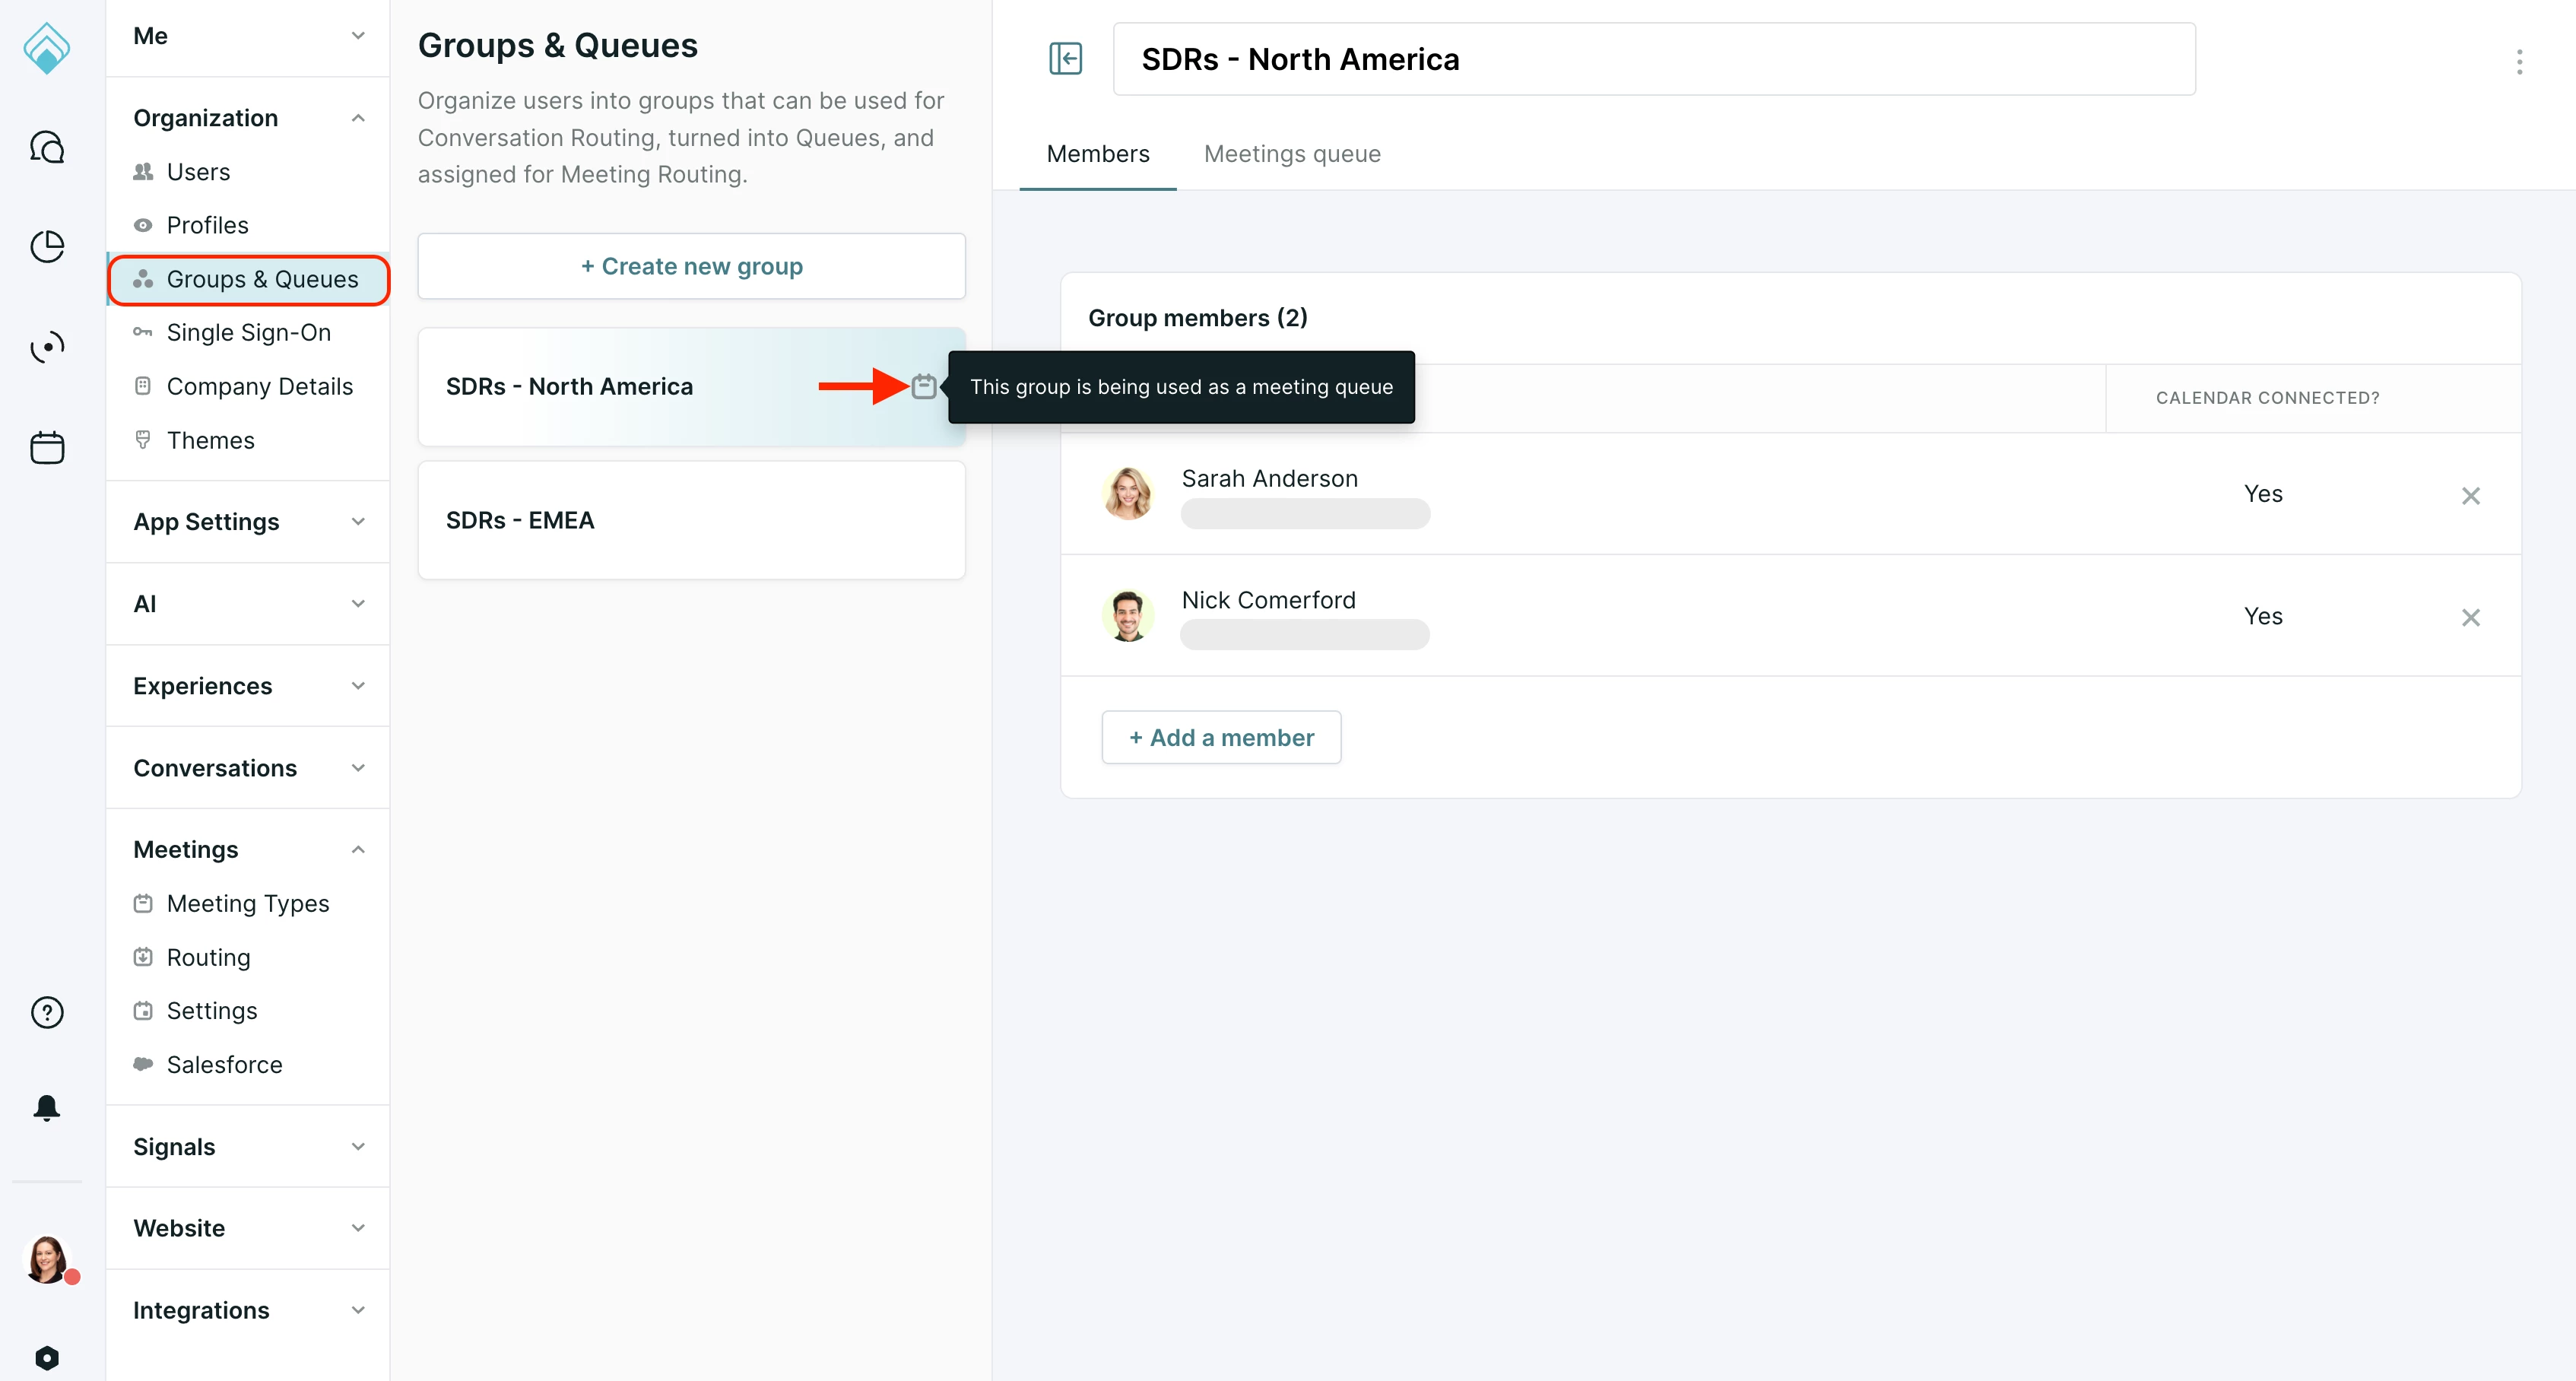
-
Then, select the Meetings Queue tab to view the queue dashboard.
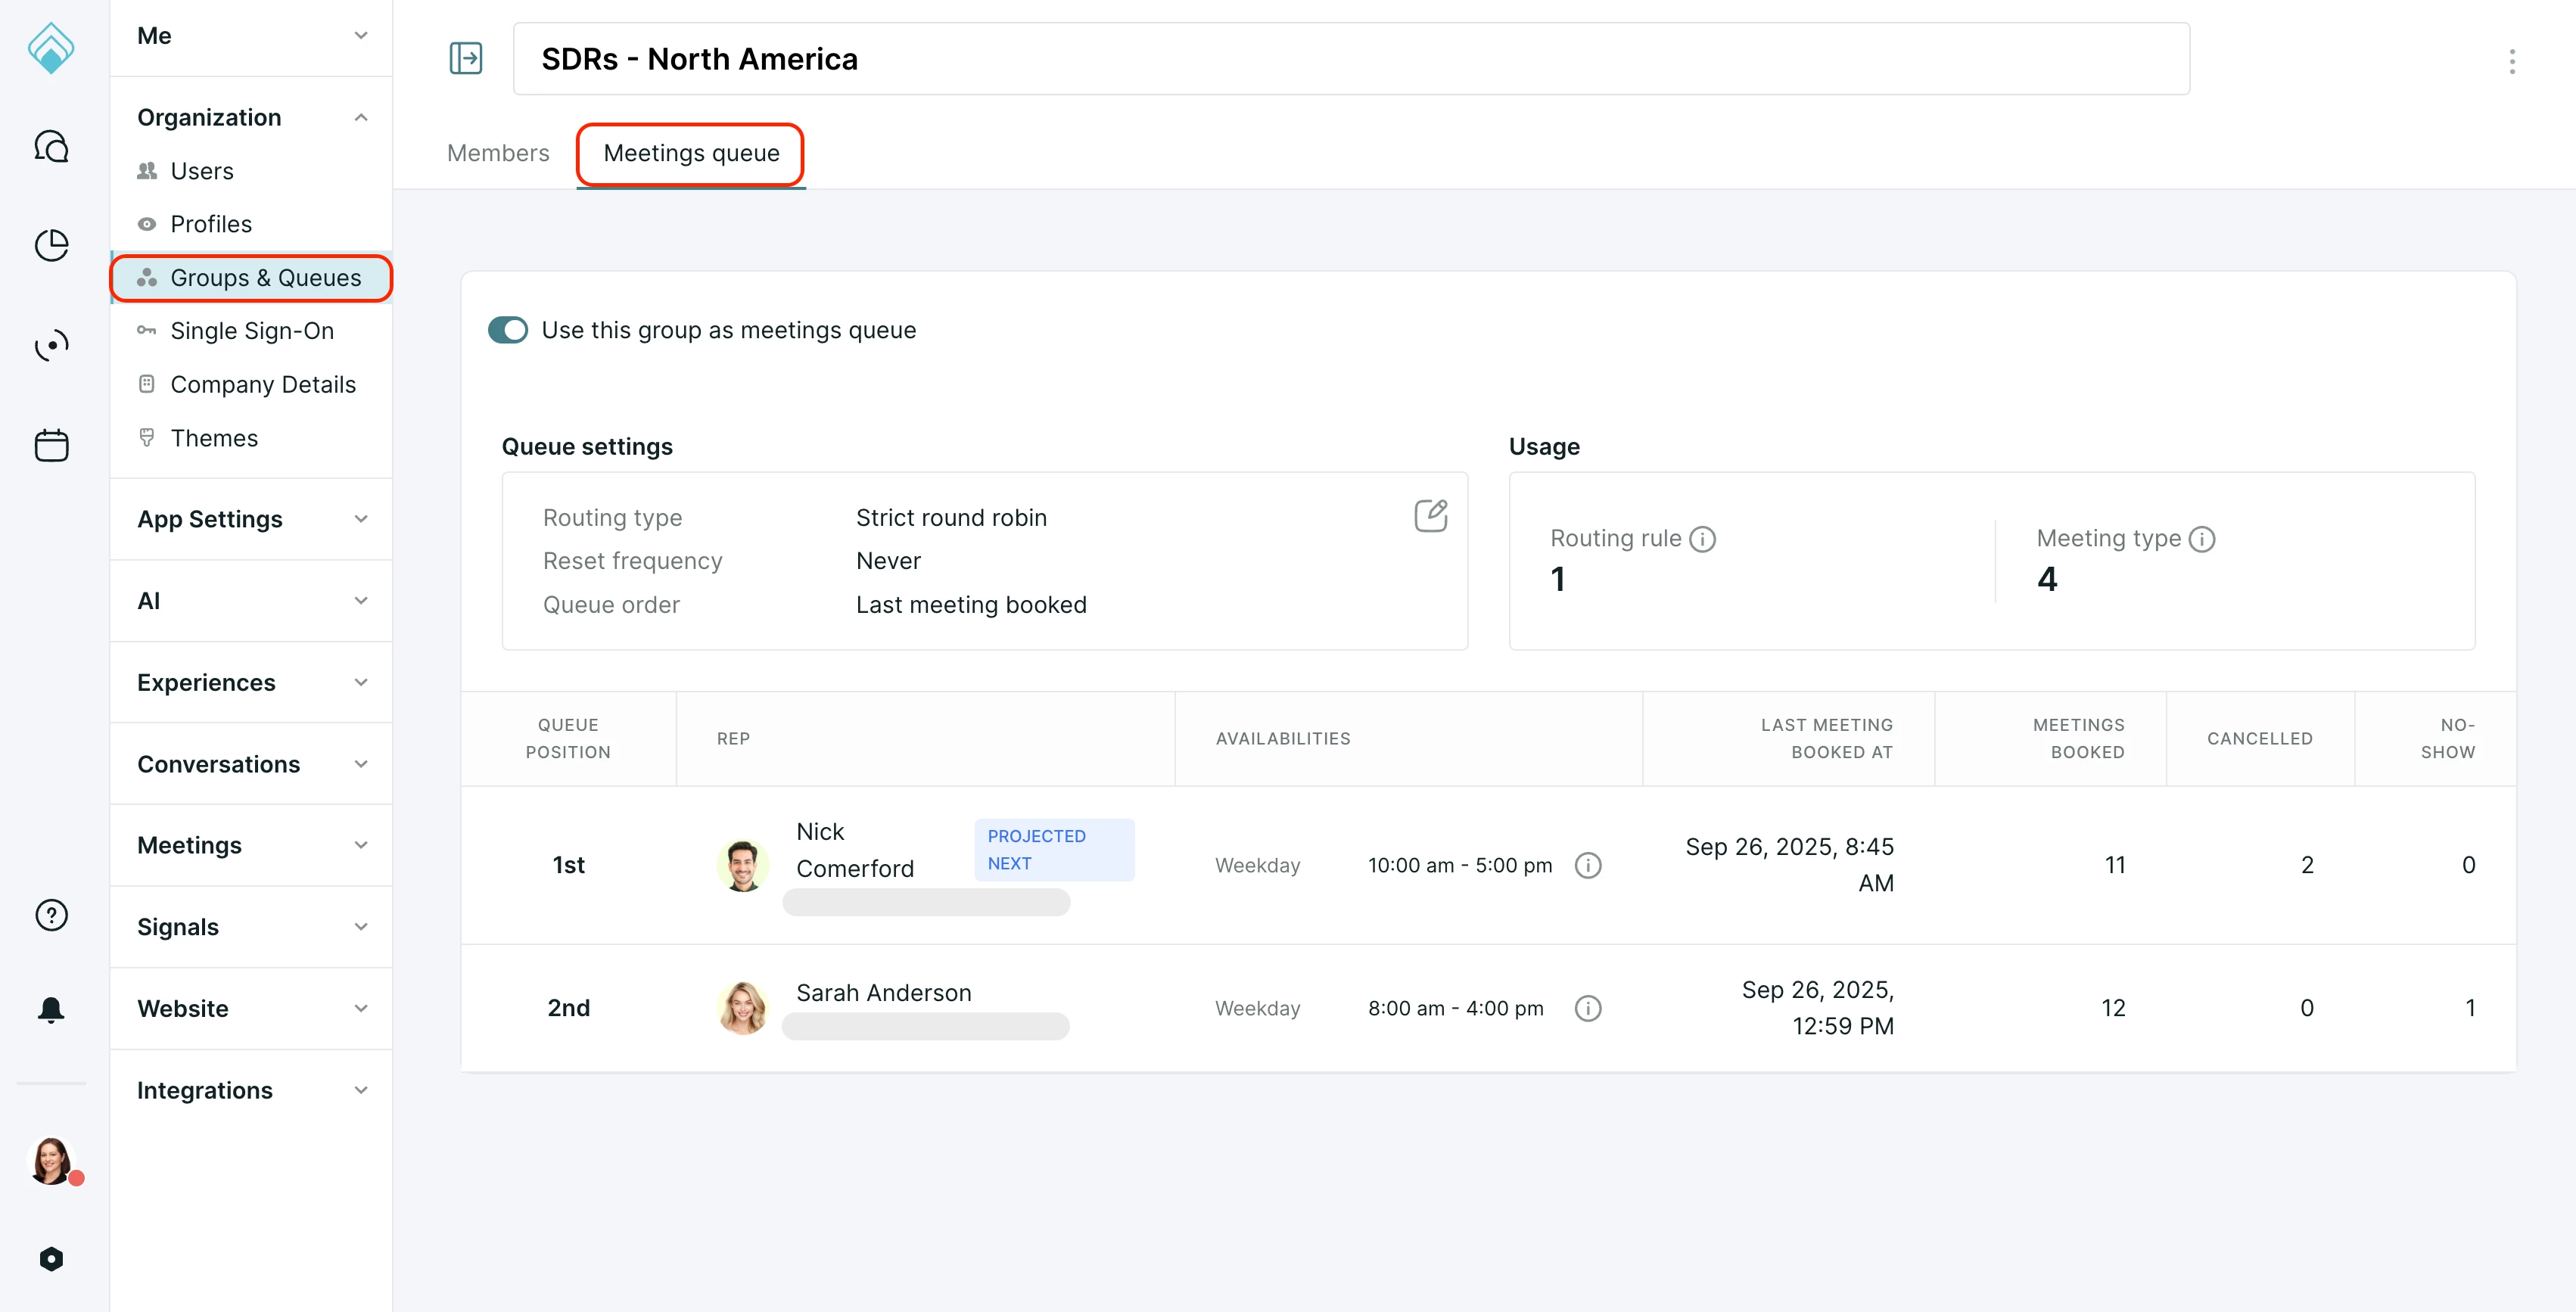
-
From this dashboard, you can:
-
View the list of reps to see who is "Projected Next".
-
Verify the reps’ calendar settings by hovering over the information icon in the Availabilities column.
-
Review performance stats like Meetings Booked, Cancelled, and No-Showed.
-
See exactly which Routing Rules and Meeting Types the queue is being used in.
-
Watch the queue order update in real-time as meetings are booked and cancelled.
-
Frequently asked questions
Here are answers to common questions about configuring and managing Meeting Queues.
Q: How do I create a fallback that includes reps from multiple teams?
A: You cannot select multiple queues in a single fallback rule. The correct approach is to create a new, single group that contains all the desired reps from the different teams. Once you enable that combined group as a queue, you can select it in your Routing Rule.
Q: How does a rep's calendar availability affect their spot in the queue?
A: The queue dashboard always shows who is "projected next" based on your routing logic. However, Qualified always respects a rep's real-time calendar availability. If the projected rep is unavailable for a time slot a visitor selects (e.g., they have an Out of Office block), the system will automatically skip them and offer the meeting to the next available person in the queue.
Q: Can I manually move a rep to the top of the queue?
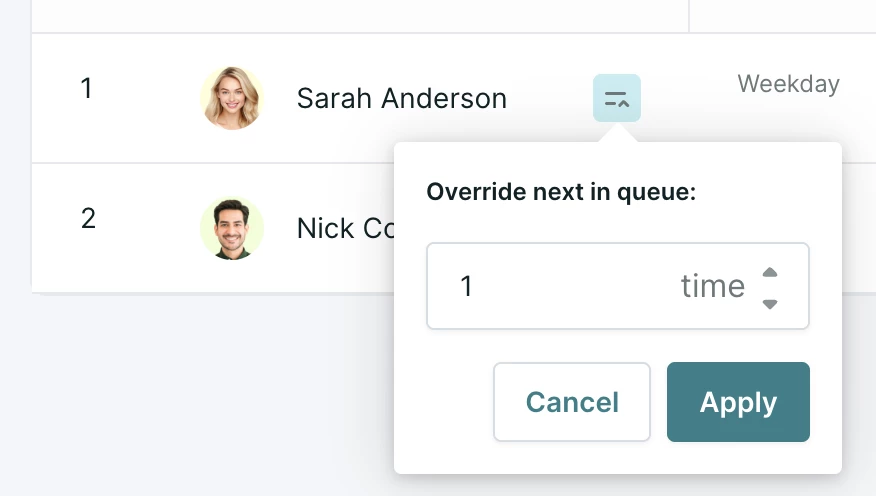
A: You can now manually have a rep “jump” to the front of the queue a set number of times. To do so, click the icon to the right of the rep’s name and select the number of times you would like to override queue priority. This rep will have first priority for that many meetings.
Q: If a rep is in two different queues, does a meeting from one affect their position in the other?
A: No. A rep's stats and position are calculated on a per-queue basis. Getting a meeting from one queue (e.g., an "Inbound Leads Queue") will not affect their position or stats in any other queue (e.g., a "Website Chat Queue").




.svg)


