


Hello Qualified Admins! 👋
We're excited to announce the rollout of User Profiles, our new and improved system for managing permissions in Qualified. This upgrade is designed to make managing your team more scalable, consistent, and secure.
For many of you, this transition will be seamless. If your team uses only the default "Admin," "Chat," and "Meetings" roles, the good news is your user permissions will not change! These three default roles will now be non-editable profiles, but they function exactly as they did before.
So, who is this migration guide for?
This guide will help you determine your next steps based on your current configuration.
First, let's check your setup. Go to Settings → Organization → Users and scroll to the far-right "Role" column. What you see there will guide you to the right path below.
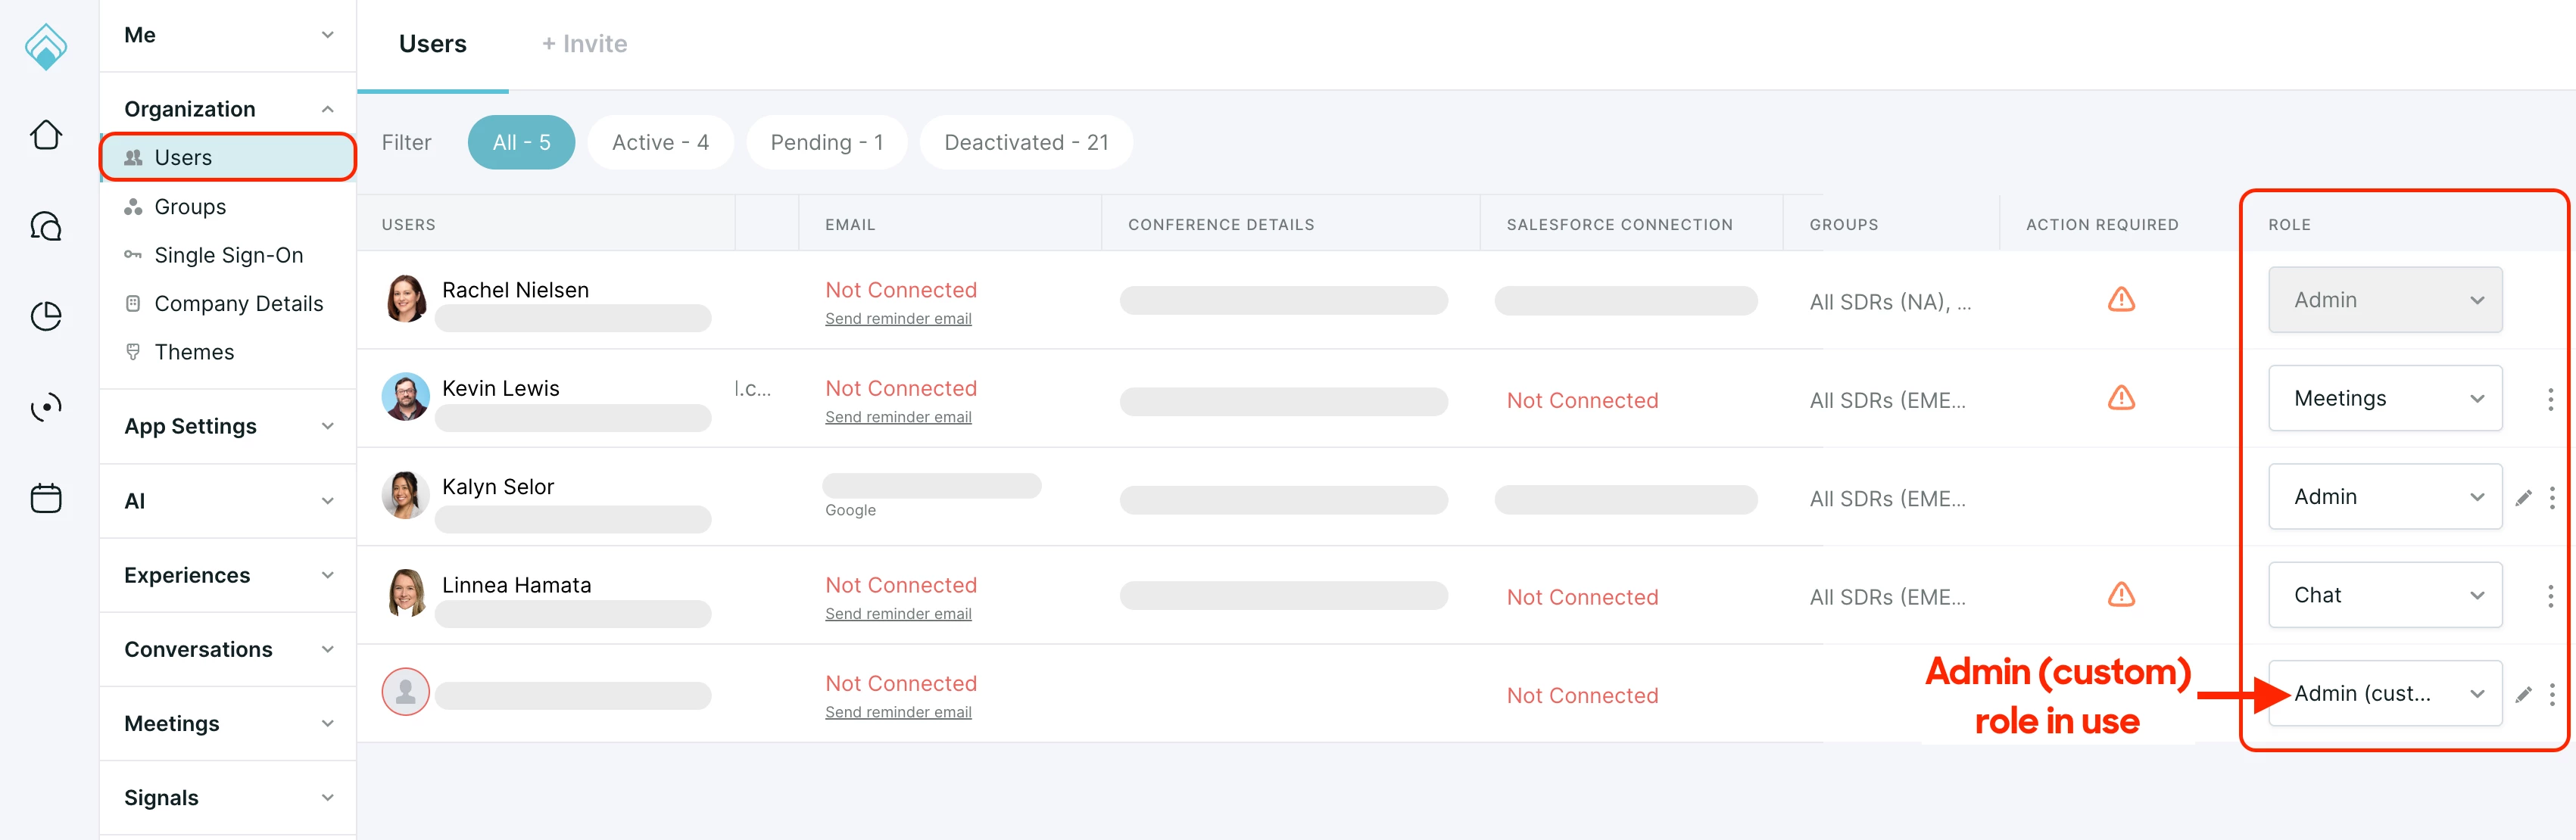
- If you see "Admin (custom)" for any user
This detailed migration guide is for you! Your existing custom roles will be migrated, and the steps below will walk you through how to standardize them into clean, reusable profiles.
- If you see ONLY "Admin," "Chat," and "Meetings" roles
Great! Your migration is straightforward. You can contact your Qualified Success Architect (QSA) now to enable this feature. Once it's on, you'll gain the new ability to create your own custom profiles. To learn more about what's possible, check out our new knowledge base article: How to manage users in Qualified.
- If you use SSO with SCIM for provisioning users
You are likely in the second group (no custom roles). For you, this is a powerful new feature. After your QSA enables User Profiles, you can begin creating custom profiles and work with your IT team to map them in your identity provider. This new knowledge base article includes those details: How to manage users in Qualified.
Migration Guide for Teams with "Admin (custom)" Users
For those with custom roles, a little prep work will make the migration process a breeze.
Before You Begin: A Quick Prep Guide
-
Plan Your New Profiles: Look at your current "Admin (custom)" users and identify the common permission sets. Your goal is to consolidate them into 2-4 standardized profiles (e.g., "Sales Manager," "Marketing Ops")
Pro-Tip to Reduce Cleanup: When you migrate, the system will create a new "Custom #" profile for every unique combination of permissions your "Admin (custom)" users have. If you have five custom admins with slightly different settings, you'll get five auto-generated profiles! To minimize this and start with a cleaner slate, you can temporarily change these users to the default "Chat" role before asking your QSA to enable the feature. Once migrated, you can then build your new, standardized profiles and assign users accordingly.
-
Contact Your QSA: When you are ready, simply reach out to your Qualified Success Architect (QSA) and ask them to enable the User Profiles feature for your account.
Making the Switch
Once your QSA has enabled User Profiles, you're ready to migrate. The steps below provide a detailed walkthrough. For a complete overview of all user management functions, you can always refer to our main knowledge base article: How to manage users in Qualified.
The core steps are the same whether you use passwords or SSO (without SCIM):
- Ignore Auto-Generated Profiles: Navigate to Settings → Organization → Profiles. You'll see several profiles named "Custom #." The system created these based on your old roles. We strongly recommend you do not edit these.
- Create Your New, Clean Profiles: Instead, click +Create profile to build the new, standardized profiles you planned out. This is your chance to create a clean, organized system.
- Reassign Users: Go to the Settings → Organization → Users settings and reassign each of your custom admins from their old "Custom #" profile to one of your new, clean profiles.
Quick Tip! When selecting the new profile from the dropdown list, make sure to click on the profile name. Typing the name and hitting 'Enter' will not save the change.
- Clean Up: Once all users are moved, return to the Profiles tab and delete the old, empty "Custom #" profiles to keep things tidy.


.svg)


