


When a visitor is matched to a Salesforce Account, Qualified can push Signals data to your mapped Account fields and display activity in an Account 360 view directly on the Account record in Salesforce. This article walks you through setting up field mappings, configuring permissions, and optionally enabling new Account creation from Signals.
Before you begin
Before mapping fields in Qualified, your Salesforce Admin needs to create new custom fields on the Account object in Salesforce to receive Signals data. There are two ways to do this:
- Unmanaged package - Download the Signals unmanaged package, , which includes a collection of pre-built custom fields on the Account object, plus reports and dashboard components for visualizing Signals data.
- Manual setup - Have your Salesforce Admin manually create the custom fields on the Account object.
Salesforce user permissions
To push Signals data into Salesforce, your Qualified Integration User needs the following permissions:
| Object | Read | Create | Edit |
|---|---|---|---|
| Accounts | X | X (optional) | X |
| Campaigns | X | X | |
| Contacts | X | X | |
| Leads | X | X | |
| Opportunities | X | ||
| The API Enabled permission must also be checked for the integration user | |||
📝 Note: The Create permission on Accounts is only required if you plan to use the Create new Accounts from Signals feature.
⚠️ Warning: If you implemented Qualified before 2022, you'll need to update your existing integration user's permissions to add Create and Edit access on Accounts.
Map Signals fields
Once your Salesforce Admin has added the new fields on the Account object, you're ready to map them in Qualified.
Refresh your Salesforce fields
- Go to Settings → Integrations → Salesforce → Connection.
- Find the “Salesforce fields” section and click the Update Fields button.
This pulls the latest custom fields from your Salesforce org into Qualified so they're available to map.
Map fields in Qualified
- Next, go to Settings → Signals → Salesforce.
- Under Signals Fields, map each Signals field (left column) to the corresponding Salesforce Account field (right column).
- Click Save.
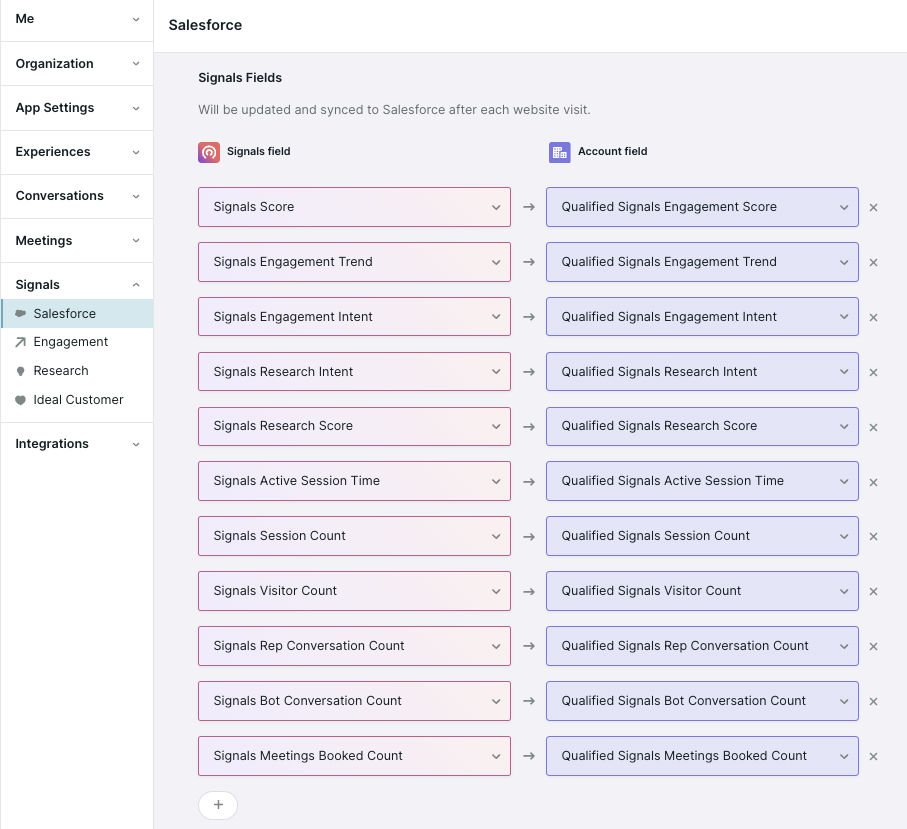
How Signals data is pushed to Salesforce
Qualified pushes an Account's Signals data to Salesforce at 9:00 PM PT, as long as no visitors from that account were active in the last 24 hours. When a visitor from that account does visit your site, Qualified pushes any updated Signals fields to Salesforce within five minutes after their session ends.
Create new Accounts from Signals
Signals can identify new ICP accounts visiting your site and push the most relevant ones into Salesforce — without leaving Qualified.
📝 Note: This feature is not available on all Qualified plans. Reach out to your Qualified Success Architect if you're interested in enabling it.
Confirm Salesforce permissions
Before mapping fields for new Account creation, confirm two things with your Salesforce Admin:
- Your Salesforce integration user has the Create permission on Accounts.
- If your org has custom validation rules for Account creation, make sure your field mappings will satisfy those rules.
Map Account creation fields
In your Qualified admin account:
- Go to Settings → Signals → Salesforce.
- Under New Account creation field mapping, map the Qualified field (left column) to the corresponding Salesforce Account field (right column).
- If needed, use the Default value textbox to override the Qualified field value when pushing a new Account to Salesforce. If left blank, the Qualified field value will be written to the new Account record.
- Click Save.
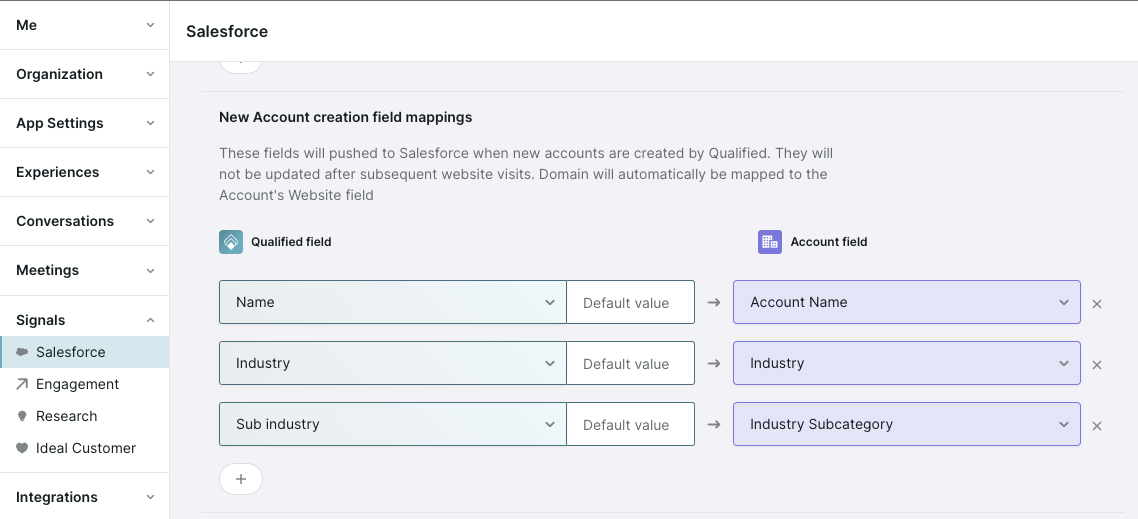
Embedded Visualforce component (deprecated)
📝 Note: If your team previously set up the Signals Account 360 view using the embedded Visualforce component, that configuration will continue to work — no changes are needed on your end. When you're ready to migrate to the current setup, see Displaying Qualified Data in Salesforce with the Canvas App.


.svg)


