


When building an experience for Qualified Conversations, experience actions form the steps of your experience that a visitor will go through. Think of them as the building blocks of Qualified experiences.
Show a custom greeting
A custom greeting is often the first step of a conversations experience, especially for a rules-based experience.
Show a custom greeting can only be used as the first message sent to the visitor, before the messenger has been opened by another step.
Configuring the custom greeting includes the messaging, style, and buttons that make up the greeting. Note that the color palette, logo images, and button shapes are controlled by your messenger theme settings.
There are a few elements to customizing custom greetings:
Greeting style
There are four greeting styles to choose from, which will control the look and feel of your greeting:

The Minimal style is best suited for visitors on mobile devices, where screen real estate is at a premium. Note that if you have selected the Duotone, Full Color, or White styles, there is an optional checkbox to show minimal style to mobile visitors. This setting is recommended, and will replace the configured setting with the minimal style when a visitor is on a mobile device.
Graphic
In all styles (except minimal), you will be able to select the graphic that appears above the text of your greeting. There are four options:

- Faces: Shows three profile pictures of Qualified users. Will prioritize reps who are online. A green dot will appear next to the faces if at least one rep is available for live chat.
- Logo: Shows a company logo. By default, this will show the logo set in messenger themes, but a different logo may be uploaded.
- Image: Upload an image that will display at the top of the greeting. Choose whether the image is bounded by the background color of the greeting, or spans the full width of the greeting. Note that this option is not available with the Duotone greeting style.
- None: No image is shown; the greeting is text-only.
GIFs are not supported in custom greetings at this time.
Title (optional)
A bolded message that greets your visitors.
Body
The main message that greets your visitors. Use this to provide a value proposition, welcome visitors, or promote content.
Buttons
Configure the text of the buttons that visitors can select in your greeting. At least one button must be included. Greeting button selections branch the experience, and they aren't saved to a field. To record a visitor’s answer, use an Ask a question step with a field.
Qualified Markdown is not supported within custom greetings.
Messenger actions
These actions allow you to communicate with your visitors via the Qualified Messenger, either as a first message or after the conversation has started.
Send a message
Send a message in the chat window to your visitor, without requiring any input or response from them. This can be used to break up conversation flow, prepare the visitor for a question, or communicate an important piece of information.
Ask a question
Ask your visitors a question to determine how they should proceed through the experience.
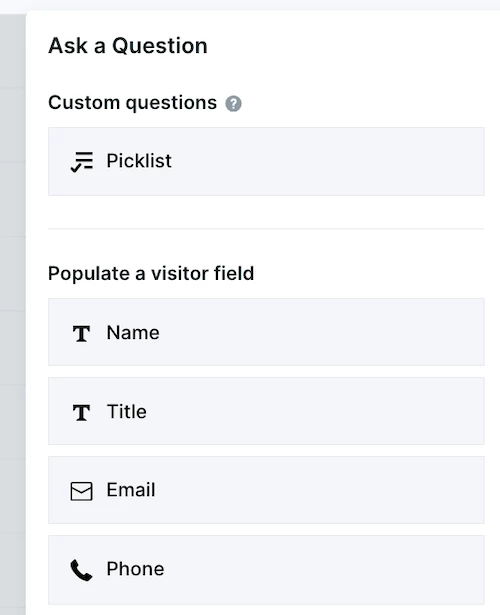
Questions to visitors fall into two categories:
Custom question (picklist)
Define a question for your visitors and populate picklist options that will allow them to respond.
Fields
Ask your visitor to fill in one of your Qualified fields. The field type sets the format of the visitor's response.
When you ask the visitor to fill in a field, you can choose to skip the question if the field already has a value. This avoids asking questions the visitor answered in an earlier interaction, or that an integration such as Salesforce or your marketing automation platform has already filled in.
Custom question answers aren't stored, and you can use them only to branch within the current experience. To record a visitor's response or push it to an external system, capture it in a field.
Offer a meeting

Allow your visitor to book a meeting within the messenger window. When this action is selected, three steps are created by default:
Route for a meeting
This node will determine the meeting type that is offered, and thus the routing rules that will be used to determine which calendar(s) are shown.
If you need to route to a different set of users or a specific user within your experience, select I know who I want to route to and configure custom routing for this particular meeting offer.
Offer a meeting
This node shows a preview of the meeting booker. Use this to edit your meeting title, and determine whether you’d like to block or allow personal email addresses.
Confirmation message
After a visitor books a meeting, a message is created to thank the visitor for booking the meeting. This text can be edited or the confirmation message can be removed if desired.
Confirmation message default text
Your meeting is confirmed and an invite has been sent to your inbox.
We look forward to speaking with you!
Start Multi-modal AI SDR
Hand off the conversation to your AI SDR agent, with text, voice and video conversations available. This step ends the experience, so you can't add actions after it.
Note: If you don't see the Start Multi-modal AI SDR step, contact your Qualified Success Architect (QSA).
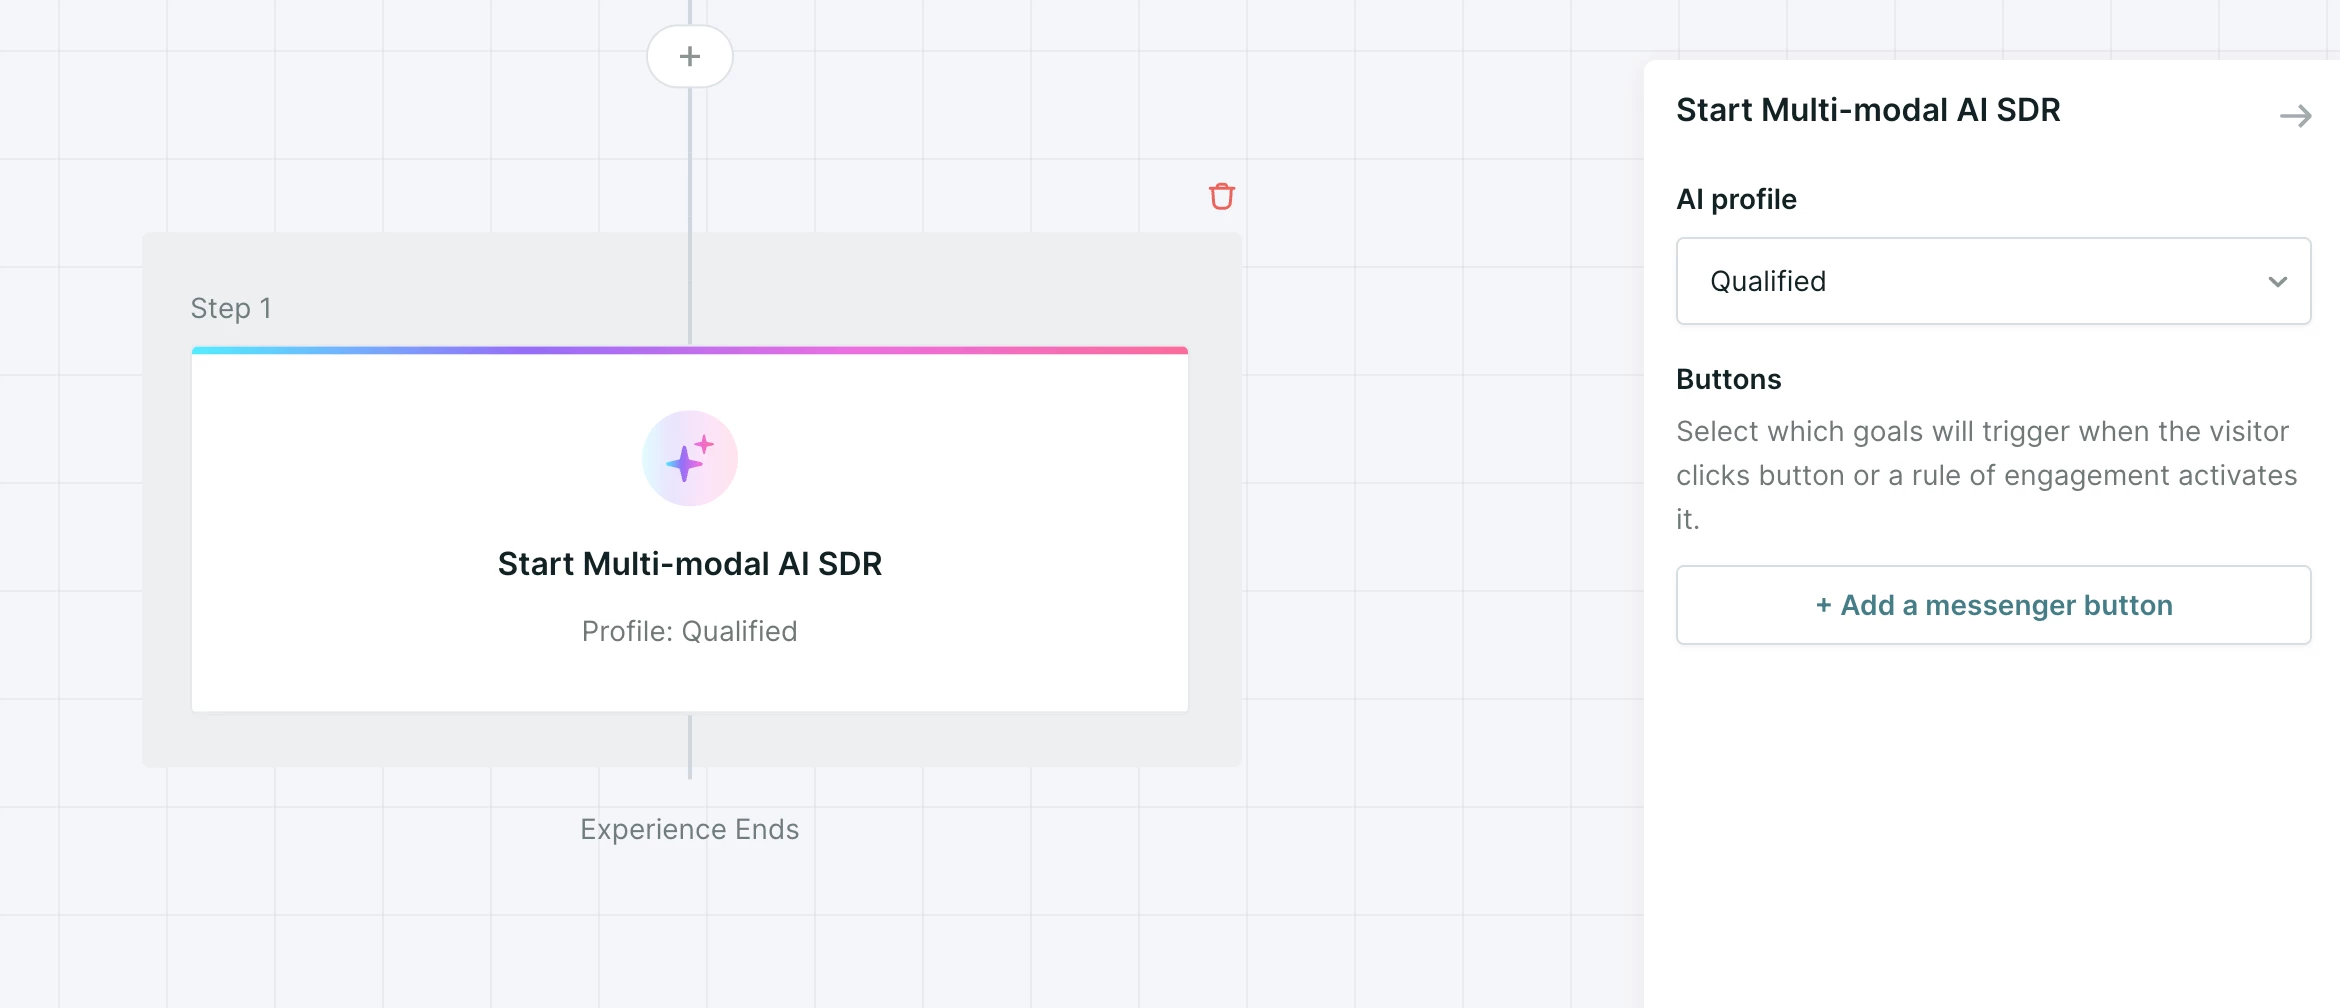
AI profile
Choose which agent profile the conversation uses. This is useful if you have more than one profile set up. For more on profiles, see [AI SDR agent profiles](LINK: same destination as the current "see here" link under Start AI SDR).
Initial message
Enter text to send as the visitor's first message when the experience starts. Your agent responds to it as it would to any visitor message, and no script is needed on your page.
The Initial message field appears in Manual and Button experiences only. Automatic experiences start without the visitor taking an action, so they don't show the field. To send an initial message from your own website code, see startChat in the Client-side API article.
Pounce
When Pounce when a visitor lands is checked, your agent opens the conversation with a message as soon as a visitor arrives. When it's unchecked, the agent waits for the visitor to start the conversation. Consider turning it off for mobile experiences.
Messenger starting position
Check Override default position to start the messenger somewhere other than the position set in your theme.
Agent modality
Check Override default agent modality to change the default modality (Text, Voice and Video) for this experience.
Buttons
Add persistent buttons to highlight your most important calls to action. A button works as a quick-start phrase: when a visitor clicks it, your agent treats it as if the visitor had typed that message. To point a button at a goal, give it a label that matches a goal @mentioned in your Conversations guide. As a best practice, set buttons for no more than two goals.
On mobile devices
On mobile devices, conversations from this step start in a minimal starting state. No setup is needed.
Picture-in-picture
During a voice call, the visitor can select the square icon to collapse the messenger and keep talking with your agent in a small window. They can move the window around the page while they view your content, and select the icon again to return to the messenger. Picture-in-picture works on mobile and desktop and needs no setup.
Start AI SDR (legacy)
Note: Start AI SDR is the earlier version of this step. Use Start Multi-modal AI SDR for new experiences. This section is kept for experiences that still use Start AI SDR.
Hand off the conversation to an AI SDR agent. There are a few settings that will determine how the AI SDR agent takes over the conversation.
Because the Start AI SDR action hands the conversation to an AI SDR agent, it will always end the experience. No actions can be added after the Start AI SDR action.
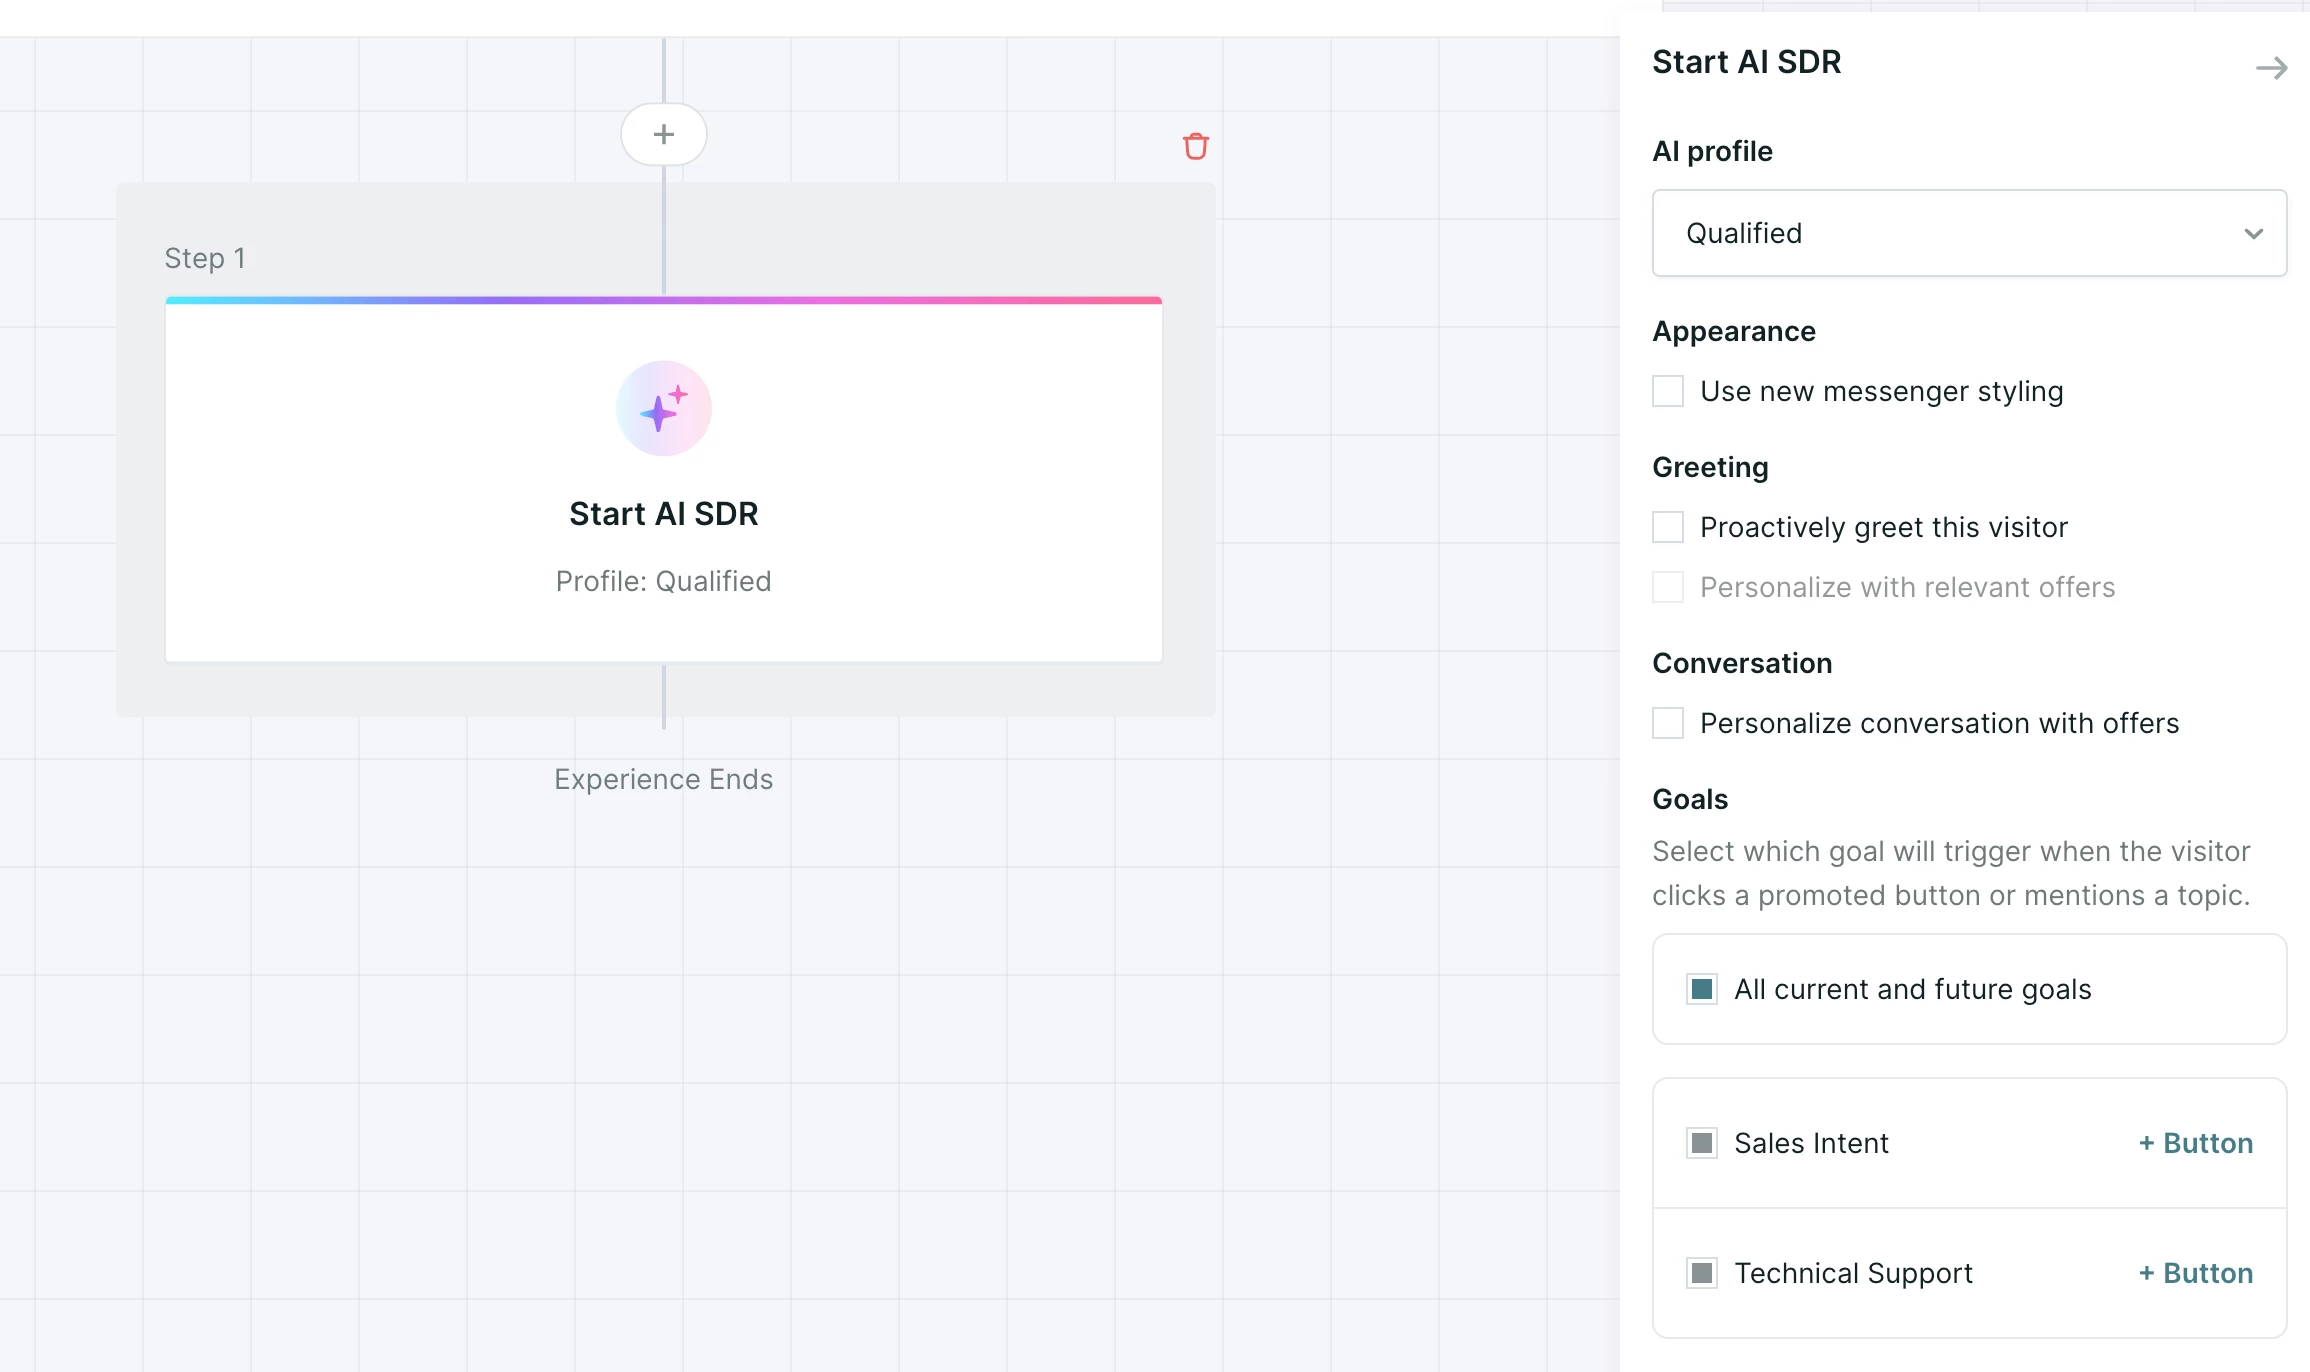
Profile
Determines which AI SDR agent profile is used for the conversation. For more information on AI SDR agent profiles, see AI SDR agent profiles.
Appearance
Select whether to use the new messenger styling configured in themes.
Greeting
If the messenger has not been previously opened by any other experience step, you can choose to have the AI SDR agent proactively greet the visitor.
If the AI SDR agent is not set to proactively greet the visitor, either by option or because other messages had been sent in the messenger previously, the AI SDR agent will wait for the visitor to type a message to respond to. You may want to use the send a message action to prompt your visitors to start the conversation in this case.
If you have configured promoted content, select the “Personalize with relevant offers” checkbox to allow the AI SDR agent to offer this content to visitors as part of an initial greeting.
Conversation
If you have configured promoted content, select the “Personalize conversation with offers” checkbox to allow the AI SDR agent to offer this content to visitors as part of an ongoing conversation.
Goals
Configure which goals are active for this AI SDR agent conversation. By default, all goals are active.
In addition to setting whether a goal is active, this setting allows you to create buttons with custom text that will trigger the AI SDR agent’s goals automatically.
As a best practice, set buttons for a maximum of two of your goals.


.svg)


